30+ Flower Crafts for Kids: Easy Ideas for Preschool and Up
Inspire creativity and an appreciation for nature with our flower crafts for kids. Pick from paper flowers, spring projects, Mother’s Day gifts, letter-themed crafts, and more!
Table of Contents–Jump to Each Section
Blooming flowers bring instant cheer with their bright colors and natural charm, and flower crafts let everyone enjoy that beauty all year long. Our flower crafts for kids include simple options for preschoolers and kindergarteners, creative paper and upcycled flower decorations, and even thoughtful handmade gift ideas. While these crafts are designed for children to create, we recommend adult supervision while they work.
Tip: Try our Flower Coloring Pages as a simple way to get creative with sunflowers, roses, daisies, and more!

Easy Flower Crafts for Kids
Yarn-Wrapped Flowers
Supplies:
- Cardboard
- Small bowl or cup for tracing
- Paint and paintbrush
- Yarn in your choice of colors, including green
- Wood craft stick
- Button
- Scissors
- Glue
- Pencil
Instructions:
1
Use the cup or bowl to draw a circle on the cardboard. Cut out the circle.
2
Paint the cardboard circle in your choice of color and let the paint dry. Paint the wood craft stick green, and let dry.
3
Begin wrapping yarn in the color of your choice around the cardboard circle. (This is easier for small kids if you glue or tape the end of the yarn in place on the back first.)
4
Wrap the yarn until you’re happy with the design, leaving some of the painted cardboard showing through. Cut the yarn and tuck or glue the end to hold it in place.
5
Glue a button to the center of your flower where the yarn crosses.
6
Wrap the wood craft stick with green yarn, tucking or gluing the end in place. Glue the cardboard circle to the craft stick to create your finished flower.
Button Flower Craft
Supplies:
- Buttons in a variety of sizes and colors
- Glue
- Markers or crayons
- Cardstock or small mounted artist’s canvas
Instructions:
1
Have fun arranging the buttons to form flowers of different shapes, sizes, and colors.
2
When you’re happy with your design, glue the buttons in place one by one, then add in a stem, leaves, and anything else you’d like.
Simple Paper Daisy
Supplies:
- Simple Daisy coloring page from ABCmouse (2 copies)
- Crayons, markers, or colored pencils
- Scissors
- Glue stick
- Green pipe cleaner
Instructions:
1
Color in the daisies, using the same colors on both. Cut out the daisies.
2
Lay one daisy face down on the table. Spread glue around the entire back.
3
Set the pipe cleaner in place for a stem. Lay the other daisy face-up on top, sandwiching the pipe cleaner in between the two layers.
4
Make sure the two daisy layers line up properly, then press them firmly together. Press closely around the pipe cleaner to hold it in place.
Clothespin & Paper Plate Flower
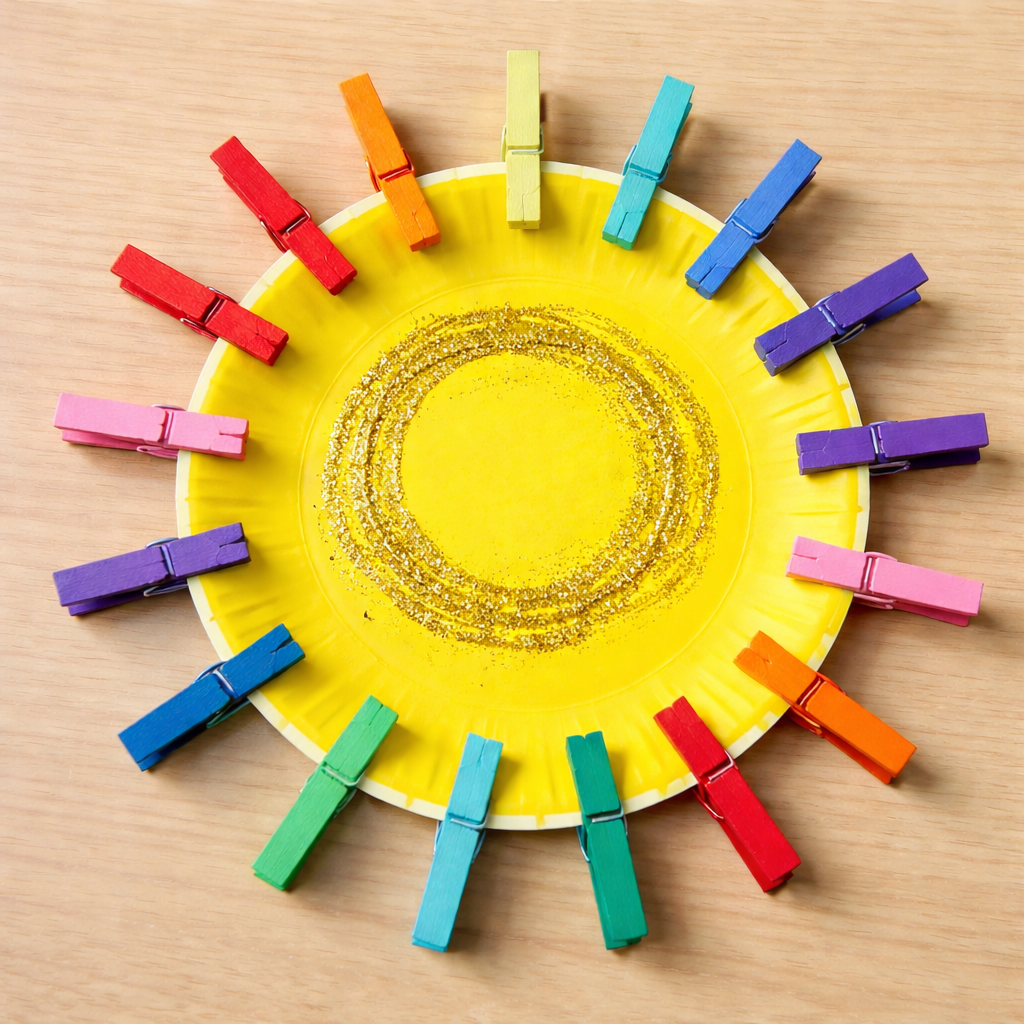
Supplies:
- Small paper plate
- Paints and paintbrushes
- Clip-style clothespins
- Optional: Glitter glue (or glue and glitter)
Instructions:
1
Paint the front of the paper plate in the color of your choice, and let it dry.
2
Paint the flat sides of the clothespins in any color you like, and let them dry.
3
Clip the clothespins around the edge of the plate to form the flower petals.
Tip: Use glitter glue or glitter and glue to make a shiny center for your flower in the middle of the plate!
Snail and Sunflower Photo Frame
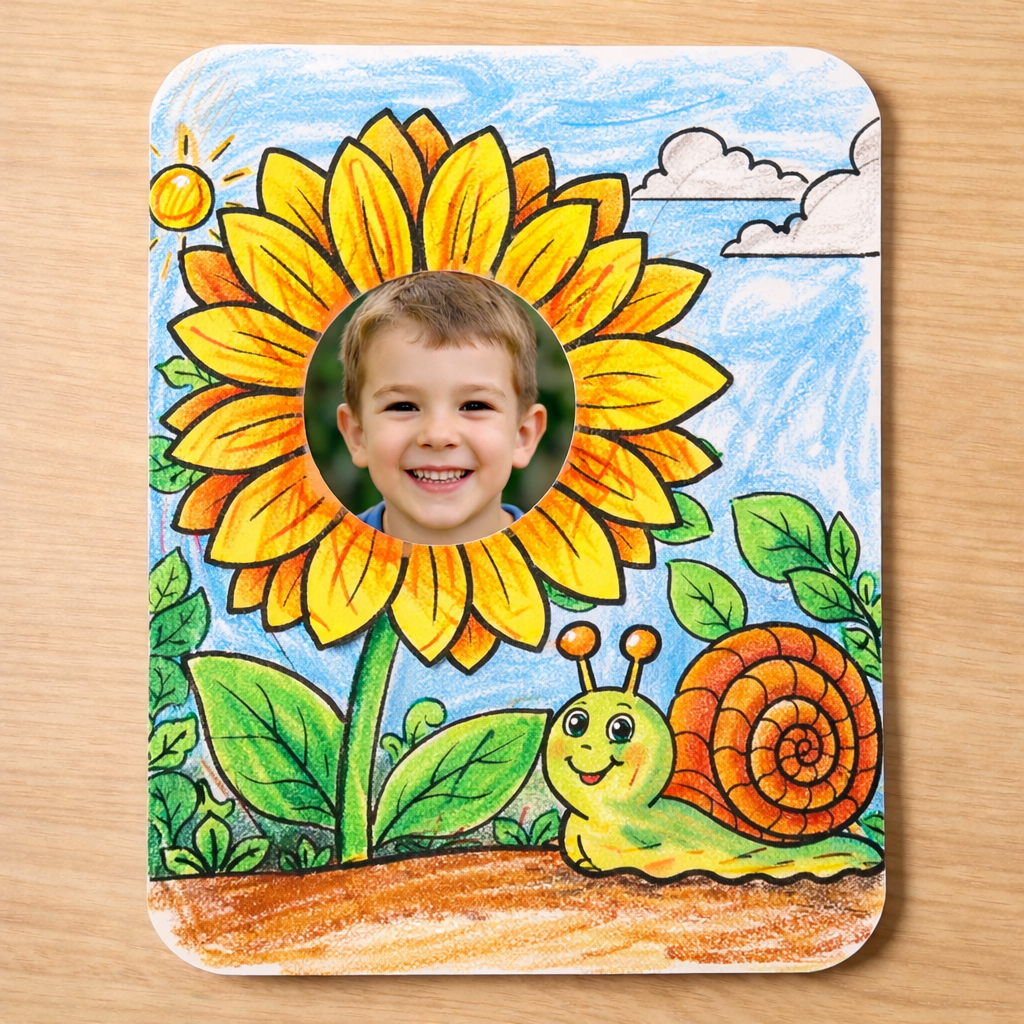
Supplies:
- Snail Crawling Past a Sunflower coloring page from ABCmouse
- Cardstock
- Photo of child’s face, sized and trimmed to fit the circle in the middle of the sunflower
- Crayons, markers, or colored pencils
- Glue stick
Instructions:
1
Print the coloring page onto a piece of card stock or print the page on regular paper and glue it to the card stock.
2
Color in the coloring page any way you like. Leave the center of the sunflower blank. Glue the photo into the center of the sunflower for a sweet frame!
Flower Crafts for Preschoolers
Simple Pom Pom Flowers
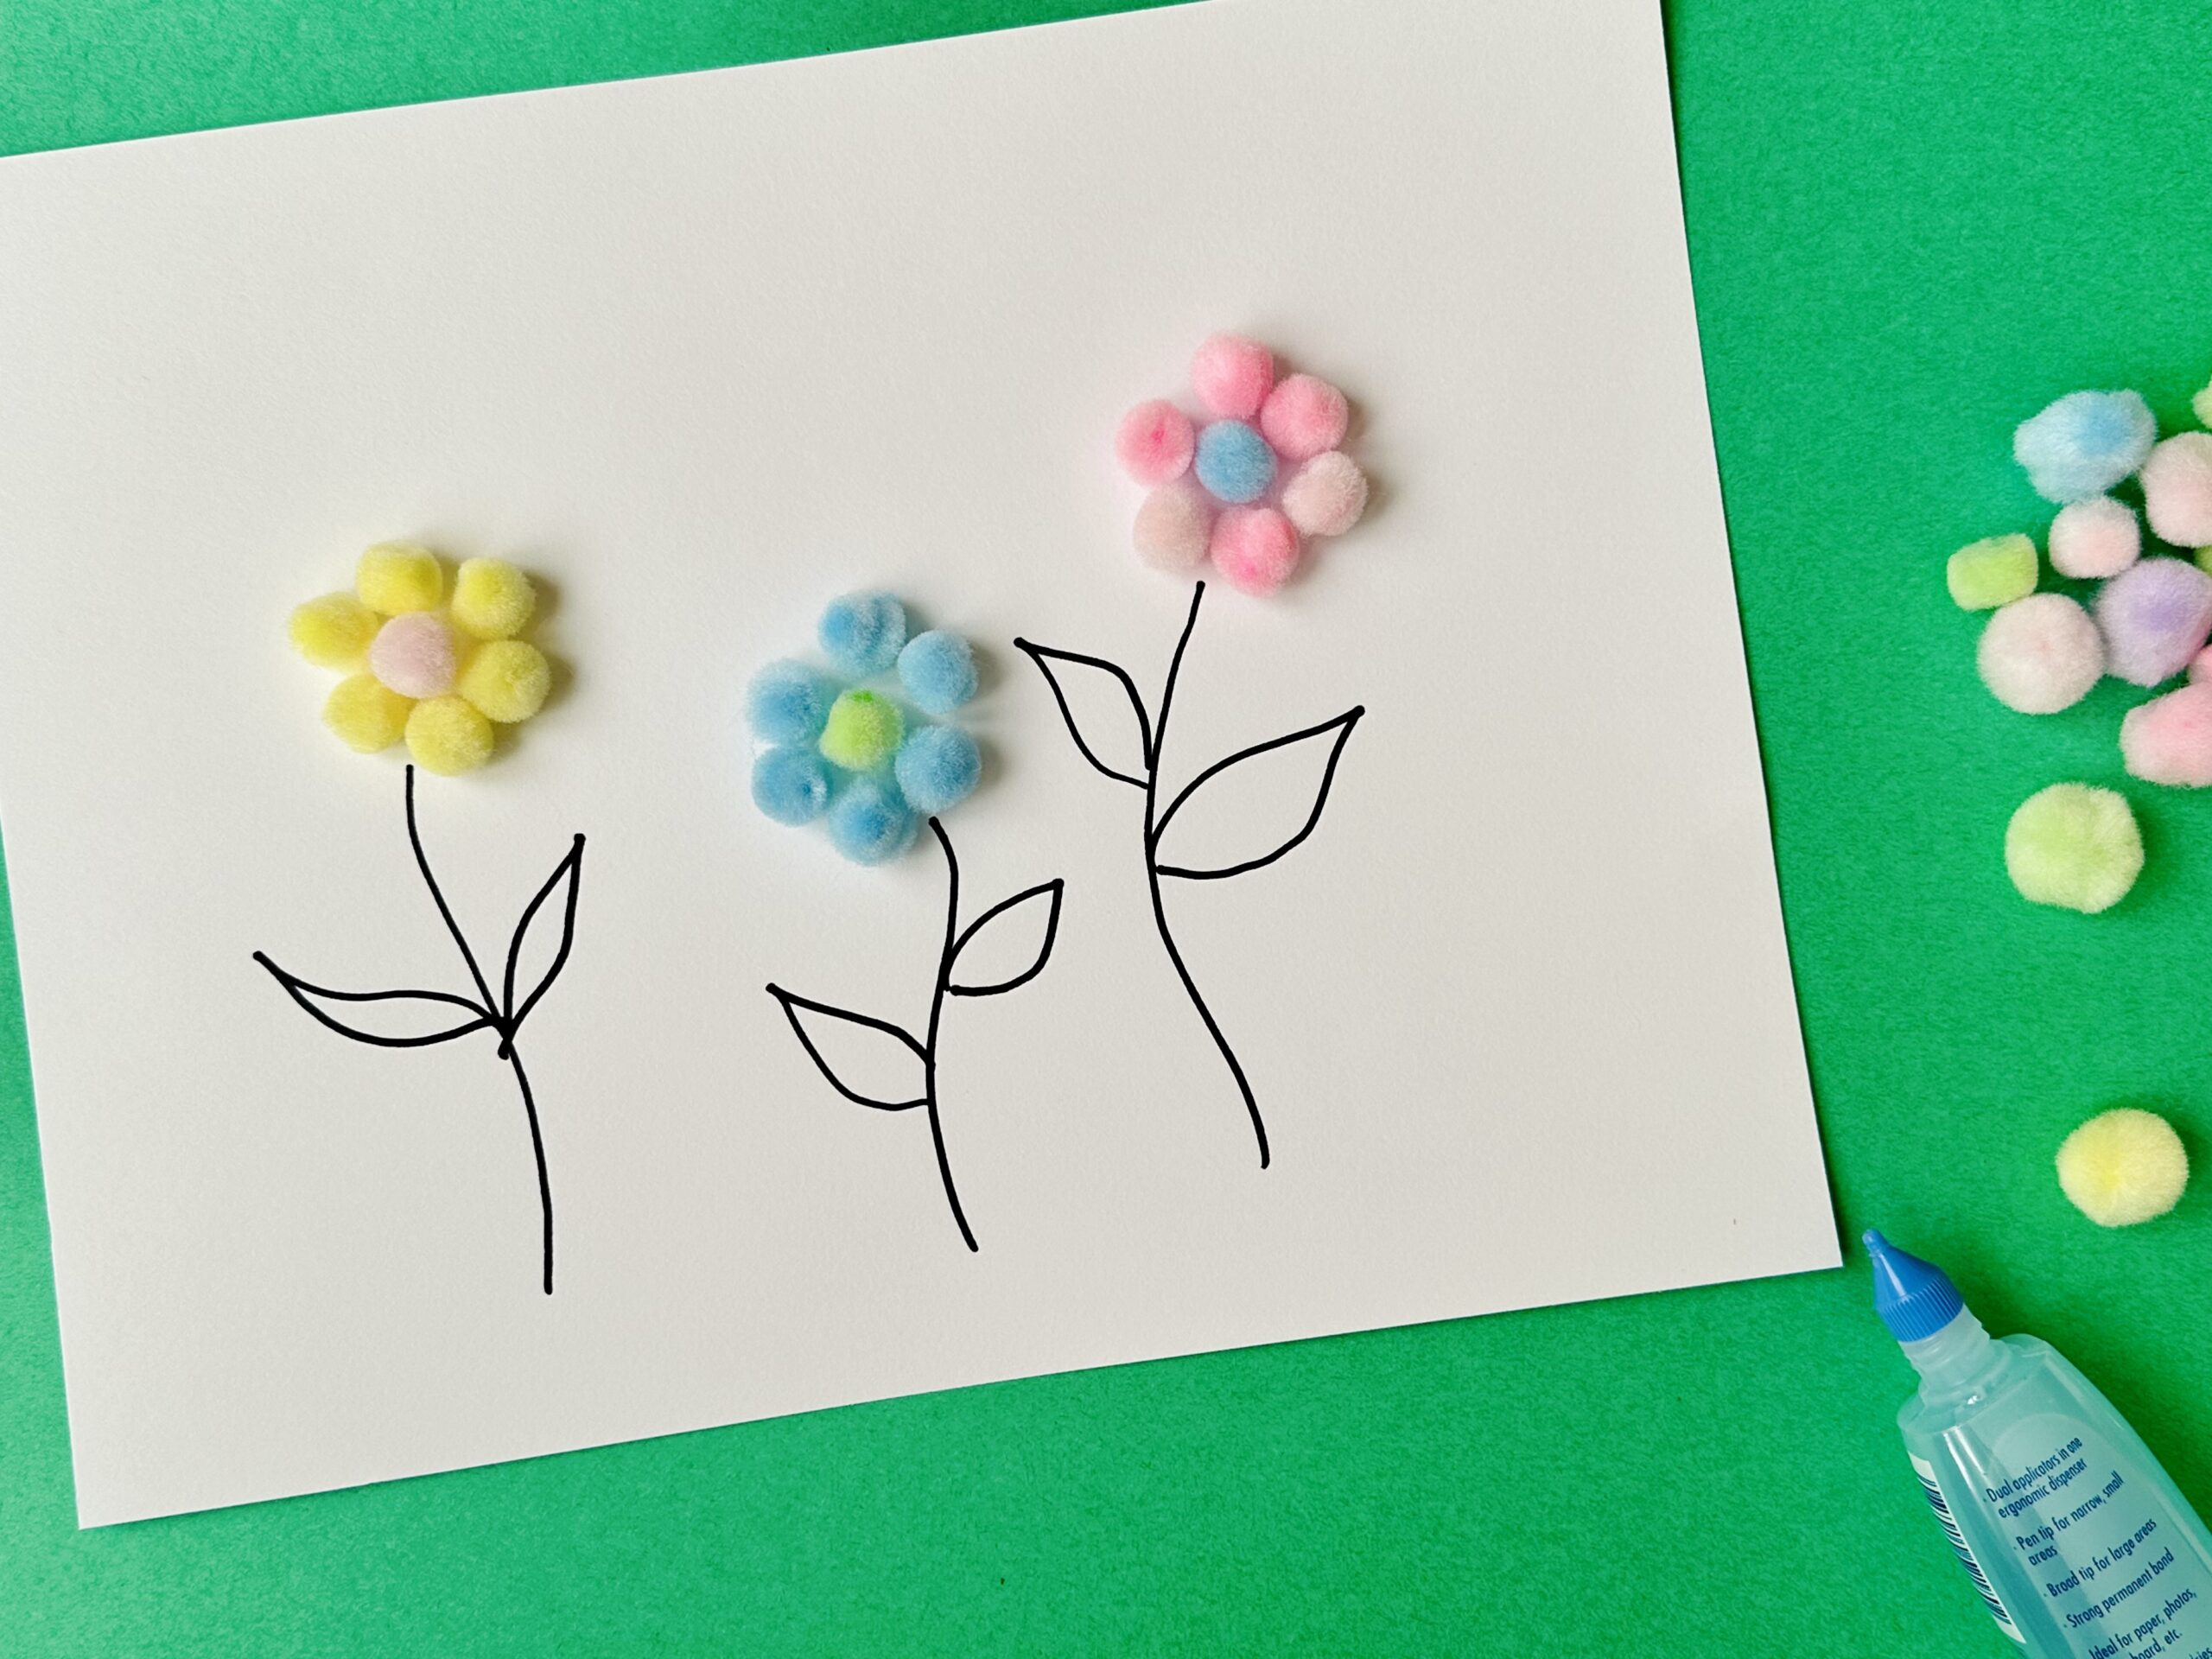
Supplies:
- Small pom poms
- Glue
- Marker
- Plain white paper
Instructions:
1
Experiment with arranging the pom pom into the shape of flowers until you’re happy with how they look.
2
Glue the pom poms into place on the white paper. Use the marker to draw stems.
Pencil Eraser Garden
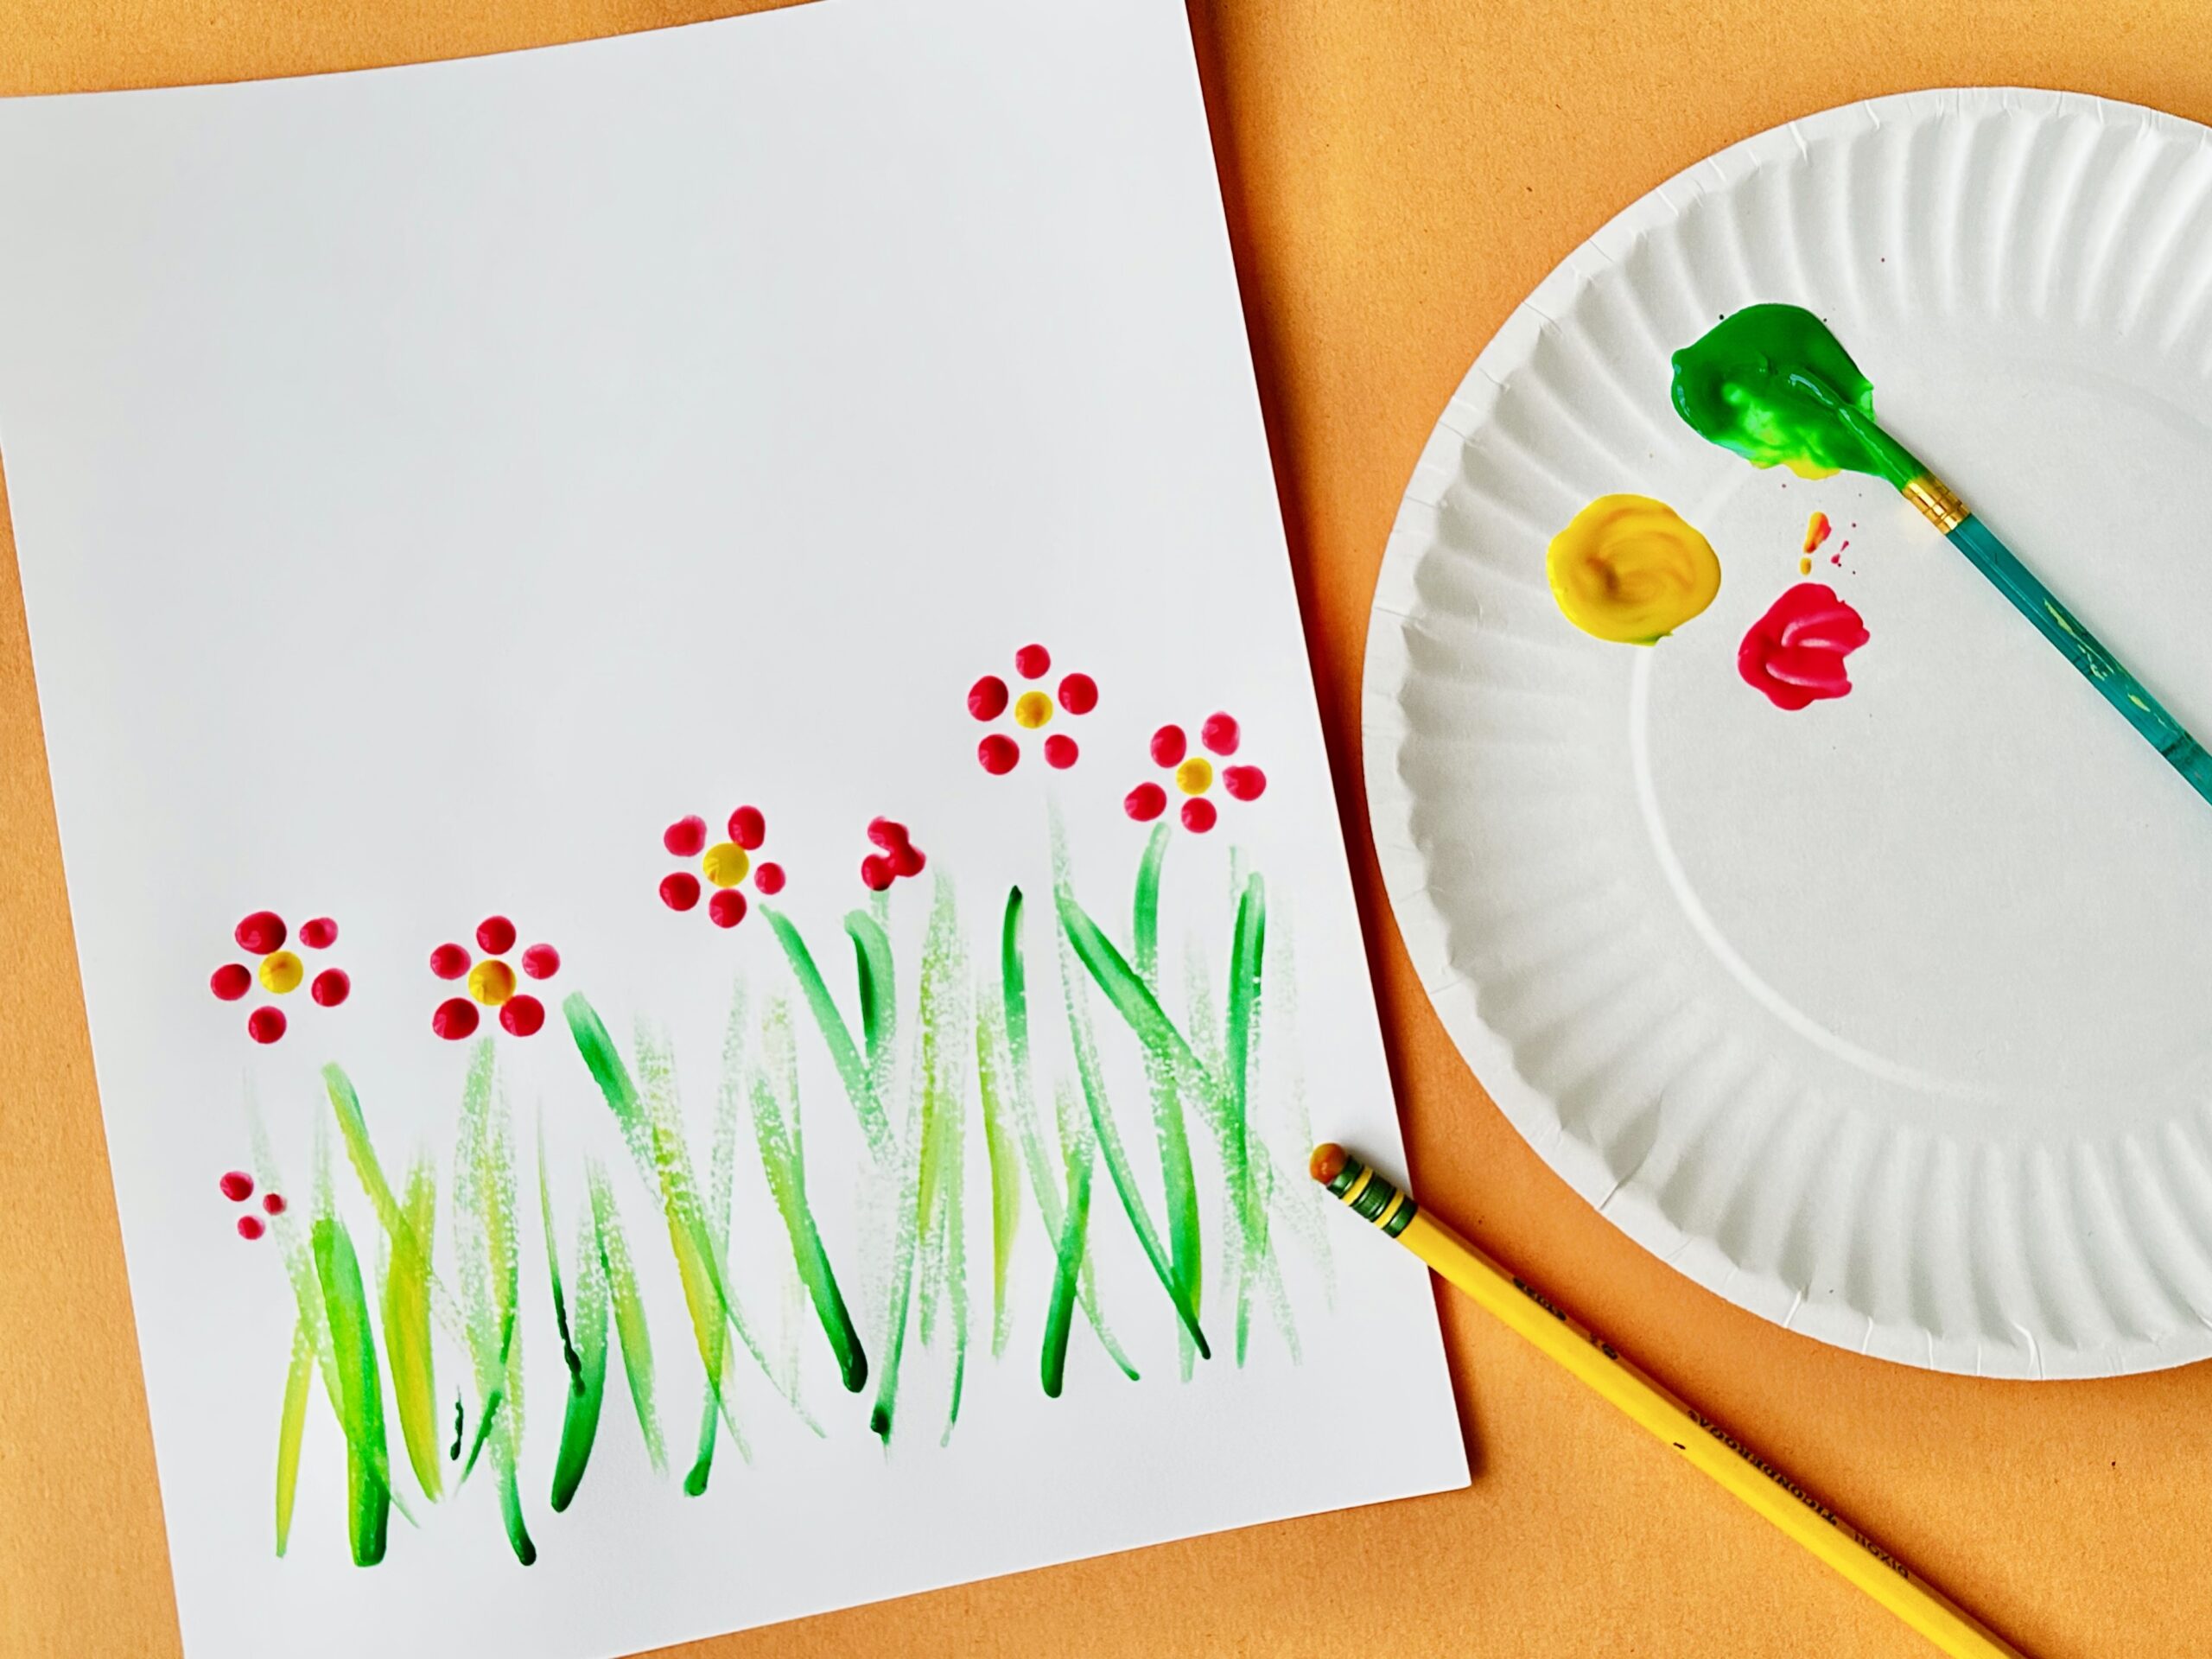
Supplies:
- Thick plain white paper
- Paint in your choice of colors, including green
- Paint brush
- Pencil with an unused eraser
- Paper plate or paint dishes
- Damp paper towels
Instructions:
1
Use the paintbrush to paint grasses and stems along the bottom half of the paper as shown.
2
Squirt a small amount of a few colors of paint into dishes or onto a paper plate. Dip the pencil eraser into the paint, then gently press it onto the paper to make the center of a flower.
3
Wipe the paint off of the eraser with the paper towel, then dip it into a new color. Make petals by adding a circle of dots around the center of the flower. Repeat as many times as you like, wiping off the pencil eraser in between colors.
Easy Rose Craft
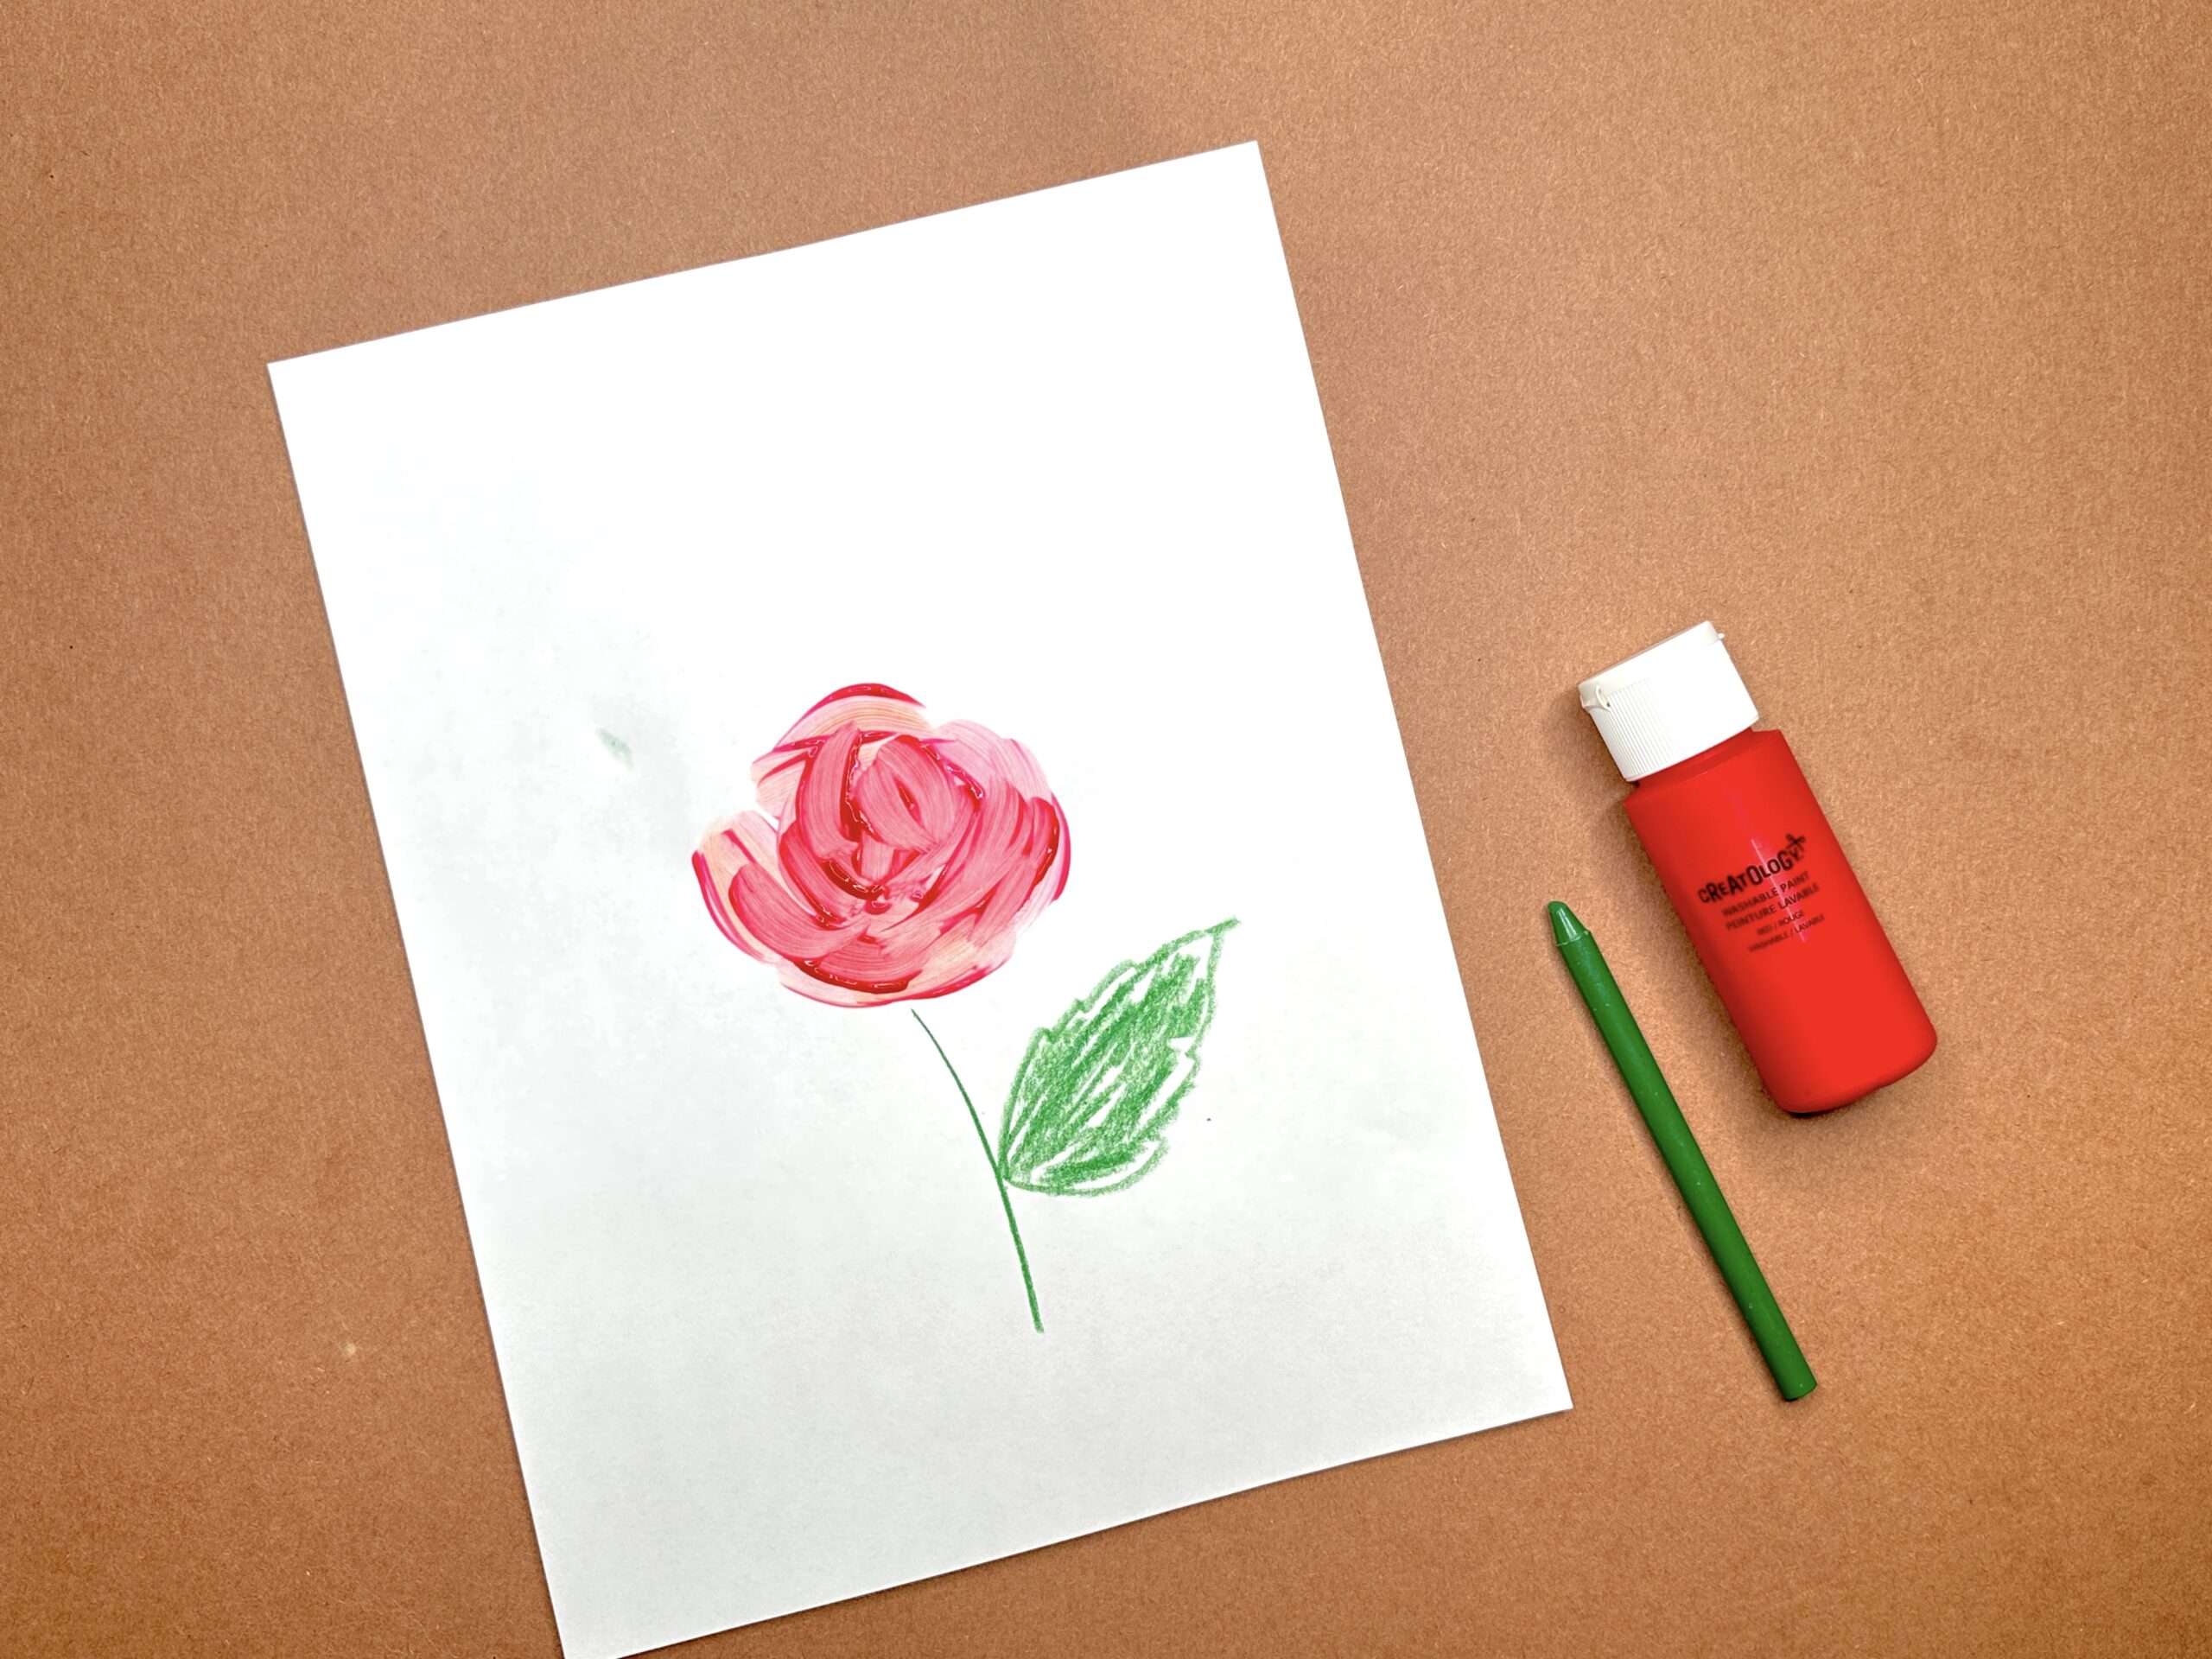
Supplies:
- Thick plain white paper
- Paint in your choice of colors
- Cotton swab or paintbrush
- Green crayon, marker, or colored pencil
Instructions:
1
Painting a rose is easier than you may think! Dip your paint brush or cotton swab into the paint and create small rounded arcs with it that overlap around each other (mimicking petals).
2
Continue adding arcs in a circular shape until your rose is a size you like. Add the stem and leaves with a crayon, marker, or colored pencil.
S is for Sunflower
Supplies:
- Yellow, green, and brown construction paper
- Plain white paper
- Cup or small bowl (for tracing)
- Scissors
- Pencil
- Marker or crayon
- Glue stick
Instructions:
1
Use the cup or bowl to trace and cut out a circle from the brown construction paper for the center of your sunflower.
2
Draw 9 petal shapes on the yellow construction paper and cut them out. Cut a strip of green construction paper for the stem, then draw and cut out a leaf.
3
Assemble the sunflower parts and paste them in place on the white paper.
4
Use the crayon or marker to draw a letter S on each petal, rotating the paper as you work.
Tip: If your child needs a bit more guidance, write the letter S lightly in pencil on some of the petals so they can trace them with the crayon or marker.
T is for Tulip Flower Craft
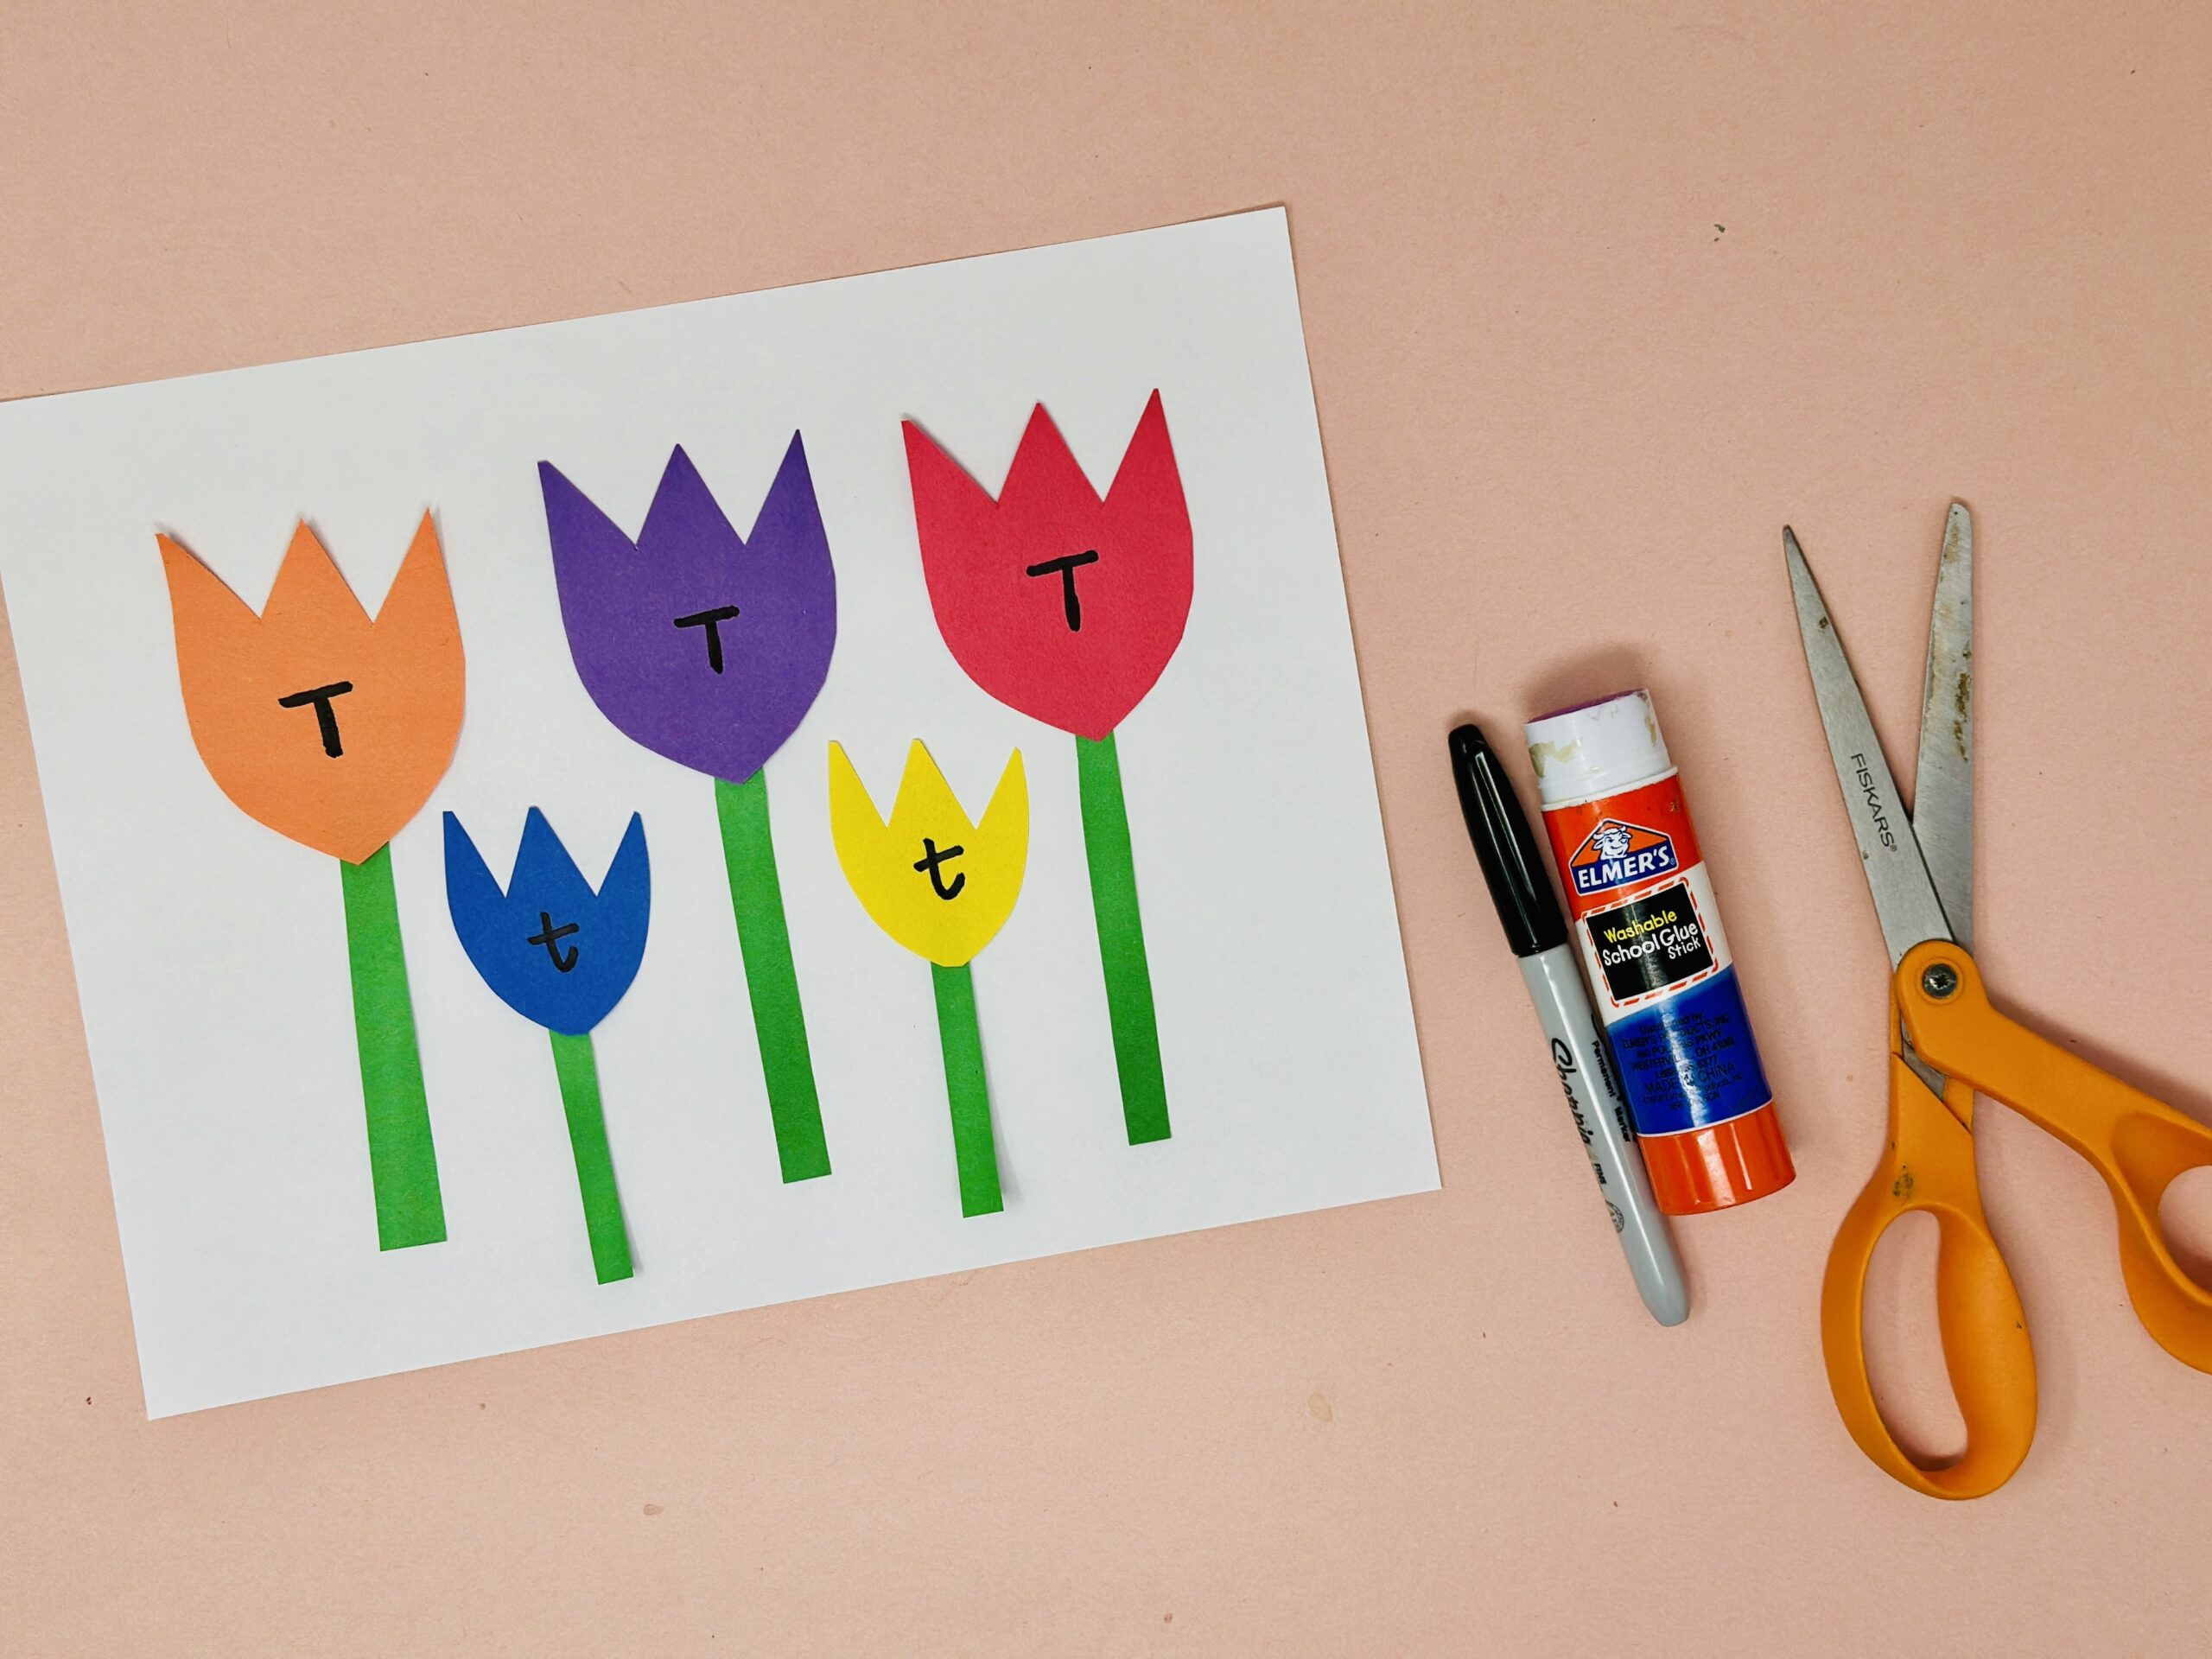
Supplies:
- Colorful construction paper, including green
- Plain white paper
- Marker
- Pencil
- Scissors
- Glue stick
Instructions:
1
Draw and cut out tulip shapes as shown from construction paper in your choice of colors. Make some tulips large and some smaller.
2
Cut strips of green paper for stems. Cut shorter stems for the smaller flowers.
3
Assemble the tulips and glue them in place on a piece of plain white paper as shown.
4
Write an uppercase letter T on each of the larger flowers, and a lowercase t on each smaller flower.
Tip: Keep learning the alphabet with hands-on letter crafts and activities for A-Z.
Flower Crafts for Kindergarteners
Flower Name Letters
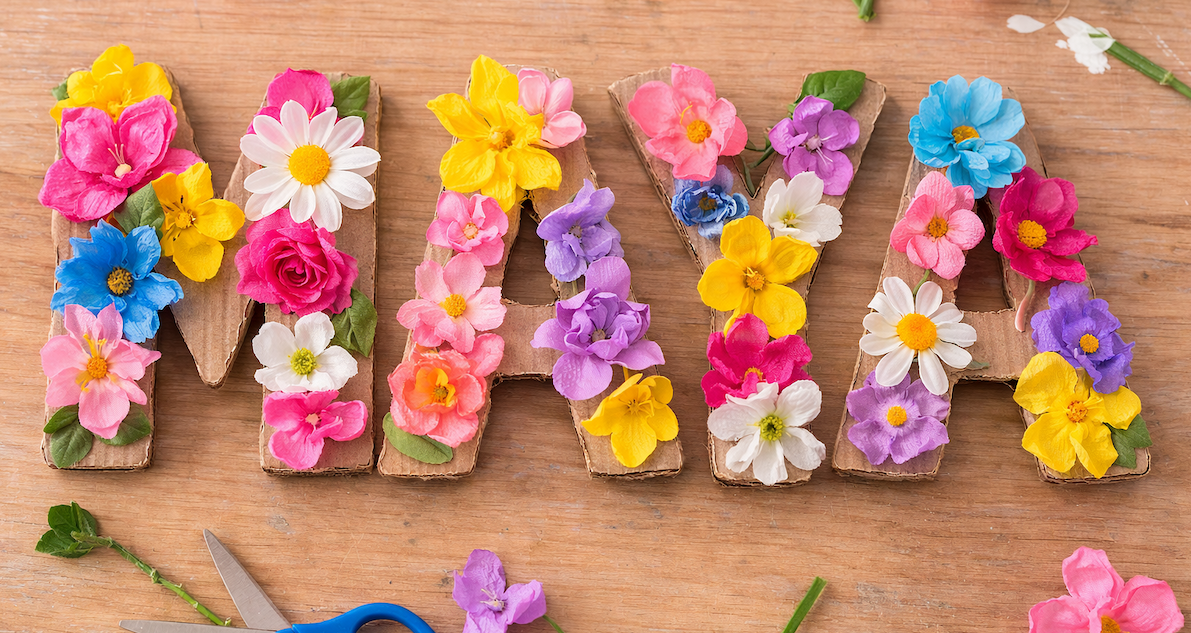
Supplies:
- Cardboard
- Scissors
- Pencil
- Metal skewer
- Artificial flowers
- Glue
Instructions:
1
Trace block letters onto cardboard to spell out the name of your choice. Cut out the cardboard letters.
2
Trim the stems from the artificial flowers, leaving half an inch or so. Have fun arranging the flowers to cover the cardboard letters until you find a design you like.
3
Carefully poke holes in the cardboard with the flower stems or metal skewer. (Use caution and help young children with this step.) Then dip the stem of your flower into the glue and stick it through the hole. Let dry.
Tip: Use our free printable alphabet coloring pages as a guide for creating the letters of the name.
Straw-Painting Flowers
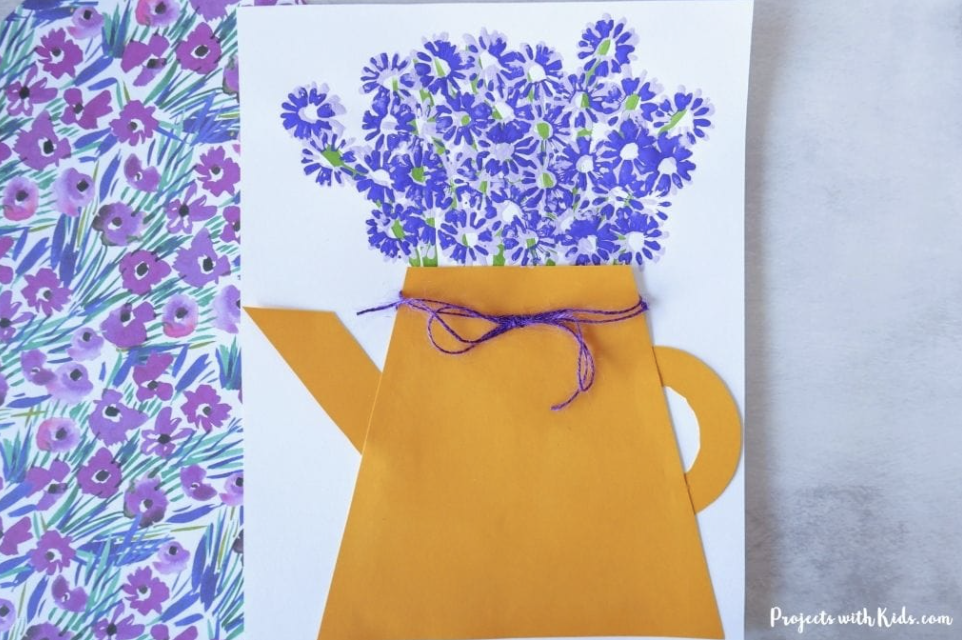
Supplies:
- Paper or plastic disposable straws
- Small scissors
- Paint in your choice of colors
- Paintbrush
- Plain white paper
- Paper plate
Our version of this craft focuses on creating a garden of flowers, not a bouquet in a pitcher as seen in the image above.
Instructions:
1
Use the scissors to make vertical cuts at the end of a straw, about one inch long. Use your finger to press the strips outward, making a flower shape. Cut several different straws, each with petals of different lengths and thicknesses.
2
Squirt some paint onto the paper plate. Dip the cut end of a straw into the paint, then press it flat on the paper with the ends splayed out to make a flower.
3
Repeat with as many colors and straw shapes as you like. Use the paintbrush to add stems, flower centers, and other details.
Painted Pasta Flowers
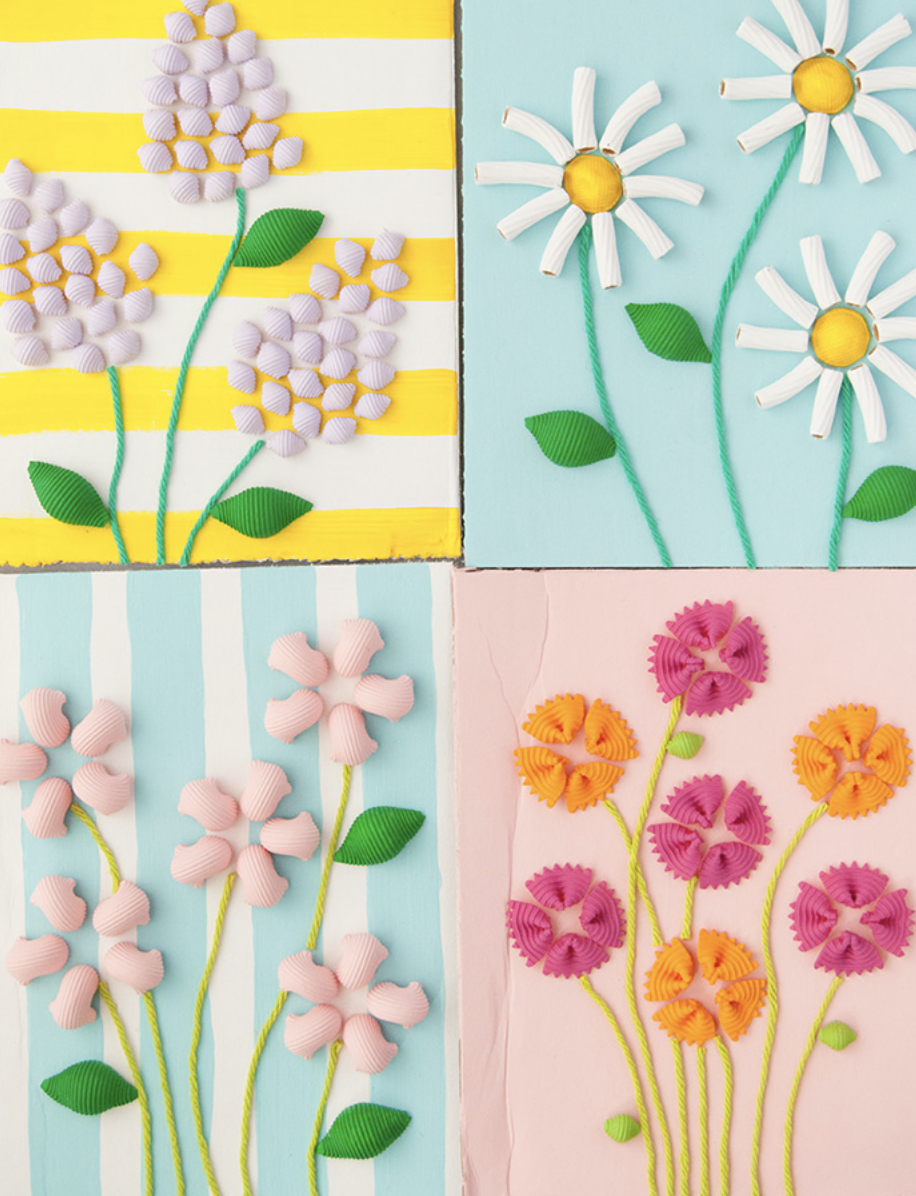
Supplies:
- Dried pasta in different shapes
- Paint in your choice of colors
- Paintbrushes
- Paint tray or paper plate
- Card stock, canvas, or cardboard
- Glue
- Yarn
Instructions:
1
Gather up an assortment of different types of pasta and try arranging them in the shape of flowers. Brainstorm what color you’d like each flower to be.
2
Add some paint to a paint tray or paper plate and paint your pasta. Remember to paint a few noodles green to act as leaves for your flowers. Let dry completely.
2
Paint your canvas, card stock, or cardboard whatever color or pattern you’d like. Let dry.
2
Arrange your flowers on the canvas. Once you’re happy with how they look, glue them into place. Then use a piece of yarn to create a stem and glue it down. Add the green pasta leaves and glue them down. Let dry completely, then display your pasta flowers!
Painted Pistachio Flowers
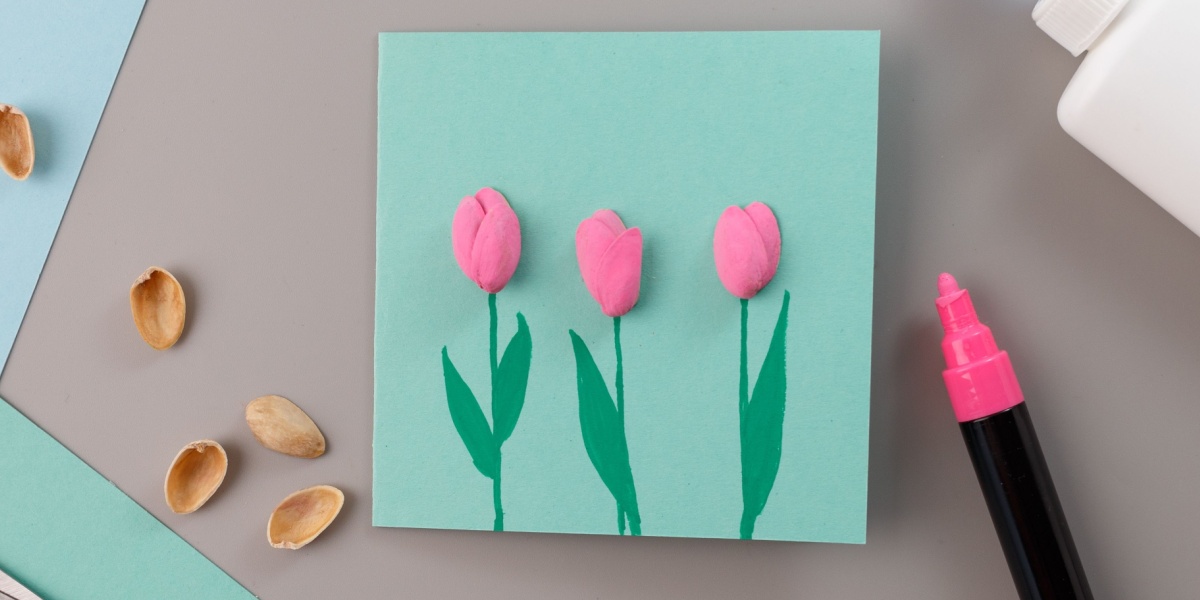
Supplies:
- Rinsed and dried pistachio shells
- Paint or paint pen
- Canvas or card stock
Instructions:
1
First, eat some pistachios! Using a damp paper towel, wipe out the inside and outside of a few shells and let them dry completely.
2
Paint the shells whatever color you’d like using craft paint or paint pens. Glue them down.
3
Using paint or marker, add stems and leaves under your pistachio flowers.
Handprint Flower Craft
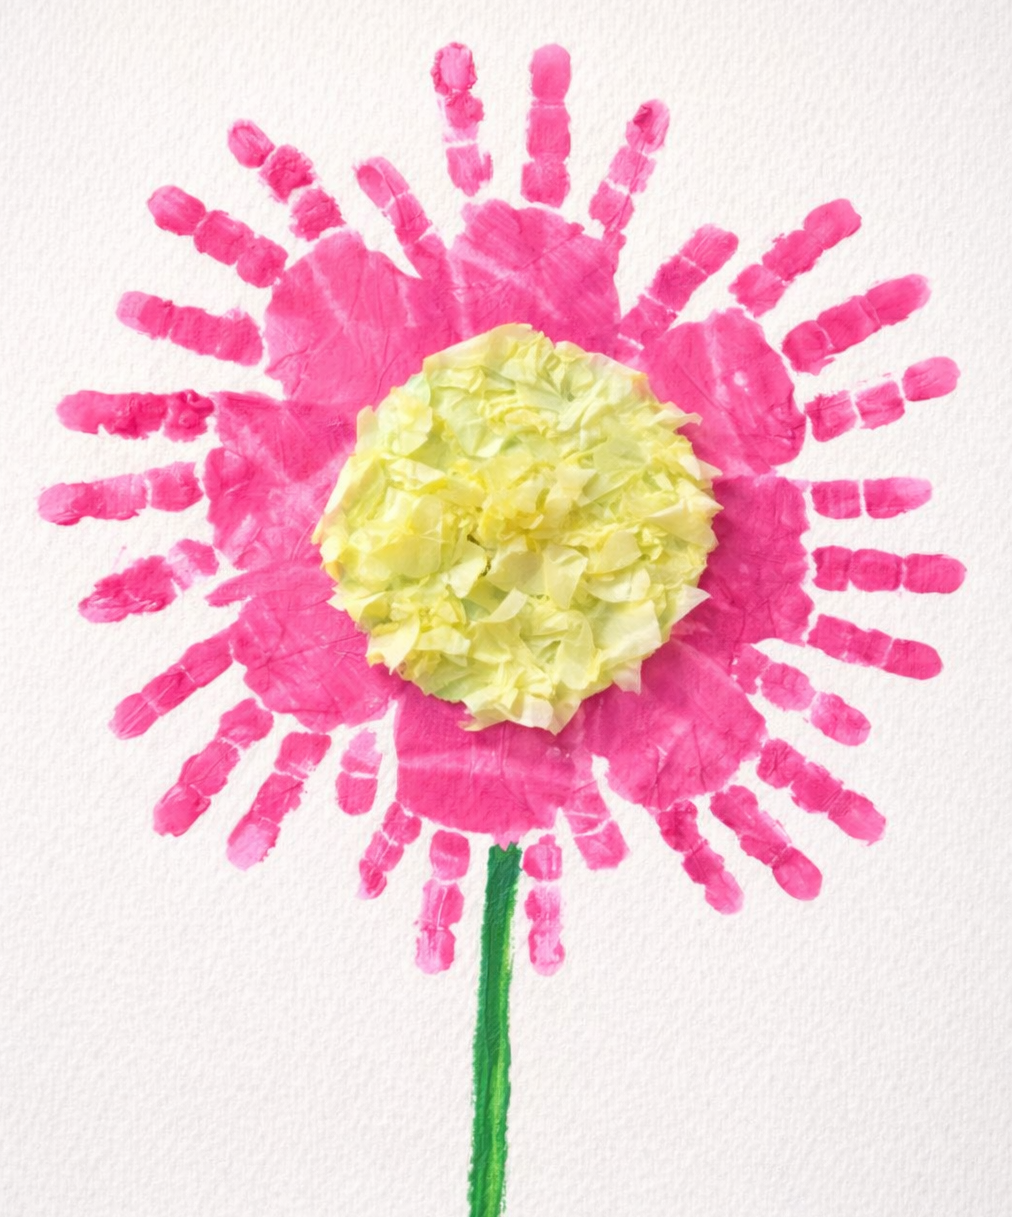
Supplies:
- Paint
- Paper plates
- Yellow tissue paper
- card stock
- Glue
- Soapy water or wet wipe
Instructions:
1
Set out a piece of card stock or a thin canvas. Add a blob of paint (any color) to a paper plate.
2
Either gently dip your child’s hand into the paint or paint it onto their hand with a paint brush.
3
Gently press their hand down flat against the canvas or card stock, with their finger tips pointed outward toward the edges. Repeat this process until you’ve formed a circle of handprints. Add a green stem. Let dry.
4
Bunch up small squares of tissue paper and glue them down in the center of the handprints, forming the center of the flower. Let dry.
Paper Flower Crafts for Kids
Origami Tulips
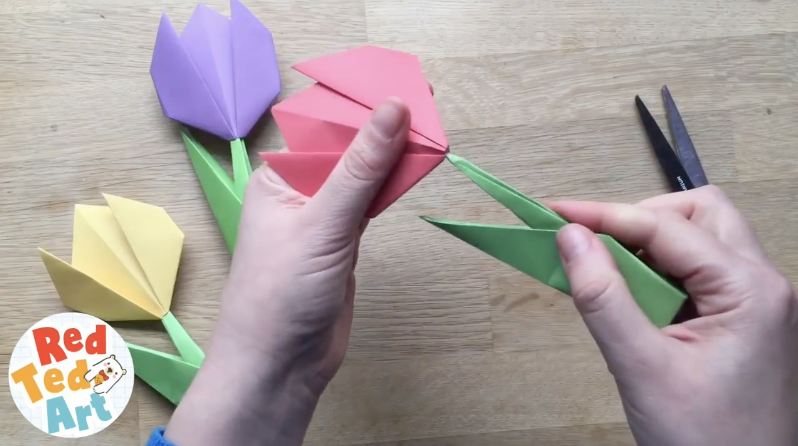
Supplies:
- Square sheet of colored paper for the tulip head (6 inches x 6 inches is a good starter size)
- Square sheet of green paper for the stem (an inch or two larger than your colored paper)
- Scissors
Instructions:
1
Fold the colored paper in half diagonally to create a triangle. Be sure to press the crease firmly with your finger.
2
Fold the triangle down the middle to make a smaller triangle. Press firmly along the crease, then unfold the smaller triangle. This center crease is your guide crease.
3
Lay the triangle flat on the table, pointing upward. Fold the left corner up at an angle to create flower petals. Repeat on the right side. Turn the paper over.
4
Lay the triangle flat on the table, pointing upward. Fold the left corner up at an angle to create flower petals. Repeat on the right side. Turn the paper over.
5
Fold in the point on each side slightly. This will hold your folds in place and finish the tulip head shape.
6
Roll the green construction paper into a thin tube, and secure with a little glue. Make a small slit in the base of the tulip head and slip the stem tube inside.
Tip: This craft is surprisingly easy to complete. We recommend watching the video from Red Ted Art to get a better understanding of the simple folds required to make this paper craft.
Fringed Flower
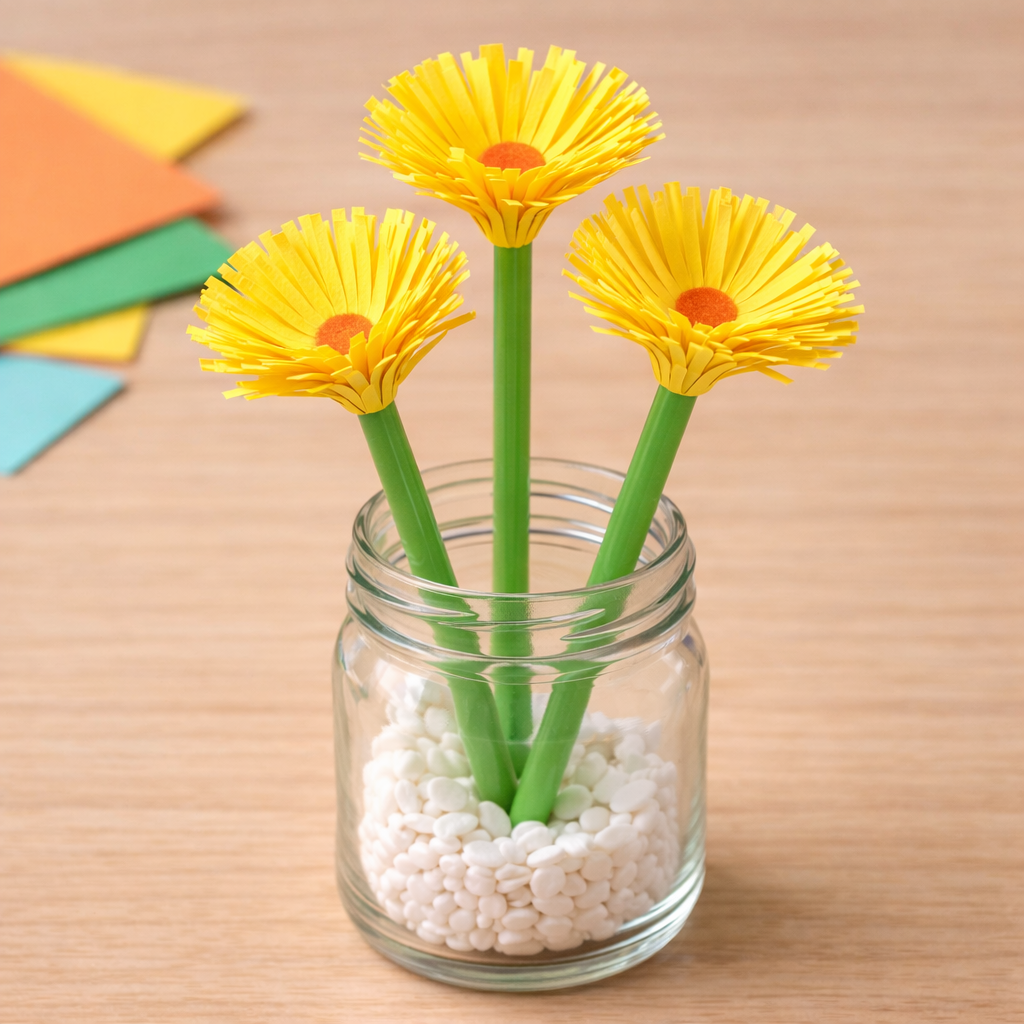
Supplies:
- Construction paper or tissue paper
- Green disposable straws
- Ruler
- Scissors
- Pencil
- Glue
Instructions:
1
Use the ruler to mark and cut 2 inch wide strips of construction paper. With a pencil, lightly mark a line along the middle of the strip, 1 inch from the edge.
2
Use scissors to fringe one edge of the paper strips by making small cuts to the line.
3
Glue the end of one paper strip to the end of the straw, with the fringed side up. Wrap the paper around the straw until you reach the end of the strip, then glue it in place.
4
Roll the paper fringe outward around the pencil to create a fluffy flower head.
Paper Flower Garland
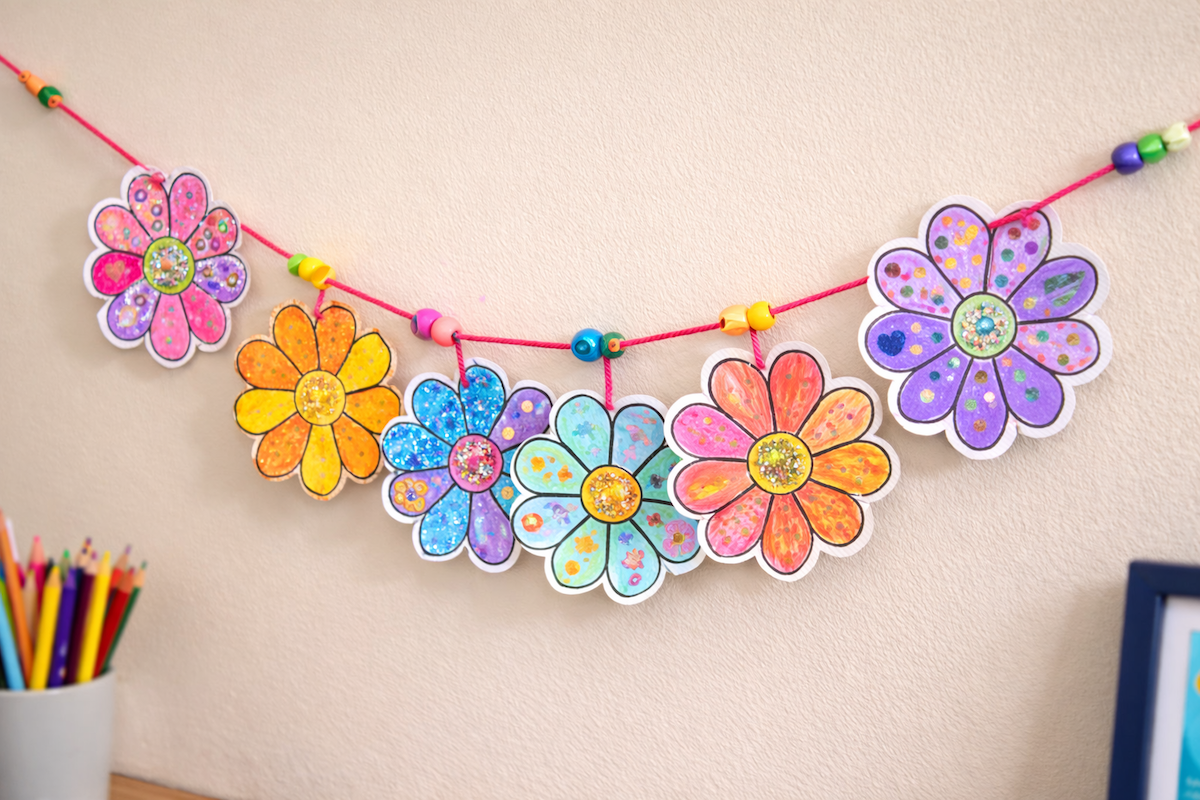
Supplies:
- Flower Coloring Pages from ABCmouse (multiple copies)
- Yarn, ribbon, or twine
- Crayons, markers, and/or colored pencils
- Hole punch
- Scissors
- Optional: Embellishments like glitter, beads, stickers, etc.
Instructions:
1
Print the flower coloring pages of your choice. (We recommend starting with the Six Simple Flower page and Single Simple Flower No Stem pages.)
2
Color and decorate the flowers any way you like. Then, cut out each one.
3
Punch holes in the tops of the flowers, and string them along the ribbon, twine, or yarn. You can add beads between the flowers if you like. Hang your flower garland to brighten up any room!
Simple Rainbow Paper Flowers
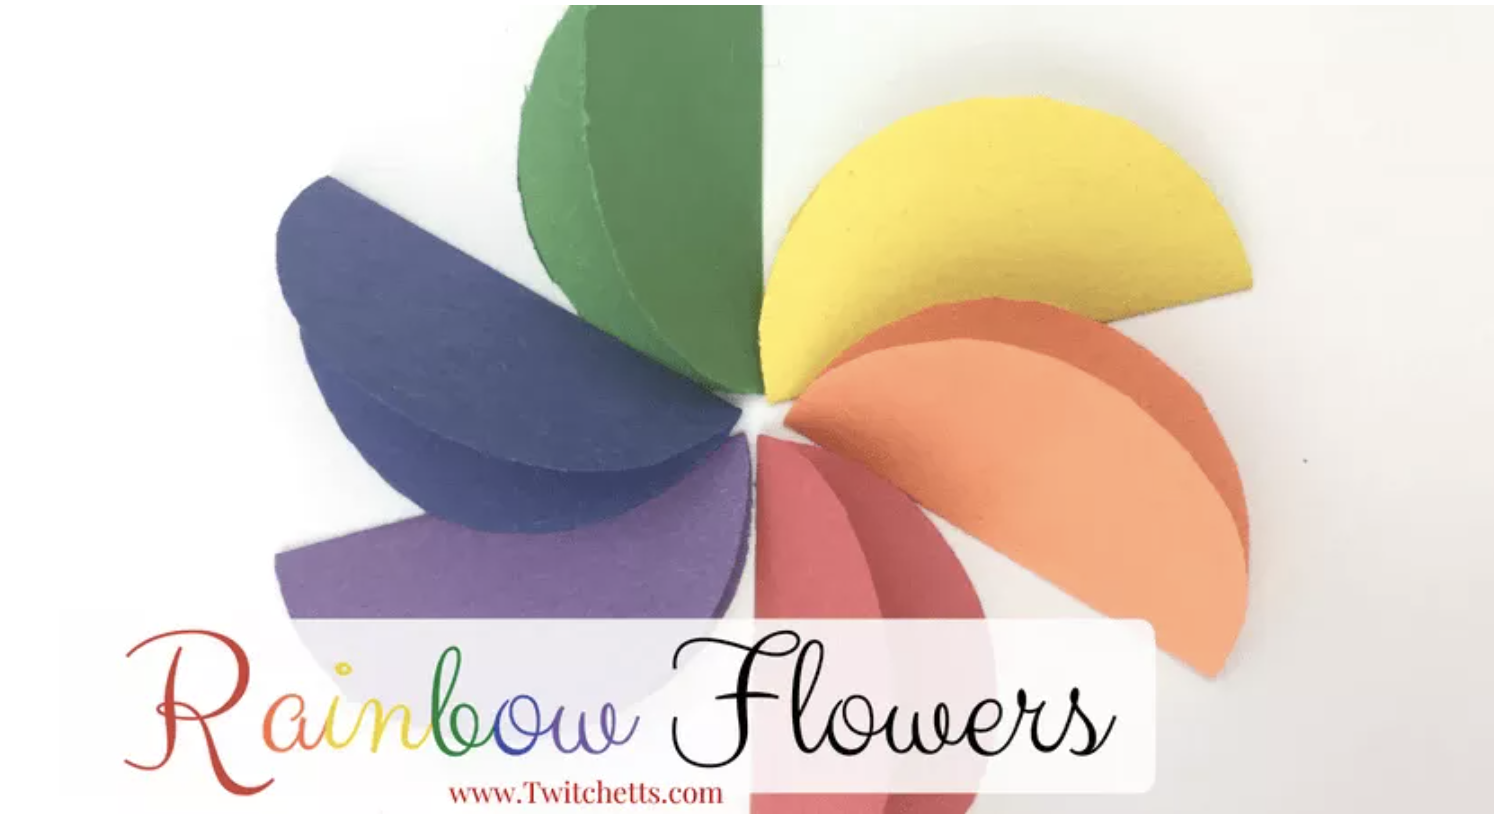
Supplies:
- Colorful construction paper
- Plain white paper
- Small bowl or glass for tracing
- Scissors
- Pencil
- Glue stick
Instructions:
1
Trace and cut out six construction paper circles. These can be all one color, or a mix of colors. Fold each circle in half.
2
Arrange the half circles to form a flower shape as shown, overlapping slightly. Glue one half of the circle to the paper; leave the other one free to make a 3D petal.
3
If you’d like, you can add construction paper stems or draw stems with a marker or crayon.
Spring Flower Crafts for Kids
Gift Bow Hyacinths
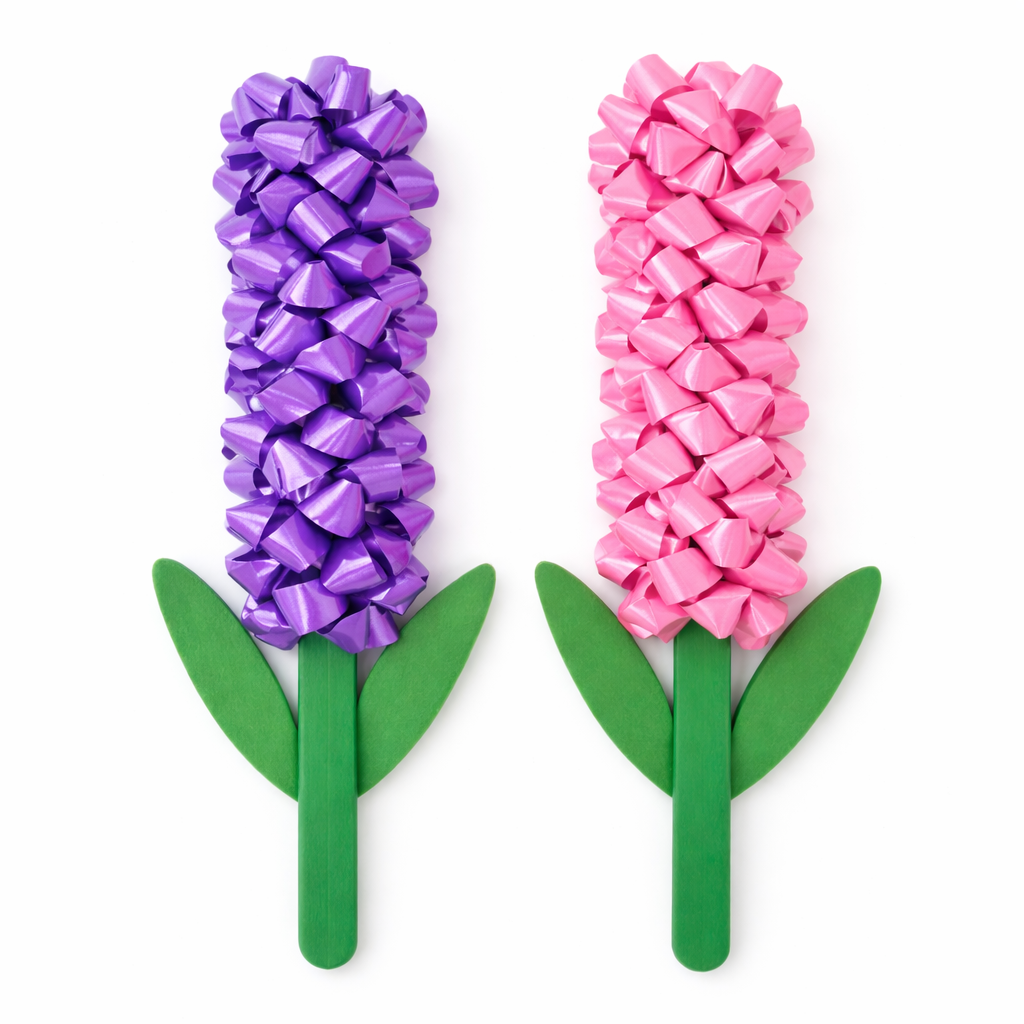
Supplies:
- Sticky back gift bows in purple, pink, or white (6 per flower)
- Wood chopstick or long thin wood craft stick
- Green paint and paint brush
- Optional: Glue
Instructions:
1
Paint the skewer or craft stick green and let it dry.
2
Peel the backing off of one bow, and stick it to the end of the craft stick. Remove the backing from a second bow and attach it to the opposite side of the stick, sandwiching the stick in between the bows. Press the two adhesive sides together firmly.
3
Repeat with a second set of bows just below the first, then a third set just below the second, and so on, leaving some green craft stick visible for the stem. Glue on a set of green paper leaves if you’d like.
Tip: If the adhesive on your bows isn’t very strong, add a little glue to hold each pair together.
Cupcake Wrapper Daffodil
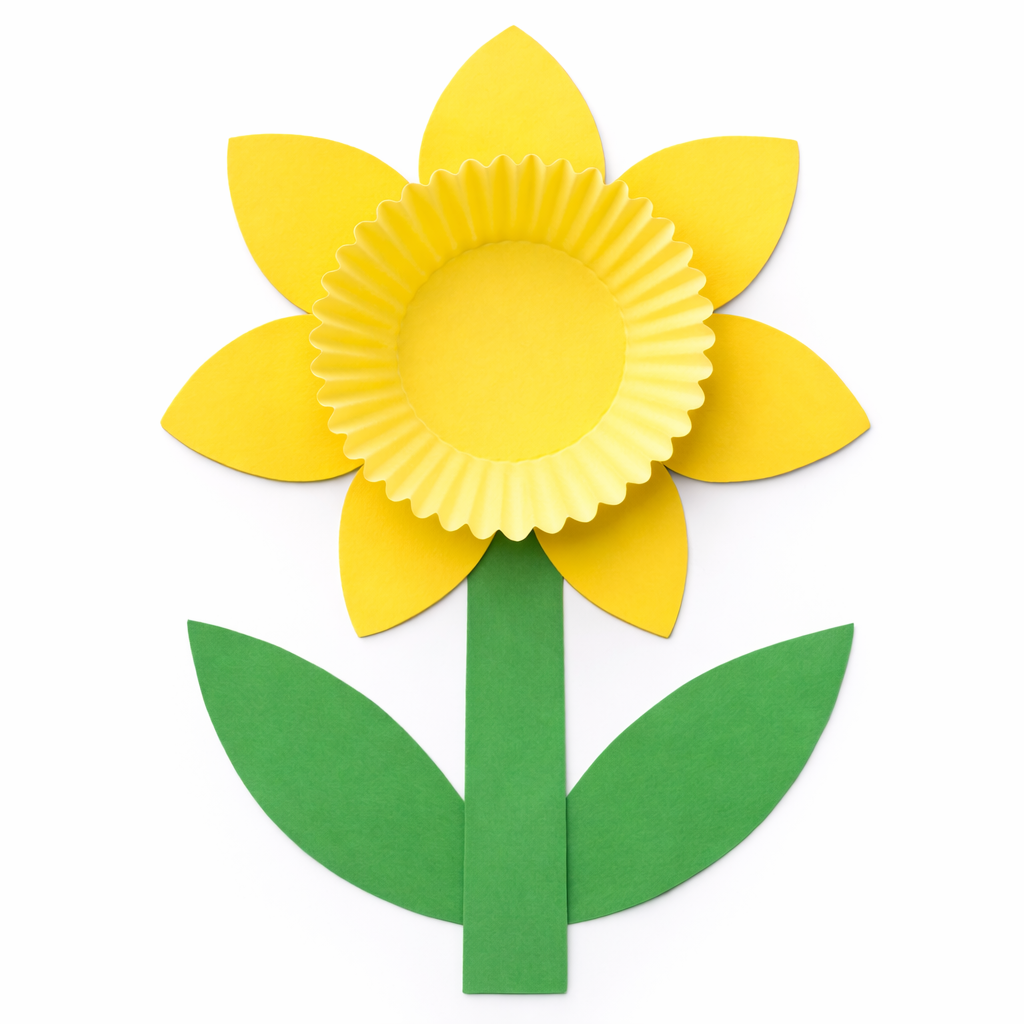
Supplies:
- Yellow construction paper
- Orange or yellow cupcake wrapper
- Green construction paper
- Scissors
- Pencil
- Glue stick
- Optional: Child’s photo sized and trimmed to fit inside cupcake wrapper
Instructions:
1
Draw and cut out the outer petals of a daffodil. Lay out the petals on the table, overlapping them slightly. Glue them together.
2
Glue the cupcake wrapper to the middle of the petals, creating the center petals of the daffodil.
3
Cut a stem and leaves from the green paper, and glue to the back of the daffodil. If you’d like glue a photo of your child to the inside of the cupcake wrapper.
Paper Tulip Crown
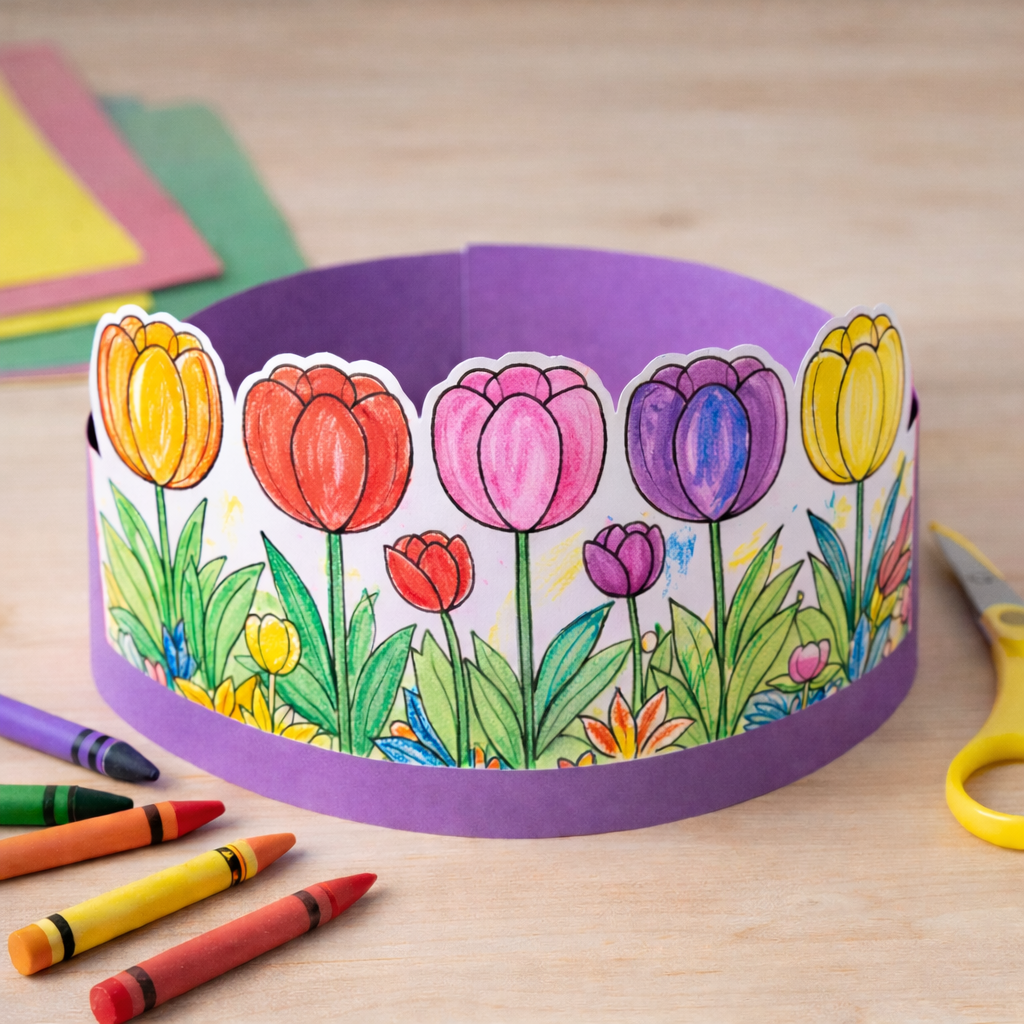
Supplies:
- Tulips in a Row Coloring Page from ABCmouse
- Construction paper in your choice of color
- Crayons, markers, or colored pencils
- Scissors
- Ruler
- Pencil
- Glue stick
Instructions:
1
Color in the coloring page any way you like. Cut out as much white space from around the tulip design as you can.
2
Cut strips of construction paper about 3 inches wide. Attach them together, end-to-end, until you have a strip long enough to create a crown that fits your head. Trim any excess.
3
Glue the row of tulips to the front of the crown, and it’s ready to wear!
Loop Yarn Hyacinth
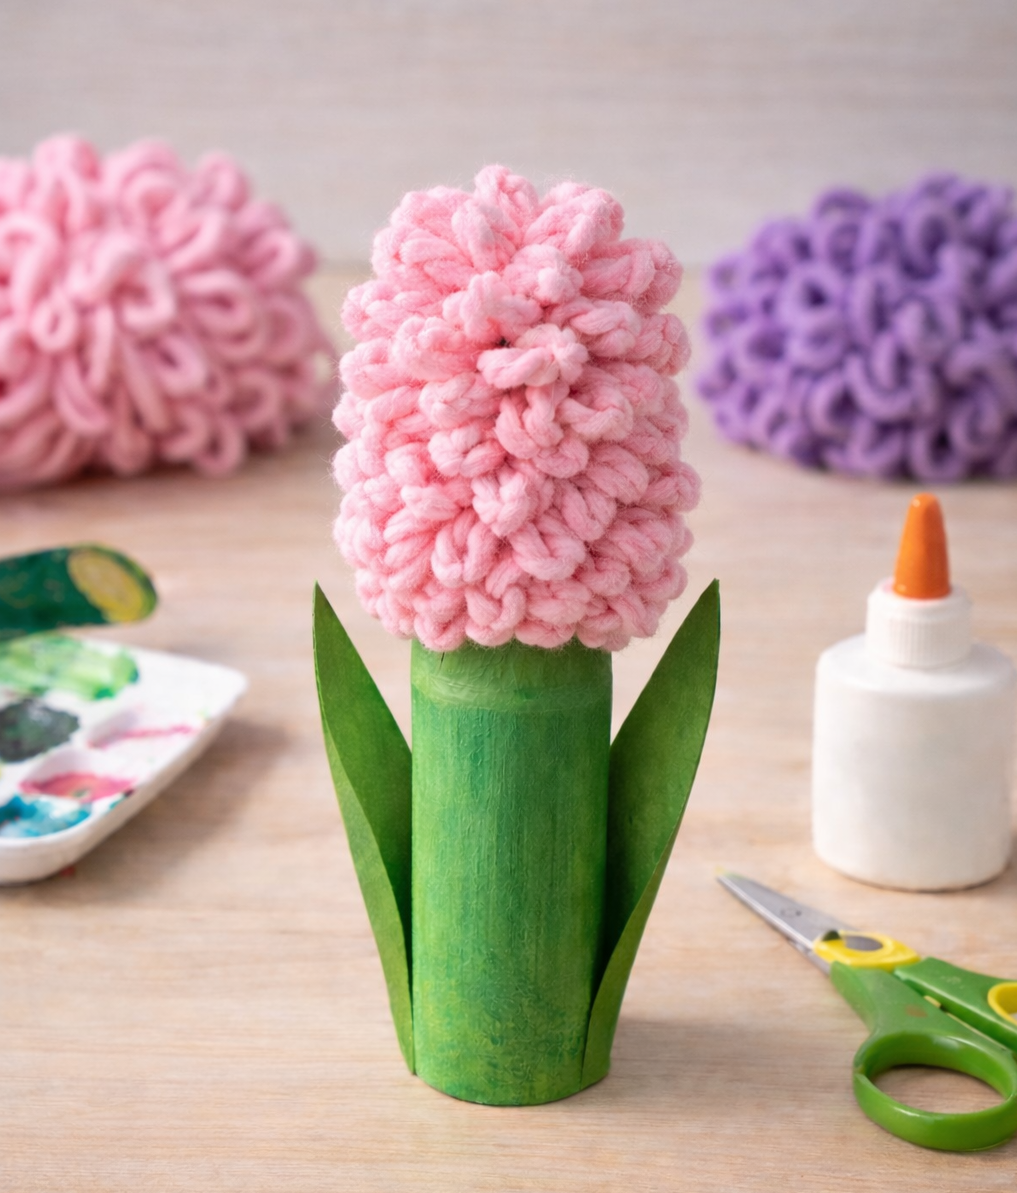
Supplies:
- Loop yarn in pink, white, or purple
- Empty paper towel roll tube
- Green paint and paintbrush
- Glue
- Scissors
Instructions:
1
Squeeze the top half of a paper towel roll in slightly, so it’s a little thinner than the bottom half. Paint the paper towel roll green, and let it dry completely.
2
Cut our green leaves from construction paper and glue them onto the bottom sides of the green paper towel roll.
3
Begin wrapping the loop yarn around the end of the paper towel tube that’s been squished in, overlapping the wraps to create a full appearance. You may need to glue the yarn down in spots or tuck it under other pieces to help secure it in place.
4
Continue wrapping until you’ve covered the top of the tube. Tuck or glue the end in place.
Flower Crafts for Mother’s Day
Paper Hand Flower Craft
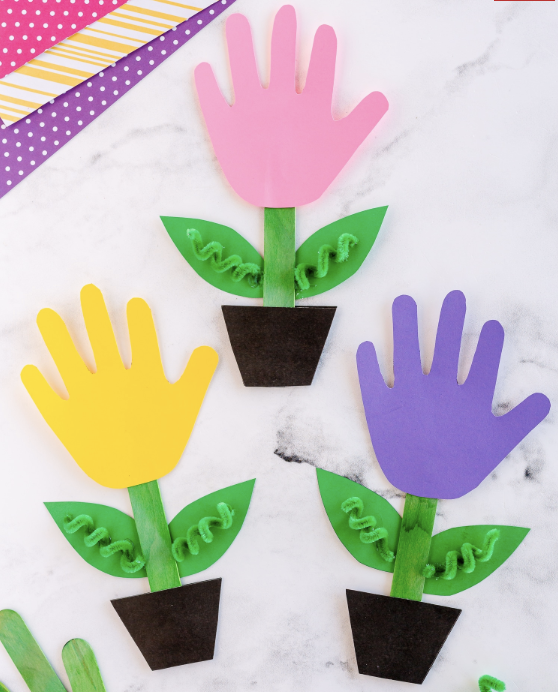
Supplies:
- Construction paper in various colors
- Green craft sticks
- Scissors
- Glue
- Pencil
- Green pipe cleaner (optional)
Instructions:
1
Pick a color of construction paper to be the flower. Have your child press their hand down onto the paper with their fingers slightly spread apart. Use a pencil to trace the outline of their hand, creating a faint line. Cut the handprint out.
2
Cut out leaves from green construction paper. Create green curly cue leaf tendrils by wrapping pipe cleaners around a pencil and sliding them off
3
Glue down the flower handprint on top of the green craft stick stem. Glue down the green leaves and curly cues behind the craft stick.
Stitched Rose Sewing Card
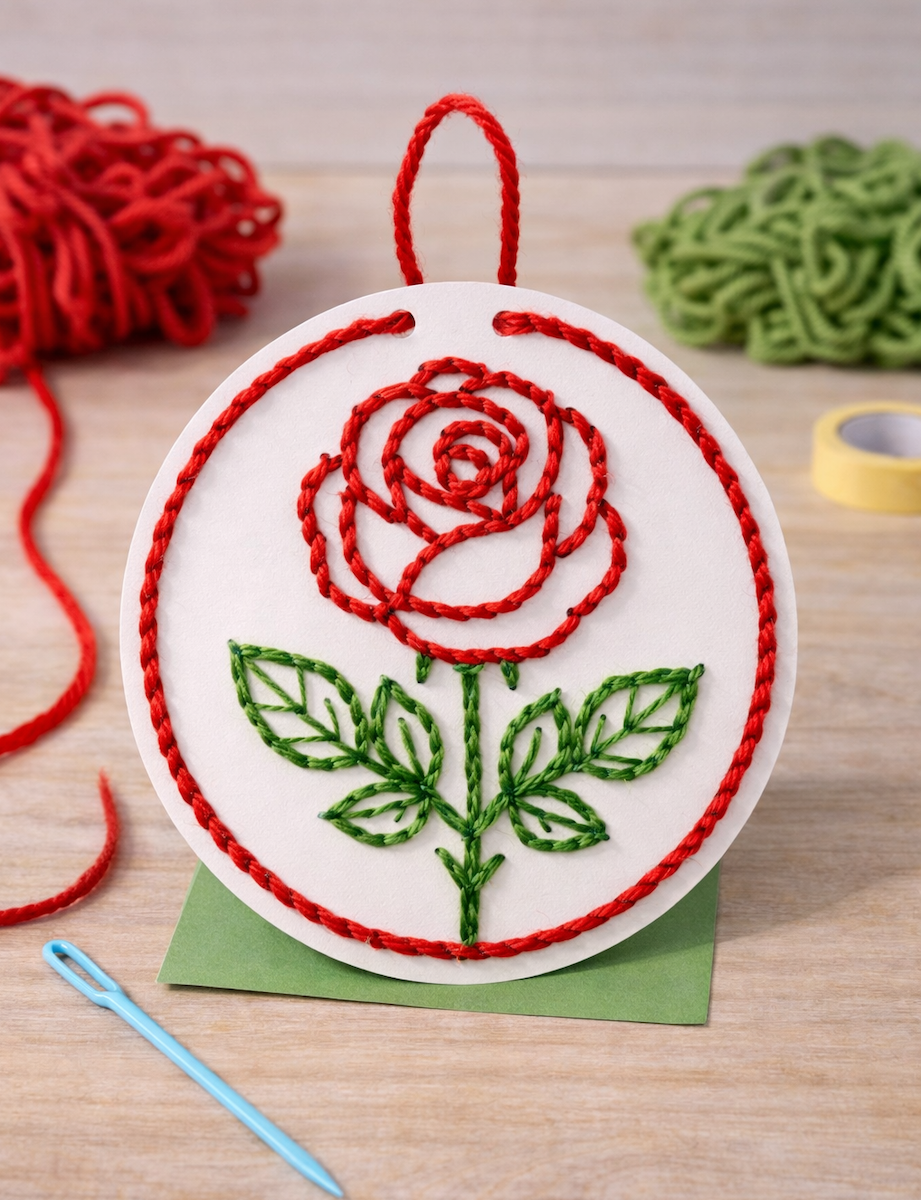
Supplies:
- Single Rose in a Circle coloring page from ABCmouse
- Card stock
- Metal skewer
- Plastic yarn needle
- Yarn in your choice of colors
- Tape or glue
- Scissors
Instructions:
1
Print the single rose coloring page on a piece of card stock, or print it on regular paper and glue it to card stock. Trim the excess around the outside of the circle.
2
Use the metal skewer to poke holes along the lines of the rose, leaves, and stem, about a quarter-inch apart. (Supervise small children or do this step for them.)
3
Thread the needle with yarn. Tape the end of the yarn in place on the back of the card stock. Sew the yarn through the holes along the outline of the flower, leaves, and stem, using a backstitch.
3
When you’ve finished sewing the design, knot the yarn and glue the paper to another piece of card stock to hide the backside. Trim the second piece in a circle to match the first. Poke two holes in the top, and use a piece of yarn to create a hanger.
Clay Flower Ornament Craft
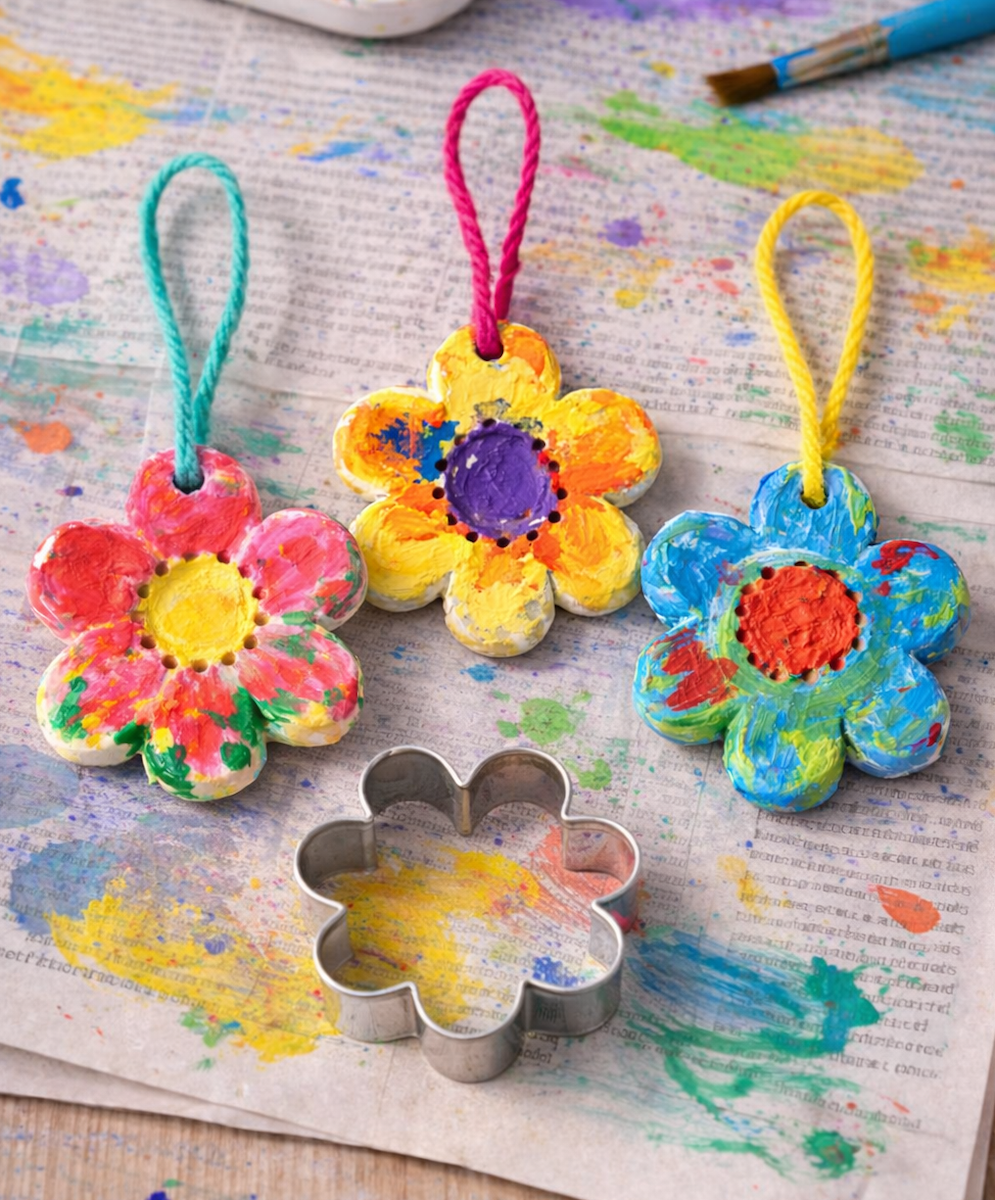
Supplies:
- Air-dry clay
- Flower cookie cutters
- Rolling pin
- Drinking straw
- Paint and paintbrushes
- Yarn or ribbon
Instructions:
1
Roll the clay flat to a thickness of about ¼ inch. Use the cookie cutters to cut out flower shapes. With the drinking straw, poke a hole in the top of each flower.
2
Let the clay dry according to the instructions on the package.
3
Paint the flowers any way you like, and let the paint dry.
4
Add a yarn or ribbon hanger that goes through the hole at the top of each flower, and wrap the ornament up as a gift for mom!
I Love You Because… Flower Craft
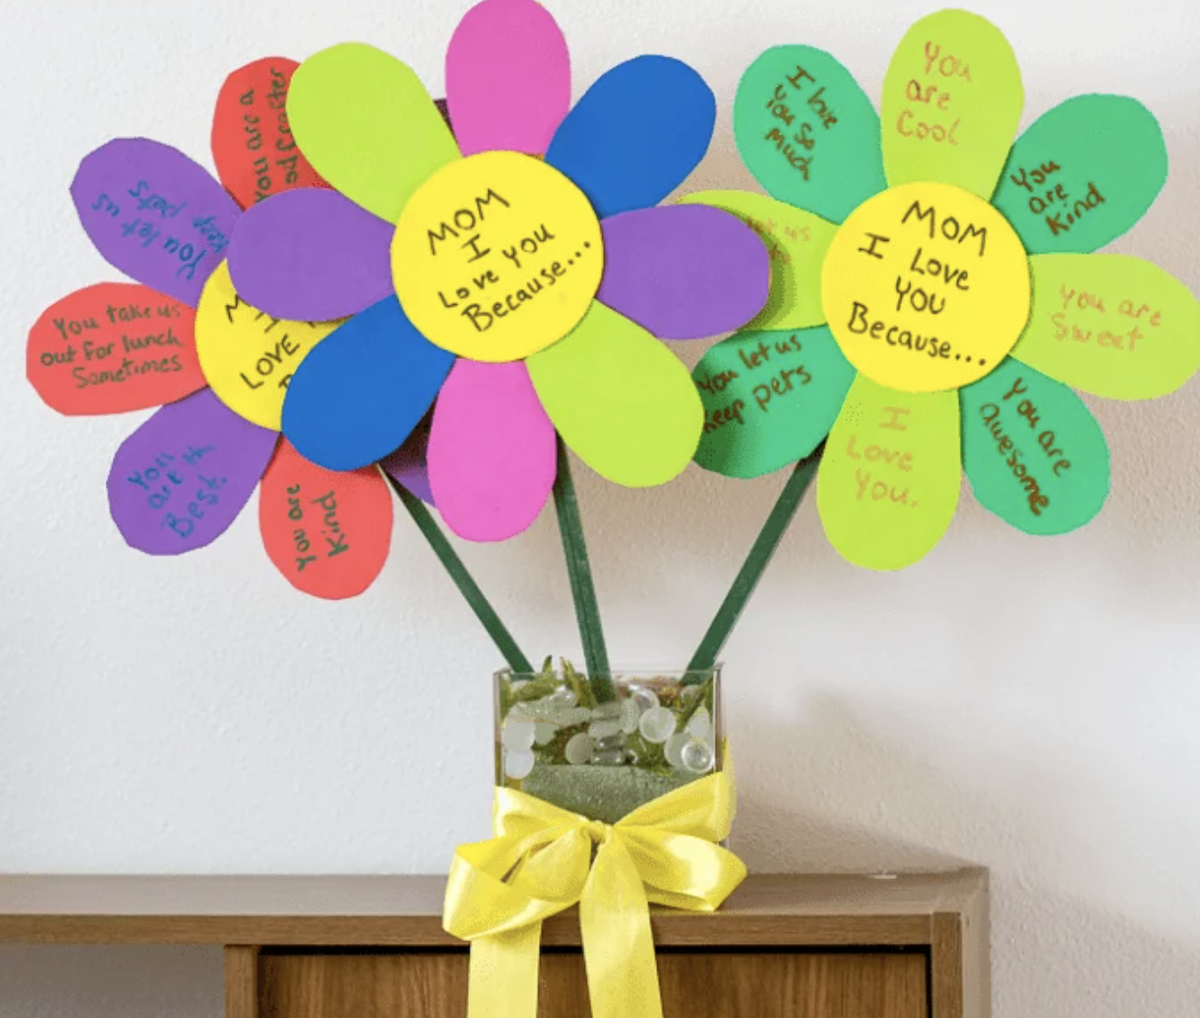
Supplies:
- Foam sheets in various colors
- Thin cardboard
- Pencil
- Lid of jar
- Sharpie markers
- Green craft sticks
- Scissors
- Hot glue
- Vase
- Decorative stones or glass pebbles
Instructions:
1
Trace the shape of a large flower petal onto a piece of thin cardboard and cut it out. Use this as a template to create the foam petals, tracing the cardboard petal onto the foam and then cutting each one out. You need 6–8 petals per flower.
2
Use the lid from a jar to trace the shape of a larger circle onto the foam sheets. This will be the center of your flower.
3
In the center of each circle, write the words Mom, I love you because…. Then write all the different reasons Mom is so great onto the flower petals, leaving the inner inch or two blank (this will be glued behind the center circle).
4
Hot glue or staple the flower petals around the back of the circle, ensuring your notes to Mom are visible.
5
Use hot glue to attach the green craft stick to the back of the flower. Let dry completely, then arrange them in a vase using decorative stones or petals to hold them in place.
Flower Crafts Using Recycled Materials
Egg Carton Flower Craft
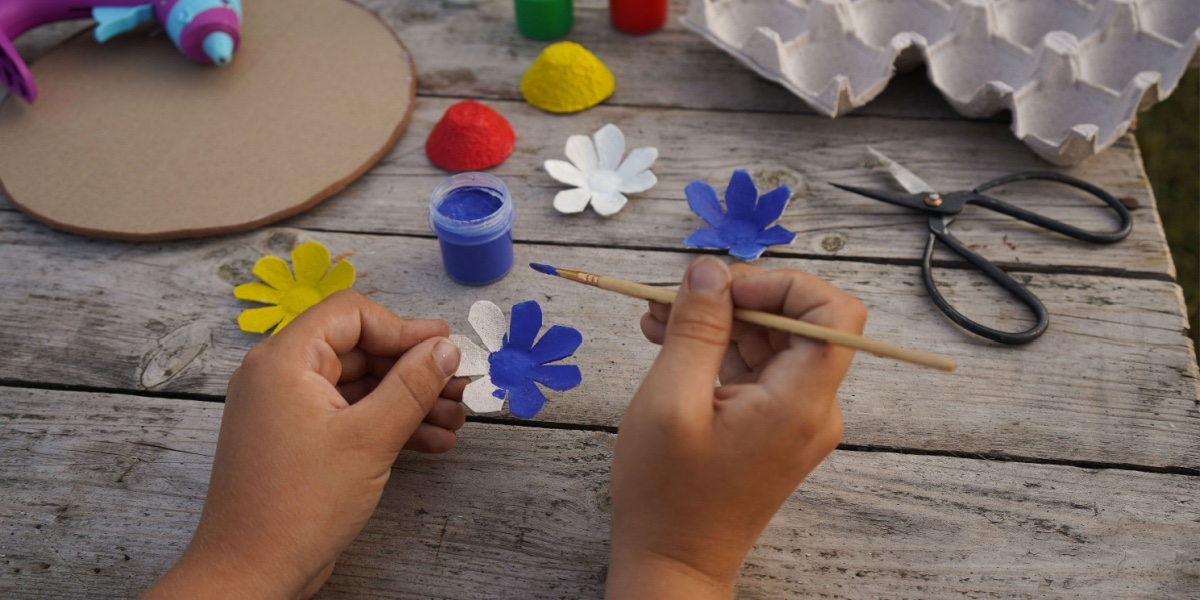
Supplies:
- Empty egg carton
- Scissors
- Paint and paintbrushes
- Optional: Glitter glue, beads, or other embellishments
Instructions:
1
Cut apart the individual compartments of the egg carton. Trim the sections to form flower petals as shown.
2
Paint each flower any color you like, and let the paint dry. Optional: Add glitter, beads, or other embellishments to the center of each flower.
2D Cardboard Vase with Flowers
Supplies:
- Cardboard
- Markers
- Wooden or metal skewer
- Real or artificial flowers
Instructions:
1
Use the markers to draw a vase on the cardboard piece. Sketch in the stems of the flowers as well.
2
With the skewer, poke holes along the stems. (Help small children with this part or do it for them.)
3
Poke the stems of real or artificial flowers through the holes, and display your result!
Scrap Paper Strip Flower
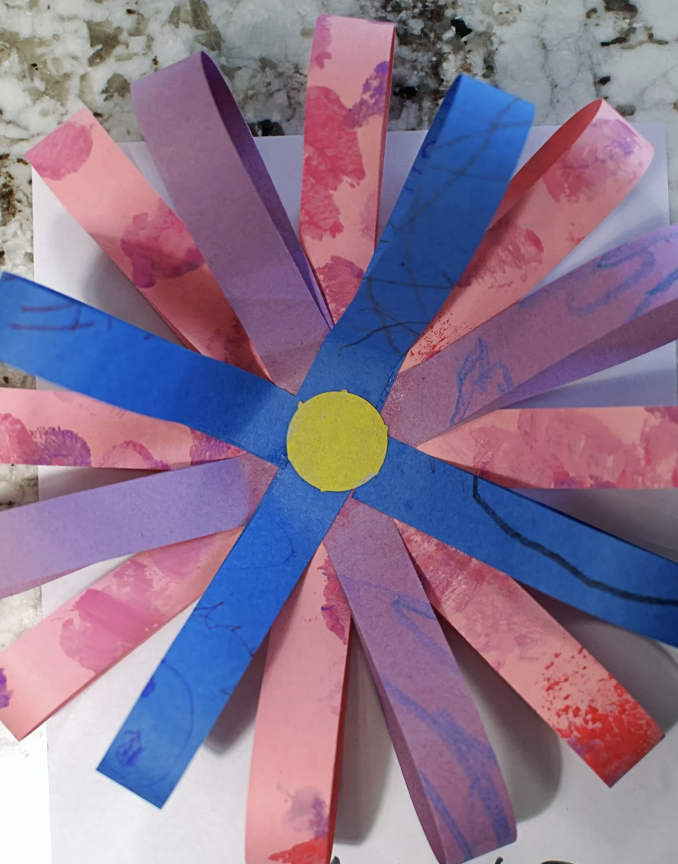
Supplies:
- Colorful scrap paper
- Plain white paper
- Green and yellow construction paper
- Pencil
- Glue stick
Instructions:
1
Cut the scrap paper into strips of varying thicknesses. Fold each strip in half and glue the ends together, forming a loop.
2
Arrange the loops onto another sheet of paper, with their centers criss crossing over each other. Glue each loop down in the middle.
3
Cut out a circle from the yellow construction paper that’s large enough to cover the spot where the paper loops meet. Glue it into place.
4
From the green construction paper, cut a stem and a leaf (optional). Glue them onto the paper to finish your flower.
Toilet Paper Roll Flowers
Supplies:
- Empty toilet paper roll tube
- Paint and paintbrushes
- Wood skewer or chopstick
- Flatback gem or button
- Scissors
- Ruler
- Pencil
- Glue
Instructions:
1
Paint the toilet paper tube any color you like. Let the paint dry.
2
Gently press the tube flat, creasing the edges. Mark the tube at intervals of about ½ inch. Cut the tube into pieces along those lines, creating flower petals.
3
Lay the petals out in a flower shape. Glue the pieces together where they touch.
4
Before gluing the last two pieces together, insert the skewer or chopstick as shown, then glue into place. Finish by gluing a flatback gem or button to the middle of the front of the flower.
Related Activities
-

Father’s Day Craft for Kids: Create a Dad Frame
Create a heartfelt Father’s Day photo frame craft kids can make with simple supplies, family photos, and easy step-by-step instructions.
-

Kids Science Experiment: How to Build a Simple Catapult
Build a craft stick catapult in this fun STEM activity for kids. Launch pom-poms and explore force, motion, and simple engineering concepts.
-

20+ Homemade Mother’s Day Card Ideas
Creative homemade Mother’s Day card ideas for kids, from flower crafts to heart designs and easy printables for meaningful, handmade gifts.
-

20+ Plant Science Experiments & Activities for Kids and Toddlers
Explore 20+ easy plant science experiments for kids, from growing seeds to photosynthesis, with simple supplies and hands-on learning at home or school.
-
30+ Flower Crafts for Kids: Easy Ideas for Preschool and Up
30+ flower crafts for kids—easy ideas for preschool, kindergarten, and beyond. Includes paper flowers, spring projects, and fun Mother’s Day crafts using simple materials.
-
40 Easter Crafts for Kids (Easy DIY Ideas)
40 fun and easy Easter crafts for kids, from bunnies and chicks to egg decorating and DIY baskets—perfect for home or classroom creativity.