40 Easter Crafts for Kids to Make at Home or School
Share
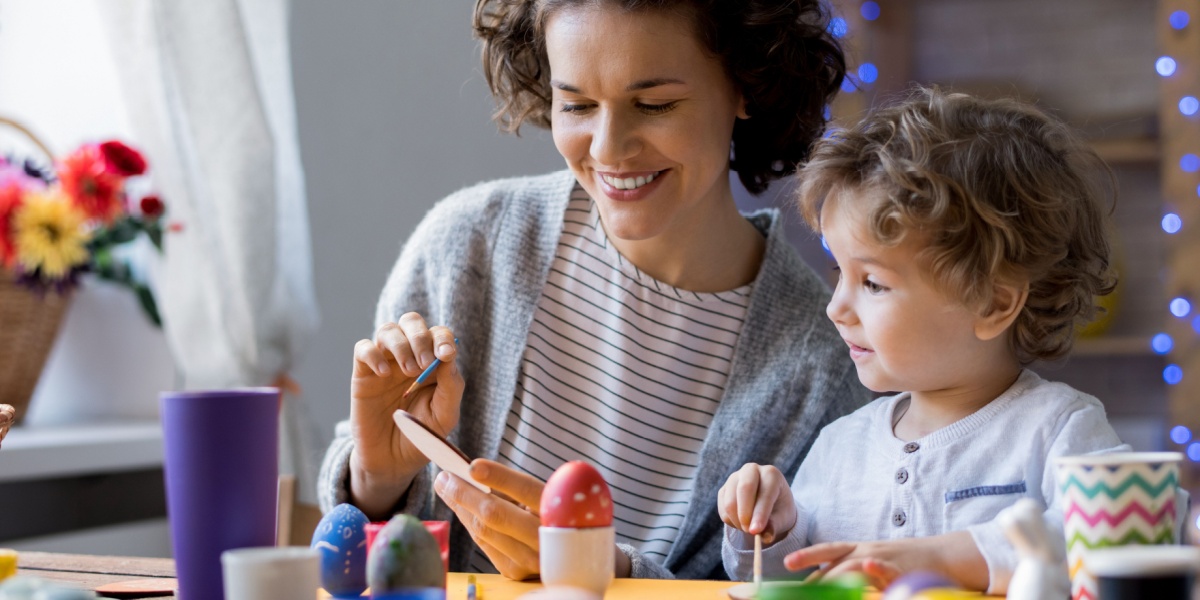
Celebrate Easter the hands-on way with adorable crafts featuring fluffy chicks, bunnies, and lambs, as well as colorful Easter eggs and baskets that kids will love!
Spring Craft Activities: Table of Contents
Whether you want to make creative Easter eggs and egg-themed crafts, cheerful chicks and bunnies, or DIY Easter baskets and treats, this list has you covered! Try these Easter crafts for kids in the classroom or at home—they only require basic supplies and are easy to do.
While each craft is designed for young children, it’s best to provide adult supervision while they work.
Easter Bunny and Animal Crafts for Kids
Tissue Paper Chick

Supplies:
- 2 small paper plates
- Yellow craft paint and brush
- Yellow tissue paper
- Orange construction paper
- Googly eyes
- Scissors
- Glue
- Pencil
Instructions:
1
Paint both paper plates yellow and let them dry. While waiting for them to dry, cut the tissue paper into small squares.
2
Squirt a small puddle of glue onto a piece of scrap paper or another paper plate. Wrap a tissue piece around the eraser end of the pencil, dip it in the glue and press it onto one of the plates, forming a small rosette. Repeat until the entire plate is covered in tissue paper rosettes.
3
Cut the other plate in half. Attach one half to each side of the full plate to make wings.
4
Cut a triangle beak from orange construction paper. Glue it to the tissue paper plate along with two googly eyes to make the chick’s face.
Check Out More Chickens! We’ve got free printable chicken coloring pages for artists who want to keep exploring this feathered friend.
Fork-Painted Baby Chick
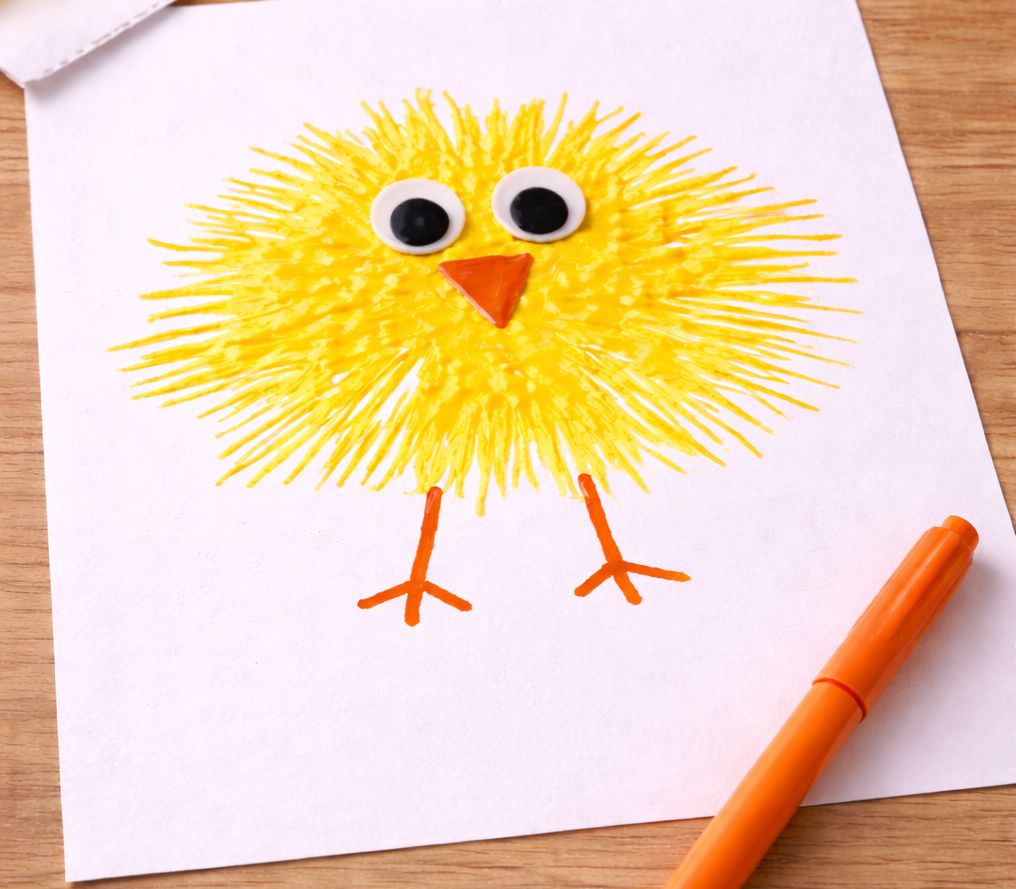
Supplies:
- Yellow craft paint
- Disposable fork
- Paper plate
- Paper (full sheet)
- Orange marker
- Googly eyes
- Glue
Instructions:
1
Squirt some paint onto the paper plate. Press the back of the fork into the paint, then press it onto the full sheet of paper. Repeat this action, creating a puffy round circle of yellow fork-painted lines on the page. Let the paint dry,
2
Use the orange marker to add the beak and legs, and glue on the eyes.
Simple Paper Doily Sheep
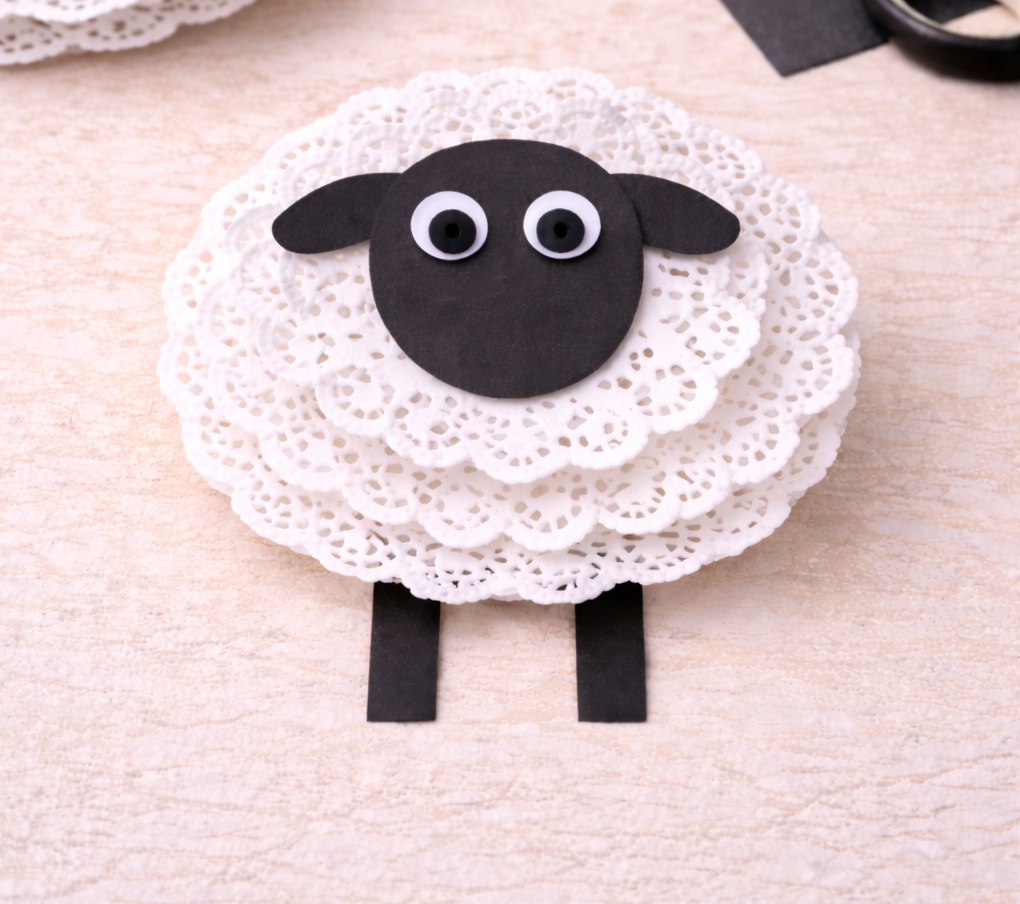
Supplies:
- White paper doilies in several sizes
- Black construction paper
- Googly eyes
- Scissors
- Glue
Instructions:
1
Layer the paper doilies with the smaller ones on top to make the sheep’s body, and glue them into place.
2
Cut a construction paper circle for the sheep’s head, and add the googly eyes. Glue it in the middle of the doilies. Add two black construction paper ears.
3
Cut two black construction paper strips for legs, and glue them to the bottom of the doilies.
Cotton Swab Dotted Lamb
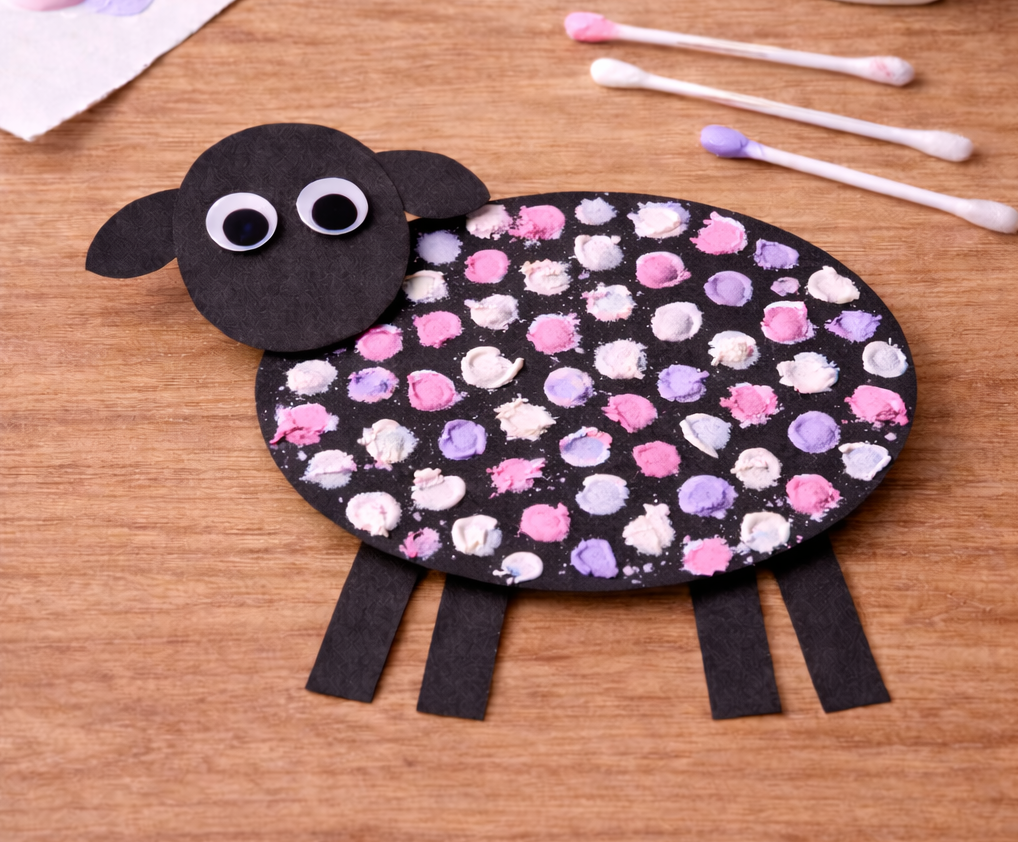
Supplies:
- Black construction paper
- White, pink, and purple craft paint
- Cotton swabs
- Paper plate
- Glue
- Googly eyes
Instructions:
1
Cut a large oval (body), small circle (head), and two even smaller ovals (ears) from the construction paper. Cut four paper strips for legs. Glue the head onto one end of the body and the legs to the bottom.
2
Pour a bit of paint onto a paper plate Dip a cotton swab into the paint and use it to make dots all over the lamb’s body. Let it dry.
3
Add the googly eyes to your lamb’s face, and you’re finished!
Cotton Ball Lamb
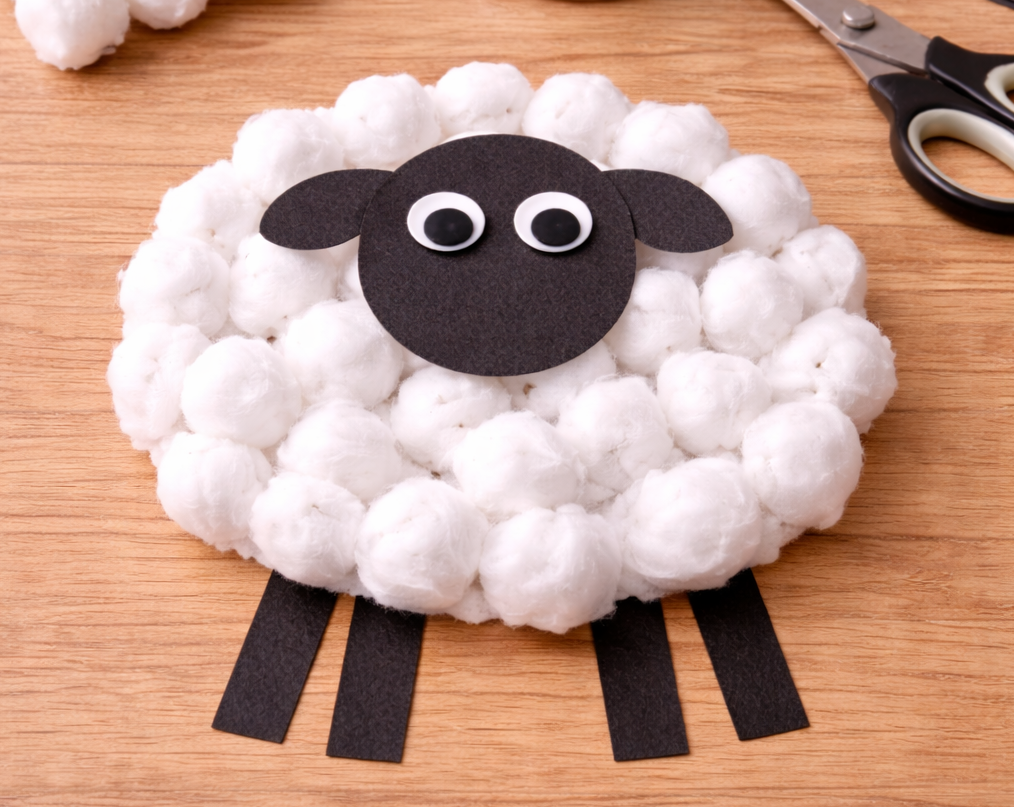
Supplies:
- Black construction paper
- Cotton balls
- Glue
- Scissors
- Googly eyes
Instructions:
1
Cut a large circle from the construction paper. Cut four strips of black construction paper for legs. Glue them in place on the back of the larger circle, two on each side.
2
Flip the paper back over so the front side is facing you. Spread a thin layer of glue over the front side of the large circle, and cover it with cotton balls.
3
Cut a smaller circle for the lamb’s head from black construction paper. Add two smaller ovals for ears and glue the googly eyes in place.
4
Glue the head onto the larger circle, on top of the cotton balls and toward the top middle. Your little lamb is ready!
Tip: Need to simplify your Easter crafts? Try our Easter coloring pages instead!
Jellybean Mosaic Animals
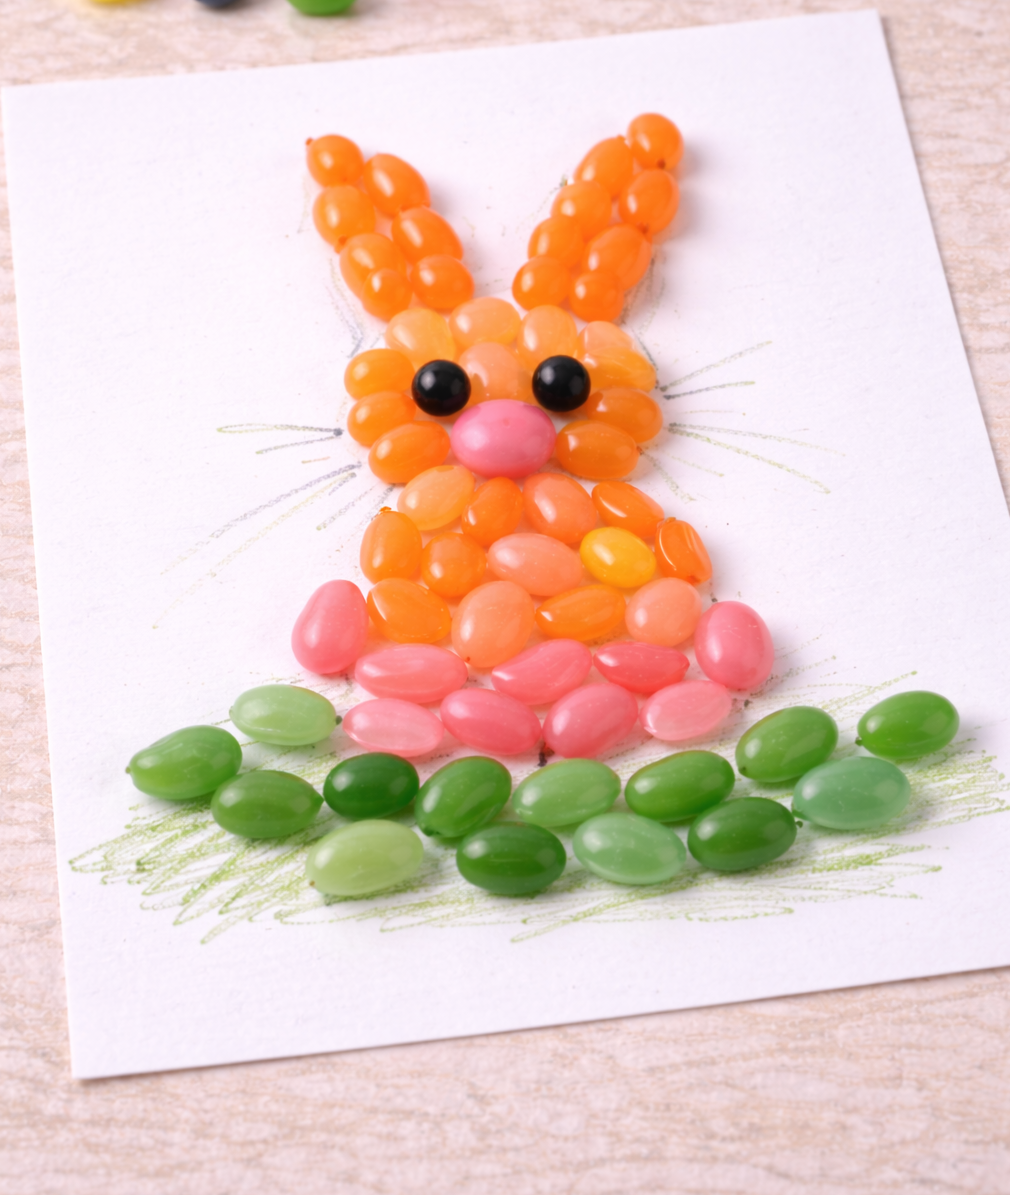
Supplies:
- Jelly beans
- Glue
- Card stock
Instructions:
1
Experiment with the jelly beans to form individual animals or even a whole spring barnyard scene!
2
When you’re happy with your design, glue it into place on the card stock (if you can resist eating it!).
Bunny Nose Mask
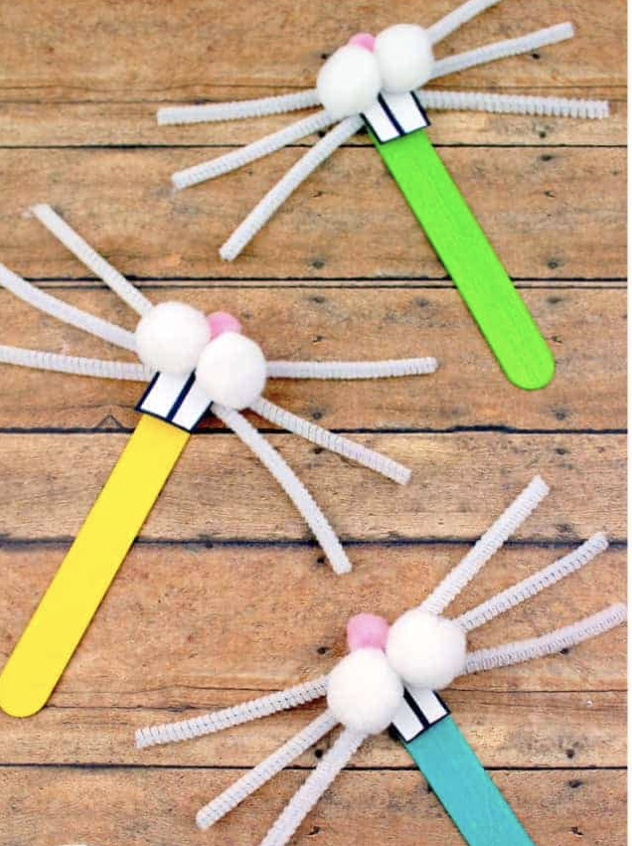
Supplies:
- Colorful wood craft sticks
- Paper
- Black marker
- 3 white pipe cleaners
- 2 white pom poms
- 1 pink pom pom
- Glue
Instructions:
1
Cut pipe cleaners into smaller sections so you have 6 pieces. Glue them to the upper end of the craft stick, arranging them to look like whiskers.
2
Use the black marker to draw a set of big bunny teeth onto a piece of white paper, and cut them out. Glue them on top of the whiskers, more in line with the lowest of the three whiskers. Leave a small amount of space at the top of the craft stick to add the bunny nose and cheeks.
3
Glue on the white pom poms, slightly covering the bunny teeth. Glue on the pink pom pom directly above them. Hold your mask up to your face and become an adorable Easter bunny!
Pipe Cleaner Bunny Ears
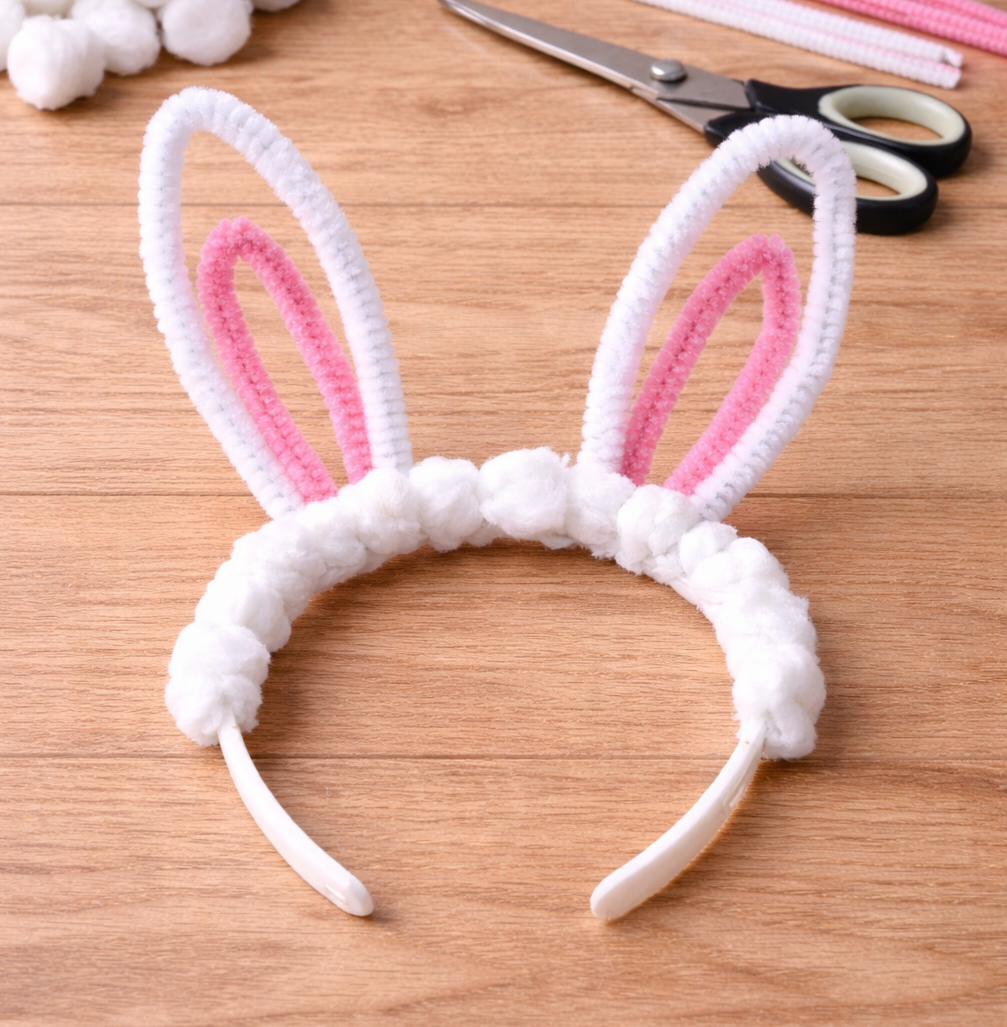
Supplies:
- White and pink pipe cleaners
- Plastic headband
- Scissors
- Cotton balls
- Glue
Instructions:
1
Fashion the white pipe cleaners into elongated loops to make bunny ears, using one pipe cleaner for each. Twist the ends around the headband.
2
Add smaller pink pipe cleaner accent loops to the inside of each ear, twisting the ends around the headband.
3
Glue on cotton balls to cover the rest of the headband. Let the glue dry, and put on your cute holiday ears!
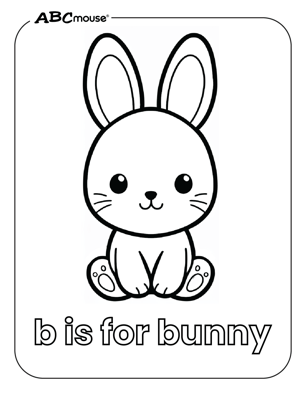
Easter Bunny with Egg Photo Frame

Supplies:
- Easter Bunny Sitting Near Plain Easter Egg coloring page from ABCmouse
- Markers or crayons
- Thin cardboard (such as from an empty cereal box)
- Photo
- Scissors
- Glue stick
Instructions:
1
Color in the coloring page, leaving the egg blank if you’d like. Then, choose a photograph of yourself or someone else. Trim the photo down so it fits in the egg.
2
Glue the coloring page to the cardboard and let it dry, then cut out the bunny and egg.
3
Glue the photo in place on the egg. Your photo frame is ready to display!
Bunny Ears and Eggs Crown
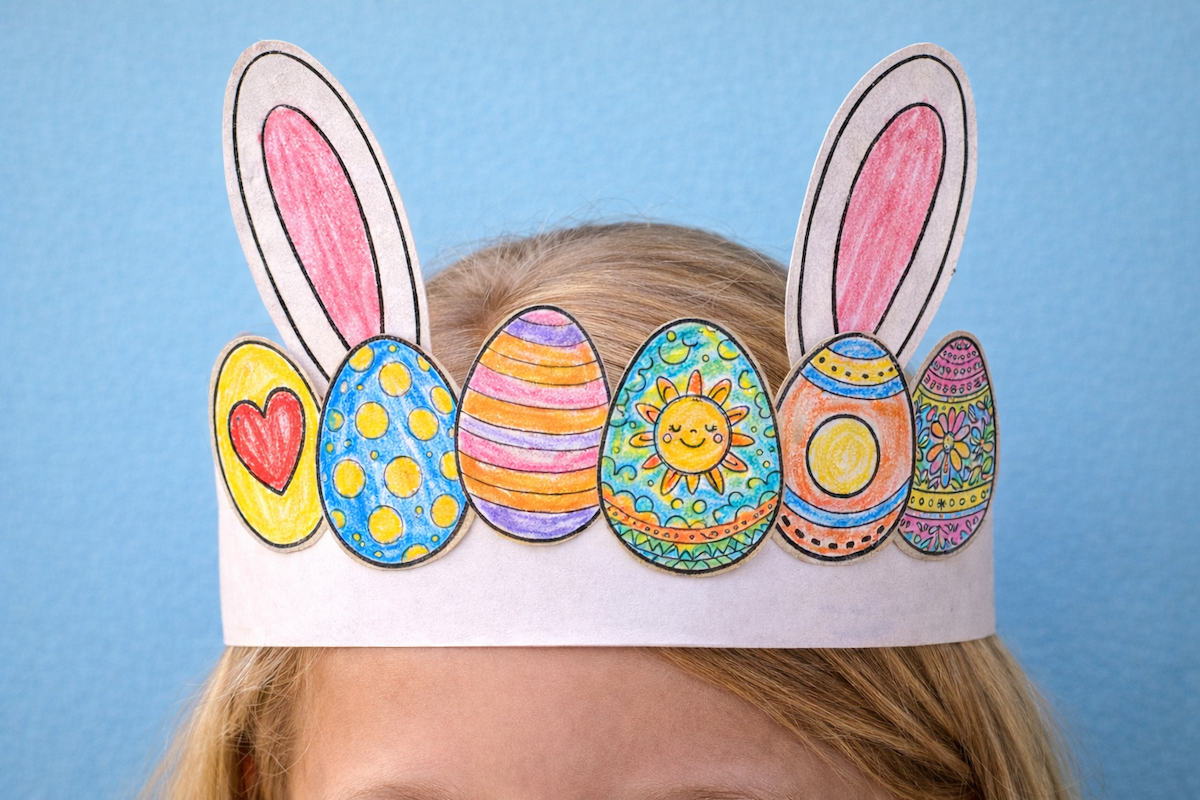
Supplies:
- 6 Eggs to Color coloring page from ABCmouse
- White and pink construction paper
- Glue stick
- Stapler
- Ruler
- Pencil
- Crayons
Instructions:
1
Cut strips of white construction paper about 3 inches wide. Glue them together at the ends to make one long strip that’s long enough to fit your child’s head.
2
Color in the eggs on the coloring page and cut them out. Glue them to the long strip of paper. Bend the strip of paper into a crown, and glue or staple the ends in place.
3
Cut out two white bunny ears with pink accents. Glue the ears to either side of the crown, then wear your new Easter crown!
DIY Easter Bunny Puzzle

Supplies:
- Easter Bunny With Patterned Eggs coloring page from ABCmouse
- Thin cardboard (such as from an empty cereal box)
- Markers or crayons
- Scissors
- Glue stick
Instructions:
1
Color in the coloring page any way you like. Trim the edges, then glue it to the cardboard and let dry.
2
Cut the picture into smaller jigsaw pieces. Then, mix them up and see how long it takes to put it back together!
Tip: Store your puzzle in an envelope or plastic baggie to play again and again
B is for Bunny
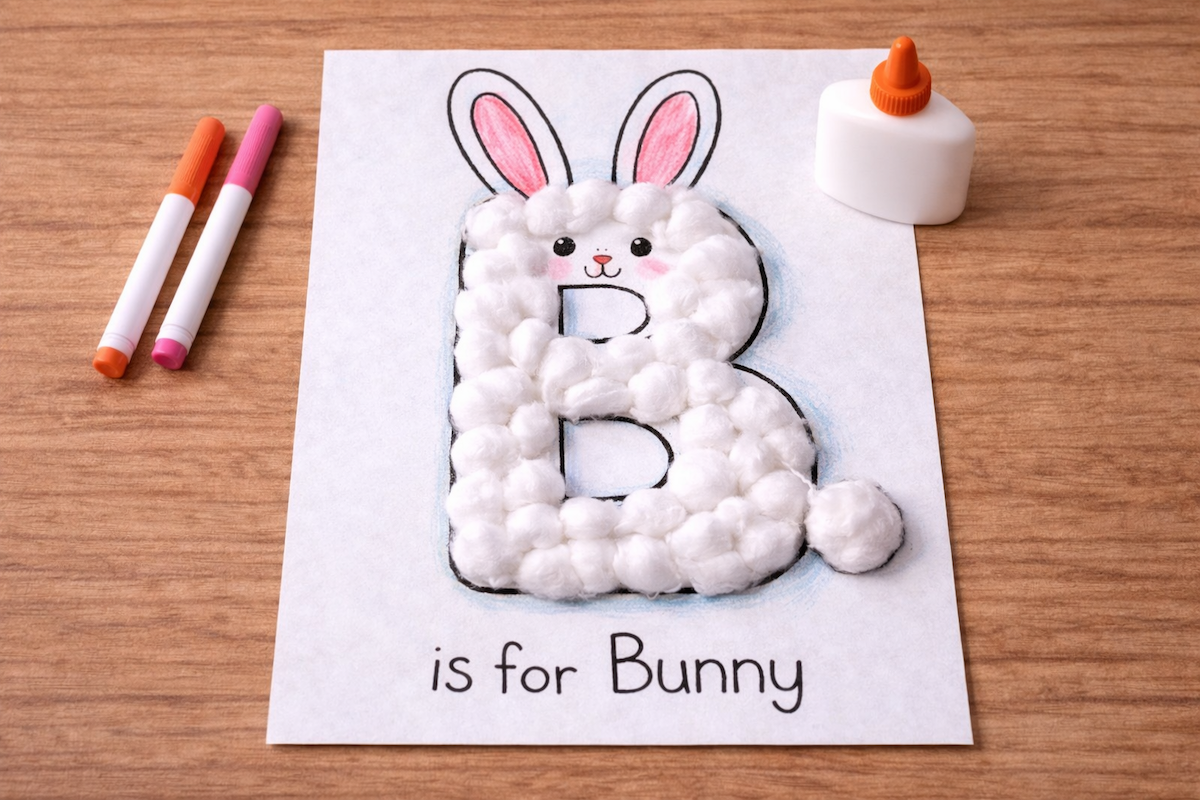
Supplies:
- Capital Letter B coloring page from ABCmouse
- Cotton balls
- Glue
- Markers or crayons
Instructions:
1
Fill in the letter B on the coloring page with glue. (Alternatively, use glue to draw a capital B with glue on a piece of construction paper.) Press cotton balls onto the glue, and let dry.
2
Use markers or crayons to add bunny ears to the top, a face at the top of the B, and a puffy tail at the bottom!
Tip: If your child loves rabbits, have them try our free-to-play, educational bunny-themed games or our bunny rabbit coloring pages.
Paper Plate Easter Bunny Mask
Supplies:
- Paper plate
- Cotton balls
- White and pink construction paper
- Scissors
- Glue
- Wood craft stick
Instructions:
1
Cut out the middle of the paper plate, leaving only the rim. Glue cotton balls all around the paper plate rim, and let the glue dry.
2
Cut two white bunny ears, and add pink accents inside. Glue them into place on the back of the paper plate.
3
Add the wood craft stick to the bottom as a handle. When the glue is dry, hold your cute mask up to your face to become a bunny!

Easter Egg Decorating Crafts
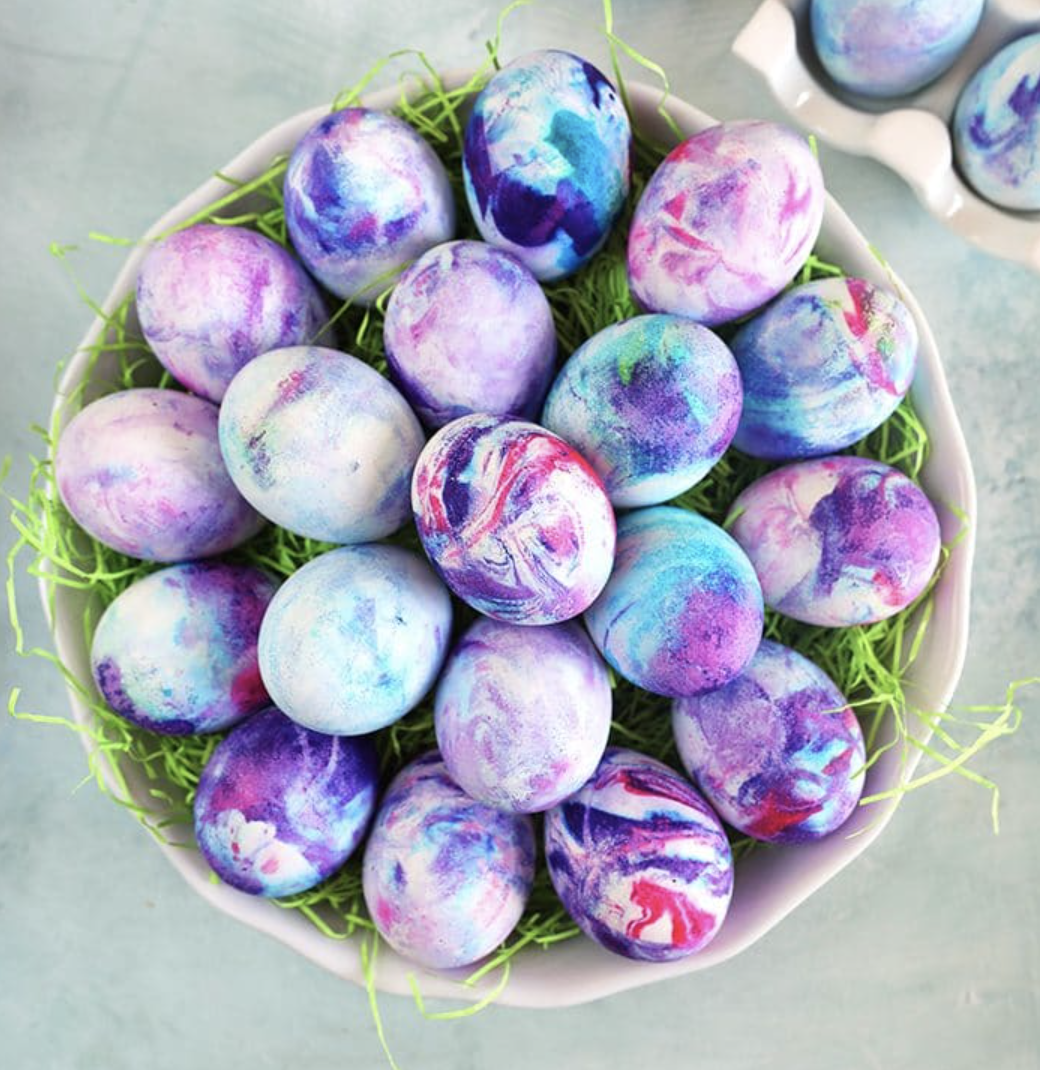
Whipped Cream Marbled Eggs
Supplies:
- Hard boiled eggs, undyed
- Vinegar
- Whipped cream in a spray can
- Food coloring
- Toothpicks
- 9 x 13 glass baking dish
- Paper towels
- Disposable gloves (optional, to protect fingers from becoming stained)
Instructions:
1
Soak the hard boiled eggs in a bowl of vinegar for 20 minutes. Remove and dry the eggs. (This helps the dye soak in more effectively.)
2
Spray a layer of whipped cream into the baking dish, about an inch thick or so. Drip food coloring onto the surface in any mix of colors you prefer. Use a toothpick to swirl the food coloring into marbleized patterns.
3
Gently roll an egg around on the surface of the whipped cream until it’s covered. Leave the whipped cream and dye on the egg, and set it aside on a paper towel to dry.
4
Repeat with your remaining eggs, adding more dye and whipped cream as needed.
5
Dip each egg into a bowl of water, then gently pat dry with paper towels. This will remove any whipped cream residue, while the dyed pattern remains.
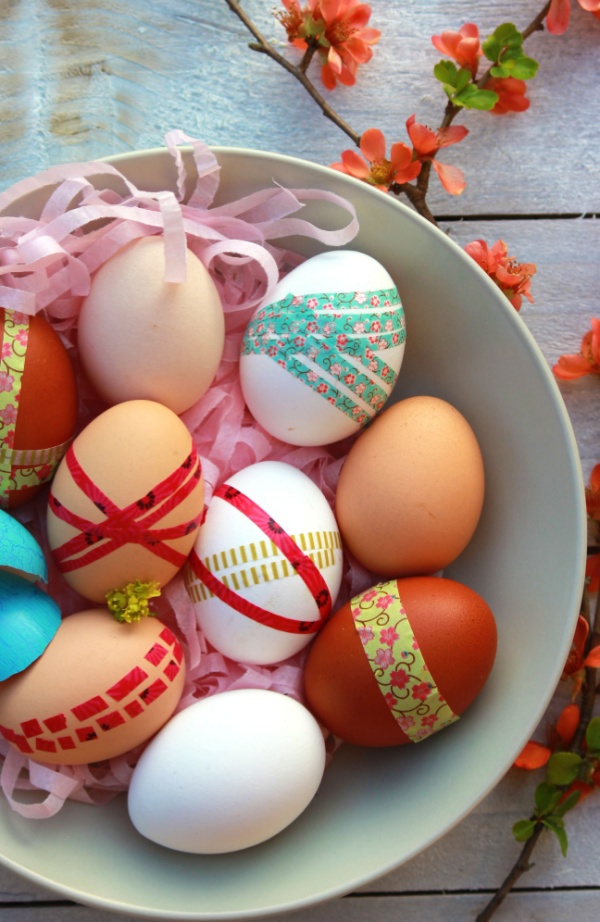
Washi Tape Easter Eggs
Supplies:
- Hard boiled eggs, dyed or undyed
- Washi tape
- Scissors (optional)
Instructions:
Have your child select several different washi tapes. Then, wrap strips of paper washi tape around your eggs to create colorful stripes. Take it one step further and cut small shapes from the washi tape like dots, hearts, or stars!
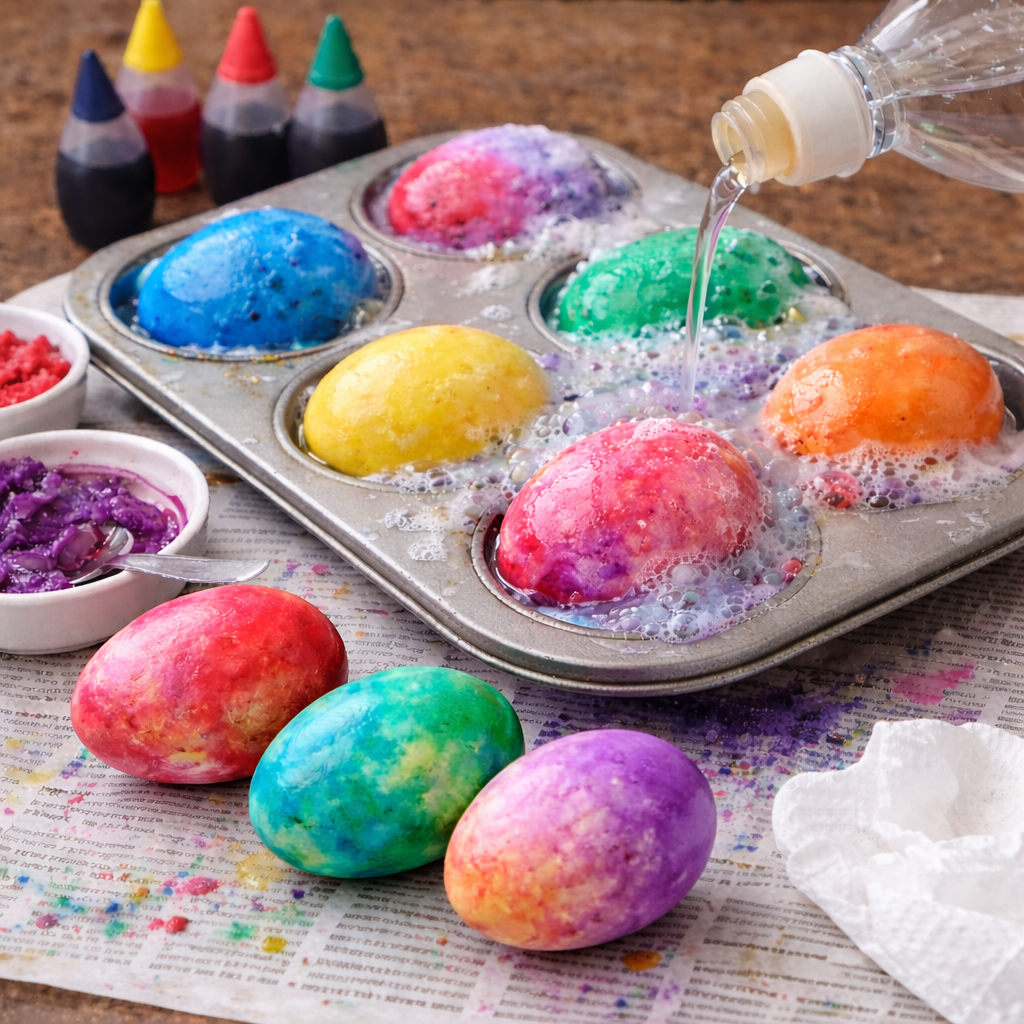
Vinegar & Baking Soda Easter Eggs
Supplies:
- Hard boiled eggs, undyed
- Food coloring
- Disposable gloves (optional, to protect fingers from becoming stained)
- Muffin tin
- Baking soda
- Water
- White vinegar
- Paper towels
Instructions:
1
Mix two parts baking soda to one part water to make a paste, then add a few drops of food coloring. Repeat with as many colors as you like.
2
Cover an egg with several colors of baking soda paste, then set the egg into the well of a muffin tin. Repeat with the rest of your eggs.
3
Pour vinegar over each egg in the muffin tin. Watch as the baking soda fizzes and foams, mixing the colors into mesmerizing patterns!
4
Carefully remove each egg and pat it dry on a paper towel. Discard the excess baking soda/vinegar mixture.
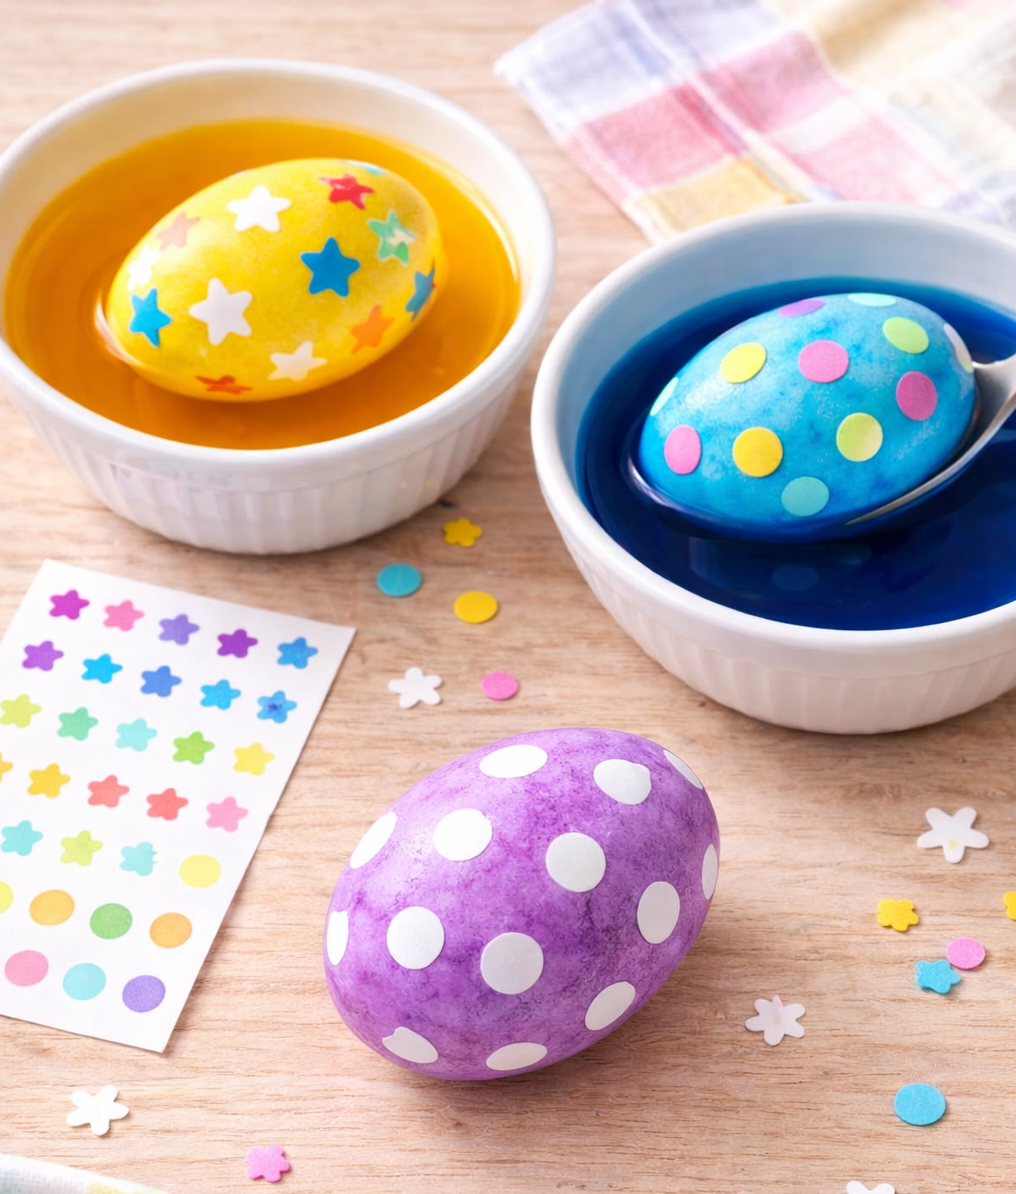
Sticker Resist Eggs
Supplies:
- Hard boiled eggs, undyed
- Small stickers in a variety of shapes (stars, dots, hole reinforcers, etc.)
- Egg dye and supplies of your choice
Instructions:
1
Place stickers on your eggs in any pattern you like. Press the edges down firmly.
2
Dye eggs according to the instructions of your dye kit. Let dry completely. Remove the stickers to reveal the undyed areas beneath!

Tip: Keep the egg decorating going with our free printable Easter egg coloring pages!
Tie Dye Easter Eggs
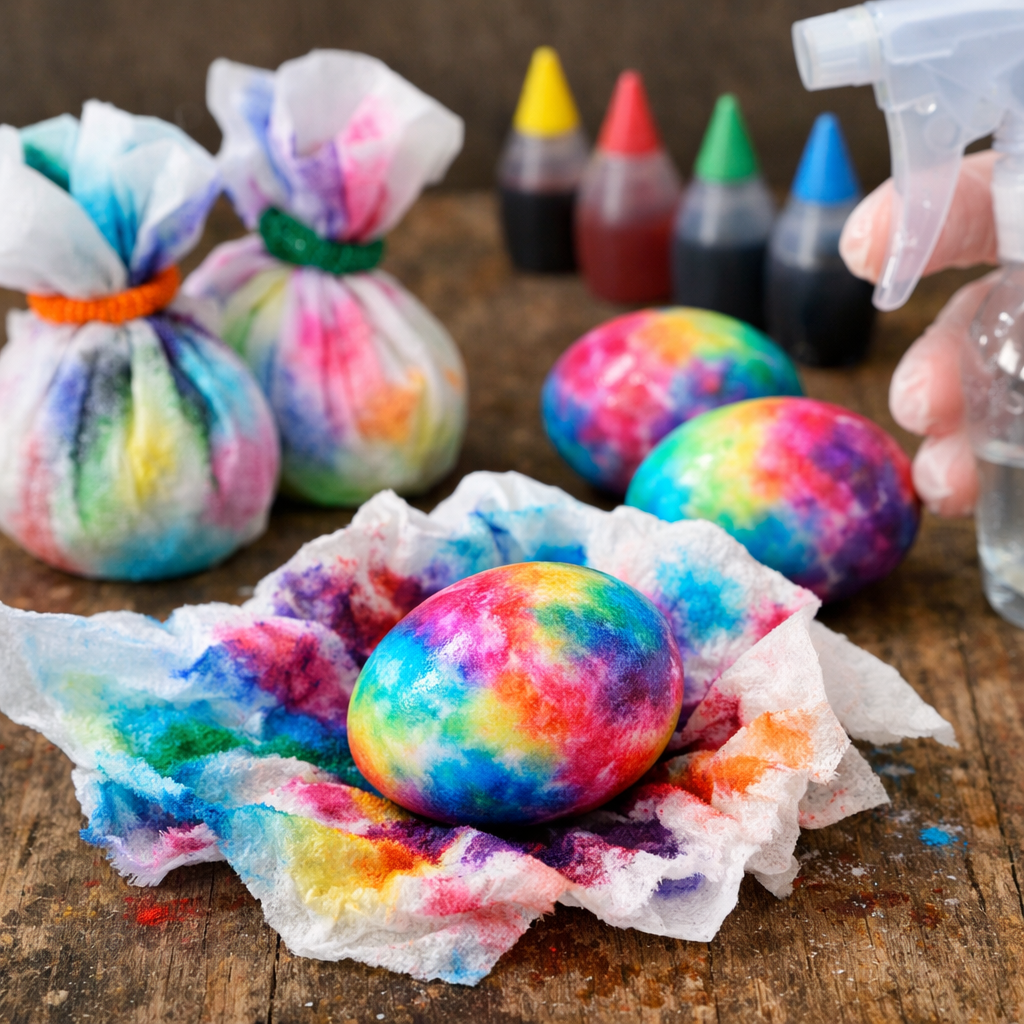
Supplies:
- Hard boiled eggs, undyed
- Food coloring
- Paper towels
- Disposable gloves (optional, to protect fingers from becoming stained)
- Water in a spray bottle
- Pipe cleaner pieces (2 inches or so) or twist ties
Instructions:
1
Set an egg in the middle of a paper towel, and draw up the towel around it. Use a pipe cleaner piece or twist tie to secure the towel at one end.
2
Squeeze drops of food coloring onto the paper towel around the egg. Leave some white space between drops.
3
Spray the paper towel liberally with water so the colors bleed together. Gently squeeze the paper towel around the egg, letting any excess water drip out.
4
Set the egg aside until the paper towel is completely dry. Repeat with the rest of your eggs. When the paper towels are dry, remove them to reveal the colored egg beneath!
Temporary Tattoo Easter Eggs
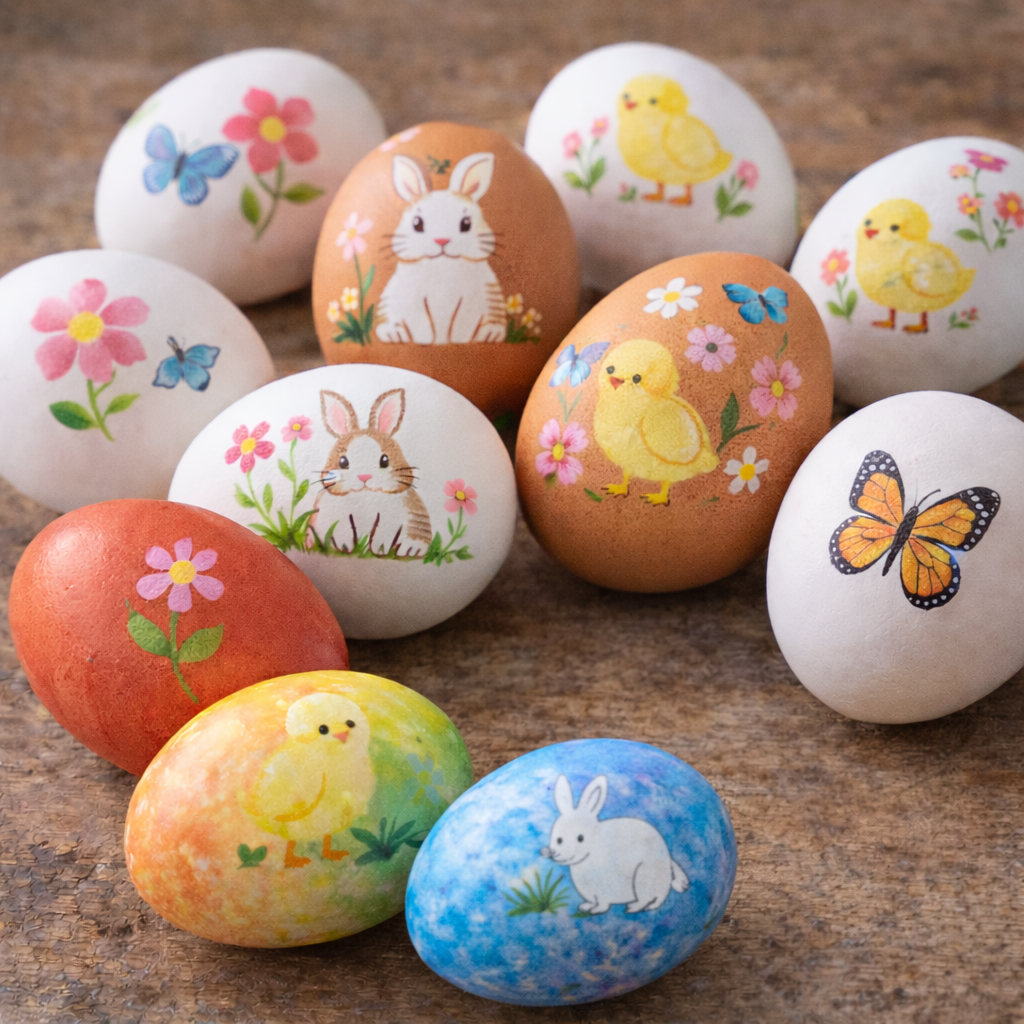
Supplies:
- Hard boiled eggs, dyed or undyed
- Small temporary tattoos in your choice of design
- Paper towels
- Water
Instructions:
1
Remove the protective plastic covering from the temporary tattoo and place it face down onto the egg.
2
Place a damp paper towel over the tattoo for a few minutes. Carefully peel away the towel and the tattoo’s paper backing, and admire the design on your egg!
Rice Dyed Easter Eggs
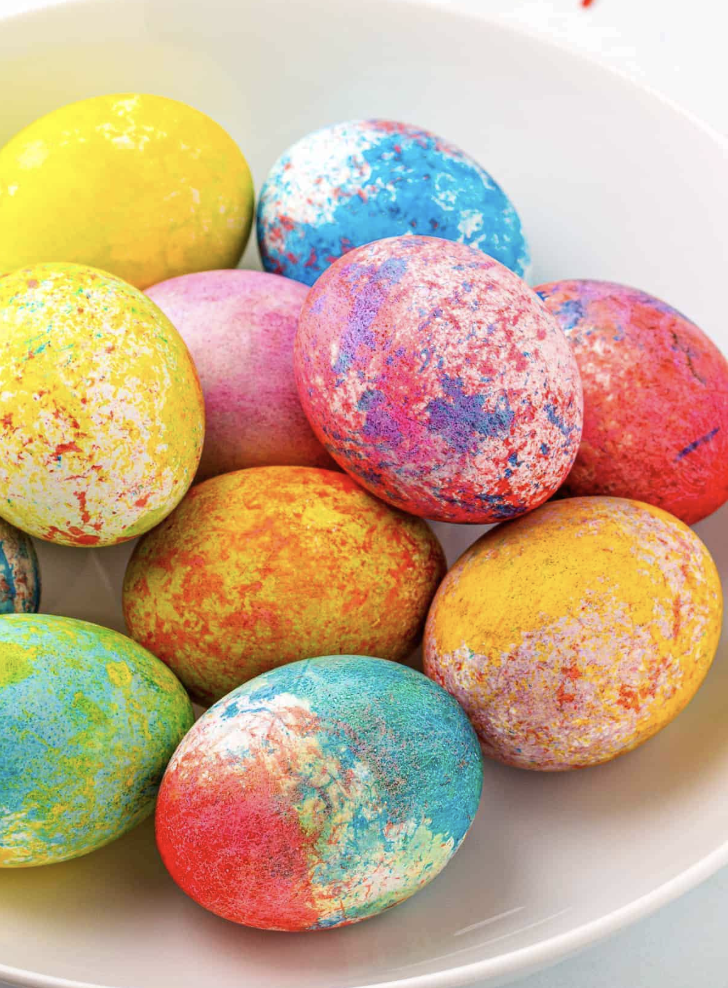
Supplies:
- Hard boiled eggs, undyed
- Dried rice
- Food coloring
- Disposable plastic zipper bags
Instructions:
1
Fill a plastic bag with about one cup of dry rice. Add 12-15 drops of food coloring, close the bag, and shake until the color is evenly distributed among the rice.
2
Open the bag and add an egg. Close the bag again, and shake gently until the egg is colored to your liking. (It should have an interesting speckled effect.) Remove the egg and set on a paper towel to dry.
3
Repeat with additional bags of rice in different colors until all your eggs are dyed. You may need to add more food coloring to the rice as you continue.
Sponge Painted Easter Eggs
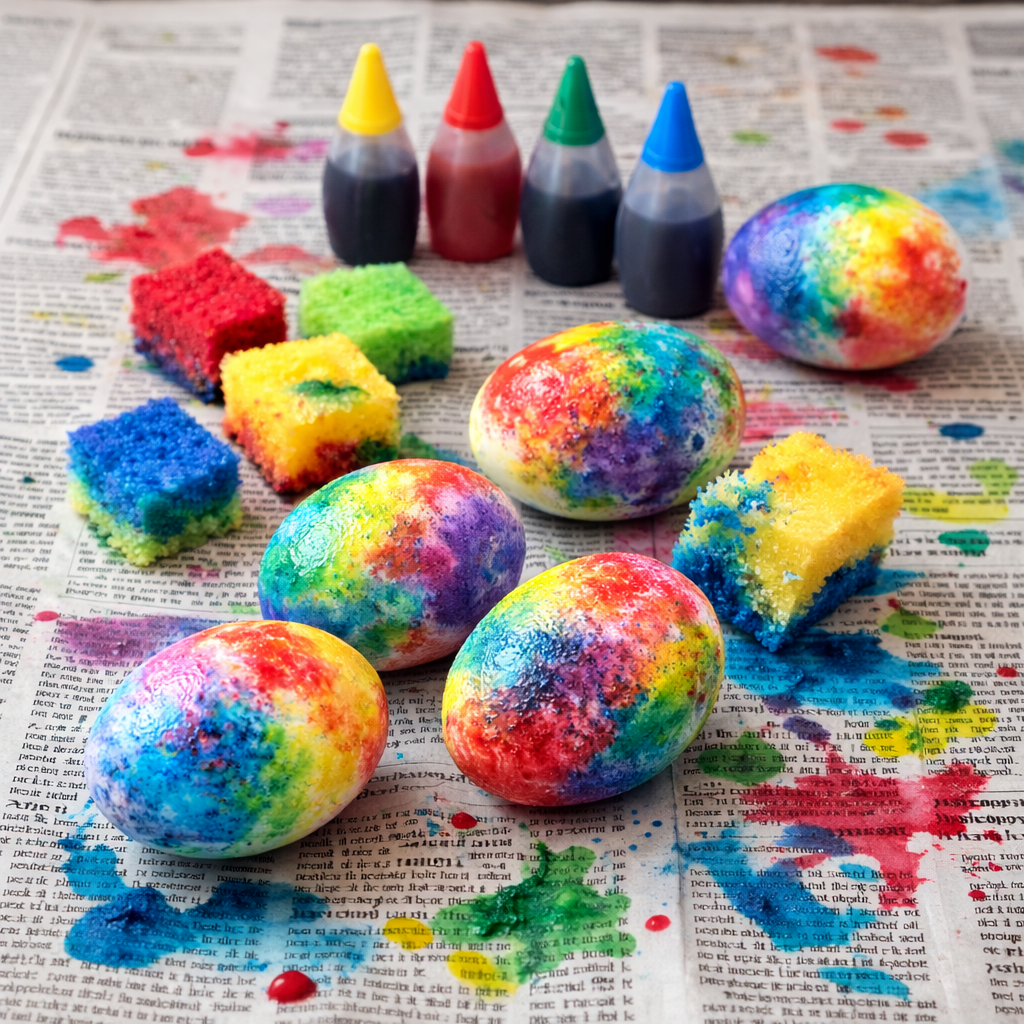
Supplies:
- Hard boiled eggs, undyed
- Food coloring
- Disposable gloves (optional, to protect fingers from becoming stained)
- Disposable sponge
- Scissors
- Plastic gloves
Instructions:
1
Cut the sponge into smaller pieces, one for each color you plan to use.
2
Put on your plastic gloves. Squeeze a few drops of food coloring onto a sponge piece. Sponge the dye onto an egg in any pattern you like.
3
Repeat with additional sponges and food colors. If you’d like to use multiple colors on one egg, let the first color dry completely before moving on to the next.
Edible Easter Crafts for Kids
Bunny House
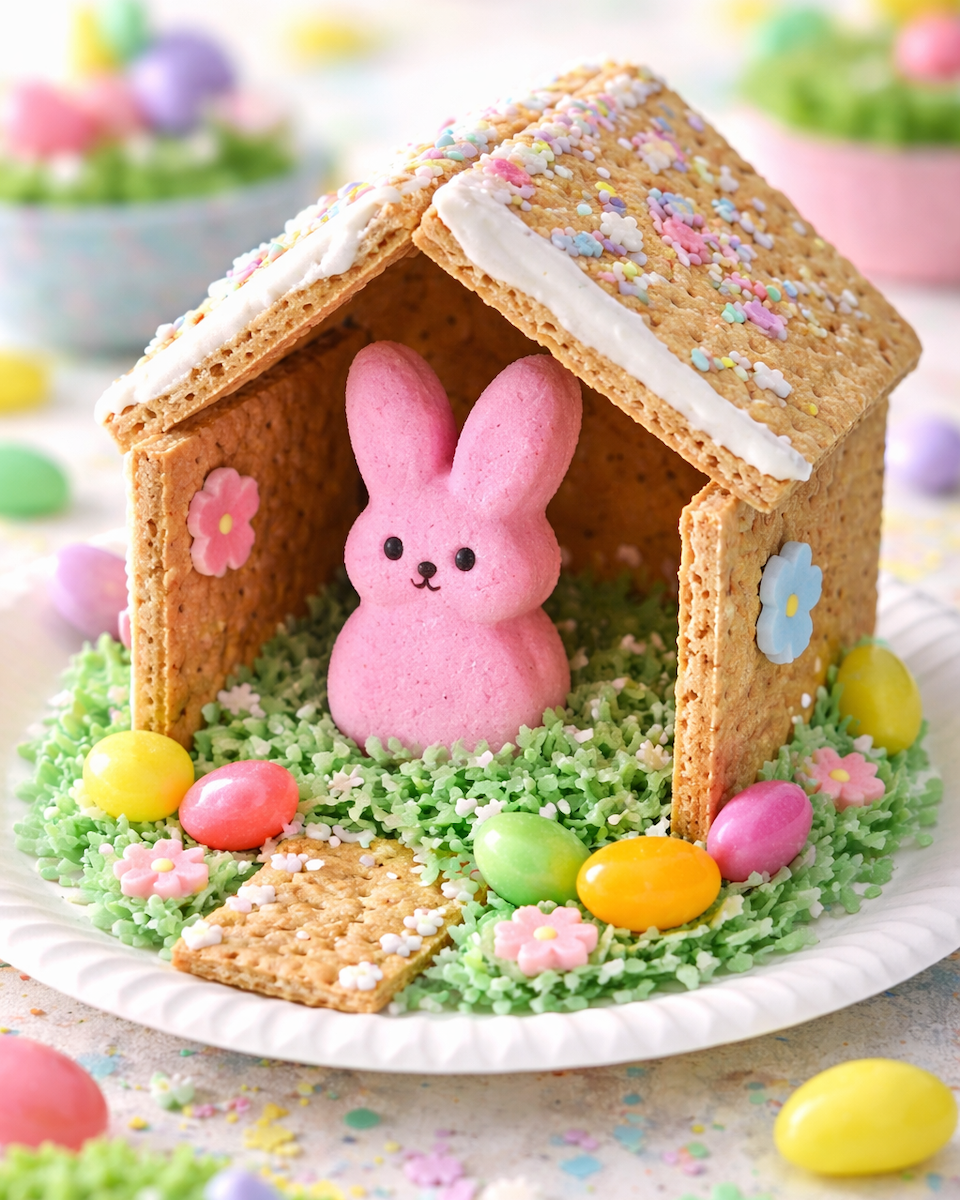
Supplies:
- Graham crackers
- Frosting
- Jellybeans and small candies for decorations
- Coconut, dyed green with food coloring (optional)
- Chocolate or marshmallow bunny
- Small paper plate
Instructions:
1
Use the graham crackers and frosting to build a simple house structure on the plate, with three walls and two slanted crackers for a roof. (Leave the fourth side open.)
2
Add decorations however you like, using dabs of frosting to stick them in place.
3
Add some coconut to the inside and outside of the house, and place your bunny inside!
Carrot Treat Bags
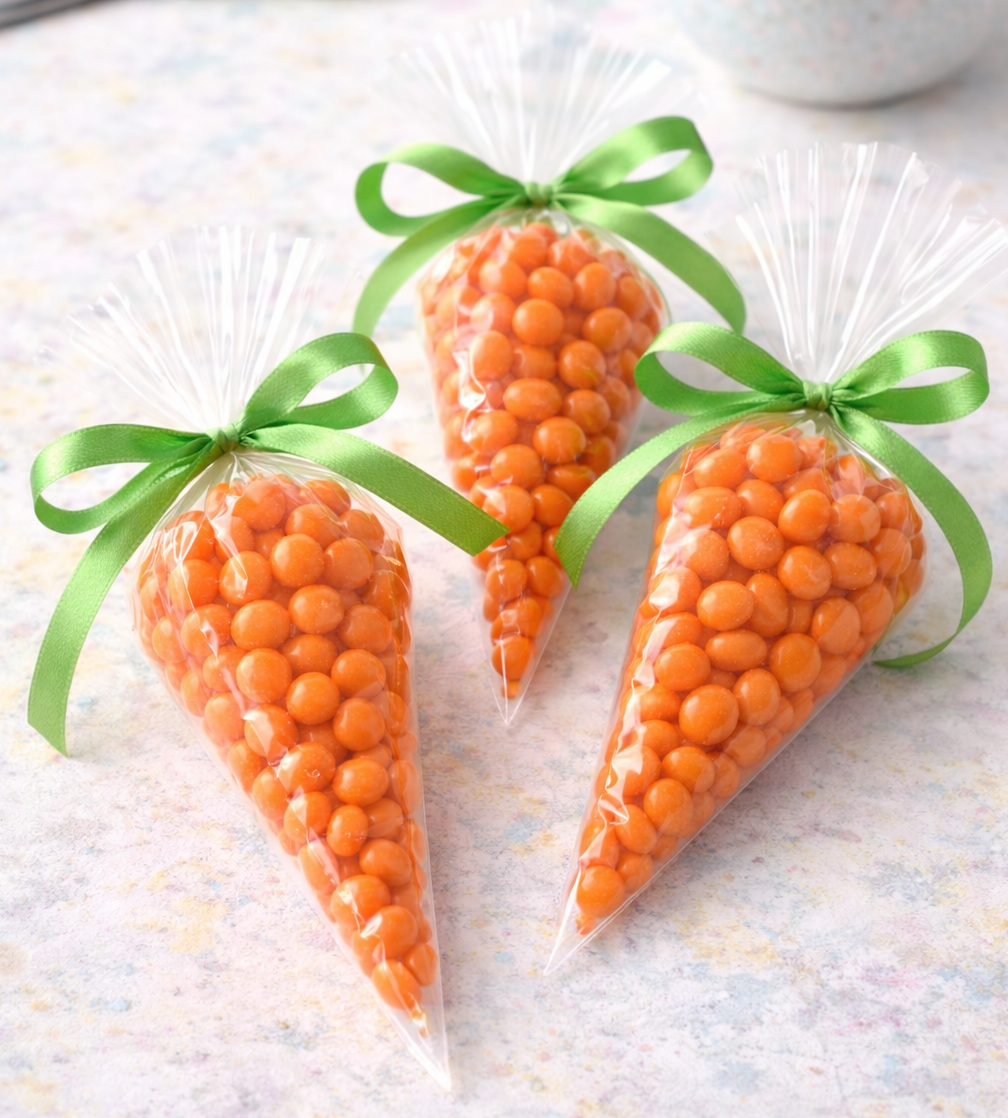
Supplies:
- Disposable plastic baggies
- Small orange candies like jellybeans
- Green ribbon
- Scissors
Instructions:
1
Pour some orange candies into one corner of the bag so it resembles a carrot.
2
Cut a piece of green ribbon and use it to tie off the bag. Trim the excess plastic and fluff the ribbon and bag edges to look like carrot tops!
Jelly Bean Skewers
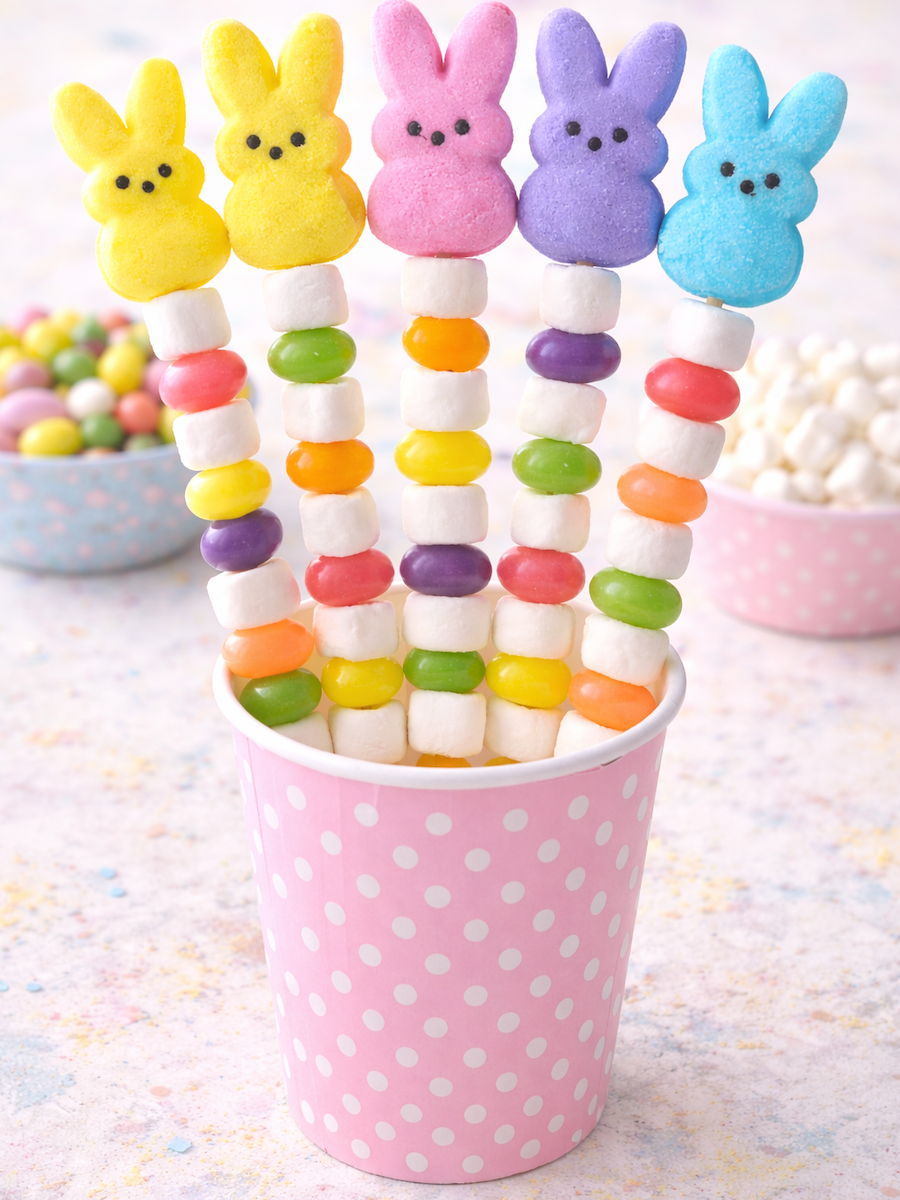
Supplies:
- Wood skewers
- Jelly beans
- Mini marshmallows
- Bunny-shaped marshmallows
Instructions:
1
Push jellybeans and mini marshmallows onto the skewers, creating fun patterns that you like.
2
Finish with a marshmallow bunny on the top. Display skewers on a plate or standing in a cup for guests to take and eat!
Chicks in Nests
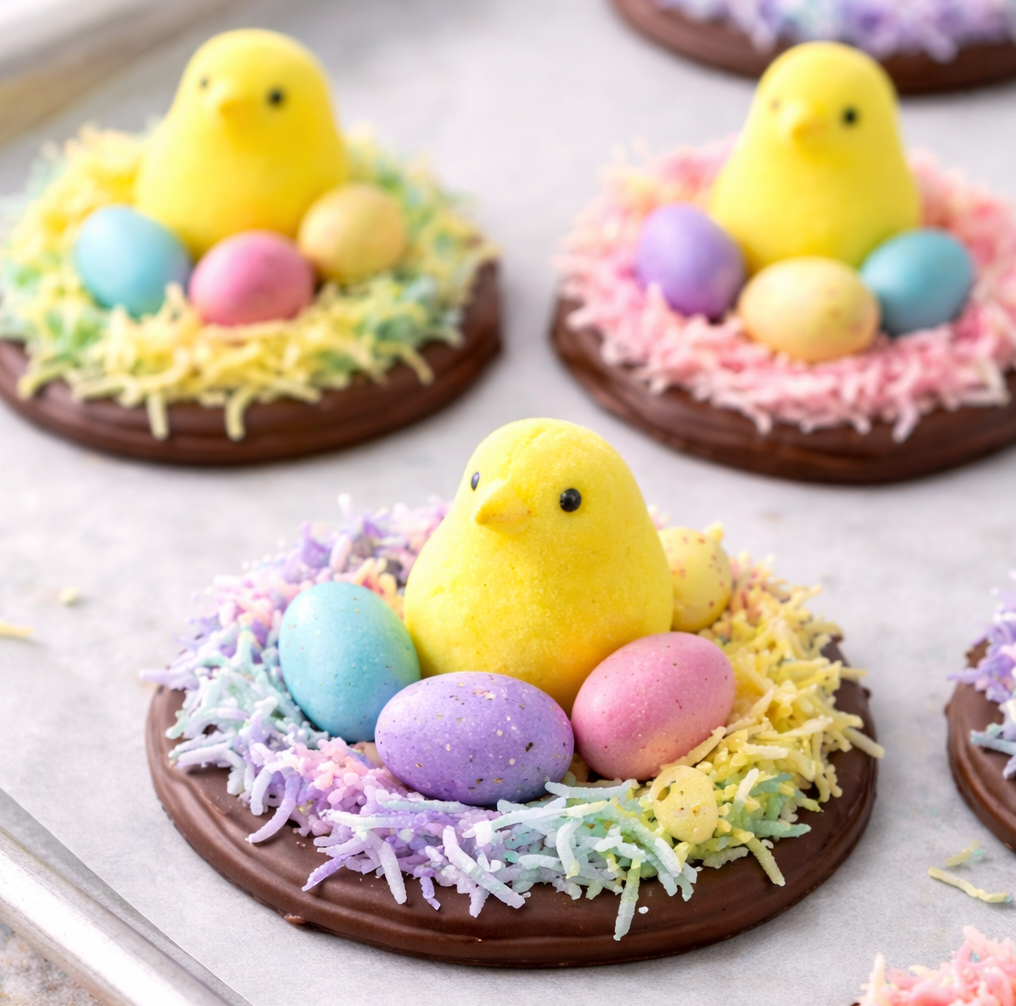
Supplies:
- Marshmallow chicks
- Coconut
- Chocolate eggs
- Food coloring
- Chocolate bar or melting wafers
- Wax paper
- Microwave-safe glass bowl
- Spoon
- Baking sheet
Instructions:
1
Color coconut in pastel colors of your choice by stirring it with a few drops of food coloring in a bowl. Lay out on wax paper to dry until you’re ready to use it.
2
Break the chocolate bar into pieces and place in the glass bowl (or use melting wafers). Microwave for 30 seconds at a time, stirring between until the chocolate is melted.
3
Spread a piece of wax paper on a baking sheet. Use the spoon to make small puddles of melted chocolate. Sprinkle coconut around the edges, and press a marshmallow chick in place in the middle. Add a chocolate egg or two to the nest too.
4
Chill until the chocolate is set, then peel your cute treats off the wax paper and enjoy!
Jelly Bean Bracelet
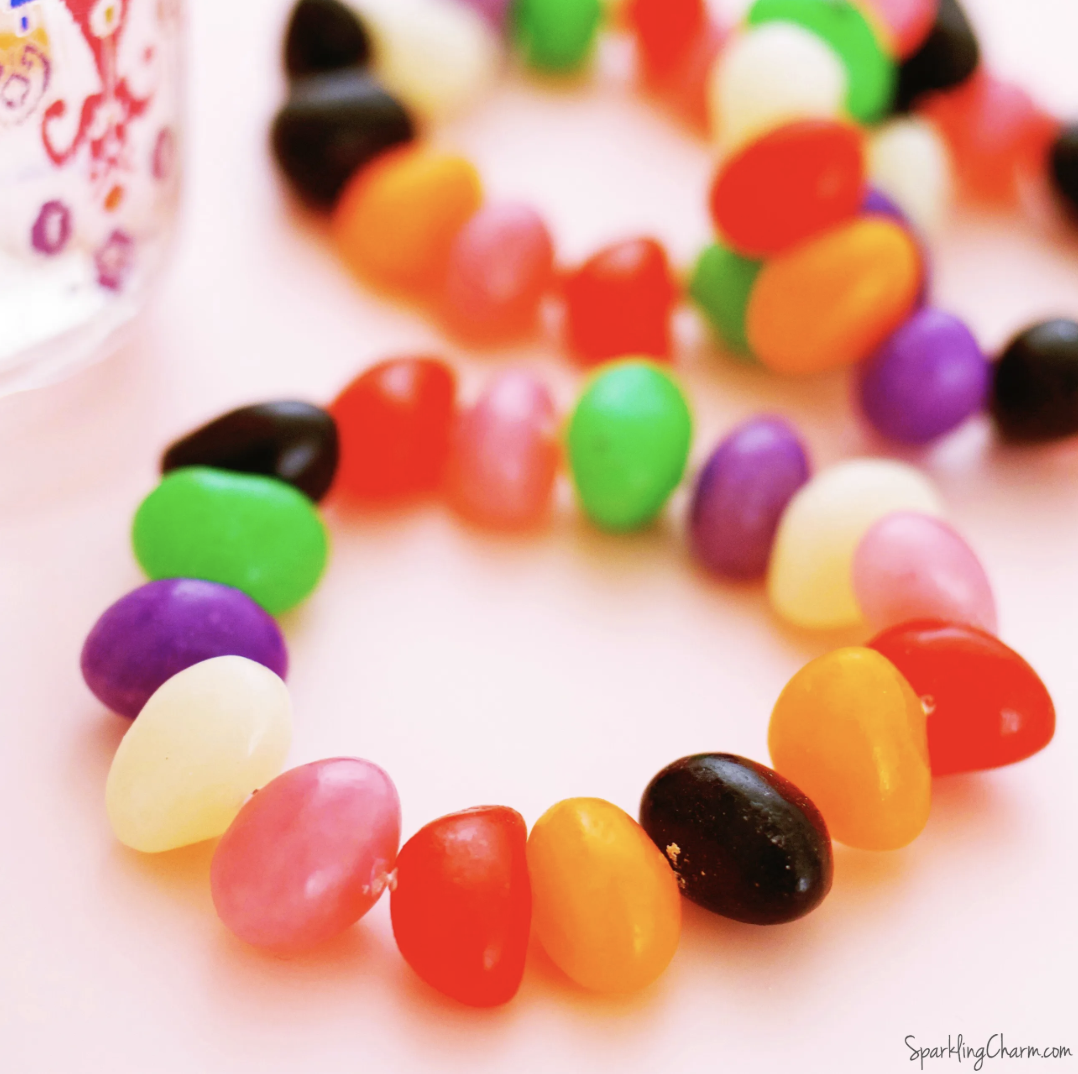
Supplies:
- Jelly beans (larger beans will be easier for younger kids to work with)
- Elastic cord
- Scissors
- Plastic yarn needle
Instructions:
1
Cut a piece of elastic cord about 10 inches long. Thread it through the yarn needle.
2
Carefully push the needle through a jelly bean, threading it onto the cord. This step requires adult supervision.
3
Repeat with additional jelly beans until your bracelet is the desired length. Knot the elastic cord twice, then trim the excess.
Chocolate Dipped Chicks or Bunnies

Supplies:
- Marshmallow chicks or bunnies
- Sprinkles or other candy decorations
- Chocolate bar or melting wafers
- Wax paper
- Microwave-safe glass bowl
- Spoon
- Baking sheet
Instructions:
1
Break the chocolate bar into pieces and place in the glass bowl (or use melting wafers). Microwave for 30 seconds at a time, stirring between until the chocolate is melted.
2
Spread a piece of wax paper on a baking sheet. Pour sprinkles or other decorations into a shallow dish.
3
Dip the bottom inch or so of each marshmallow into the melted chocolate, then into the sprinkles or other decorations. Set the marshmallows on the prepared baking sheet. Chill until the chocolate is set, then peel off the wax paper and sample your yummy Easter craft!
DIY Easter Basket Crafts for Kids to Make
Egg Carton Photo Bunny Basket
Supplies:
- Egg carton
- Yarn
- Fork
- Photos
- Pipe cleaners
- Craft paint and brush
- Scissors
- Glue
Instructions:
1
Cut apart the egg carton to create individual small “baskets.” Paint the baskets any color you like, and let them dry.
2
Poke a hole in either side of a basket, and use a pipe cleaner to form a handle as shown.
3
Follow the instructions in the video to use the yarn and fork to make two pom poms in your choice of color.
4
Glue the two pom poms together. Add pipe cleaner bunny ears to the top pom pom, and glue the face photo to the front. When the glue is dry, place your bunny in the basket and display!
Terra Cotta Bunny Basket
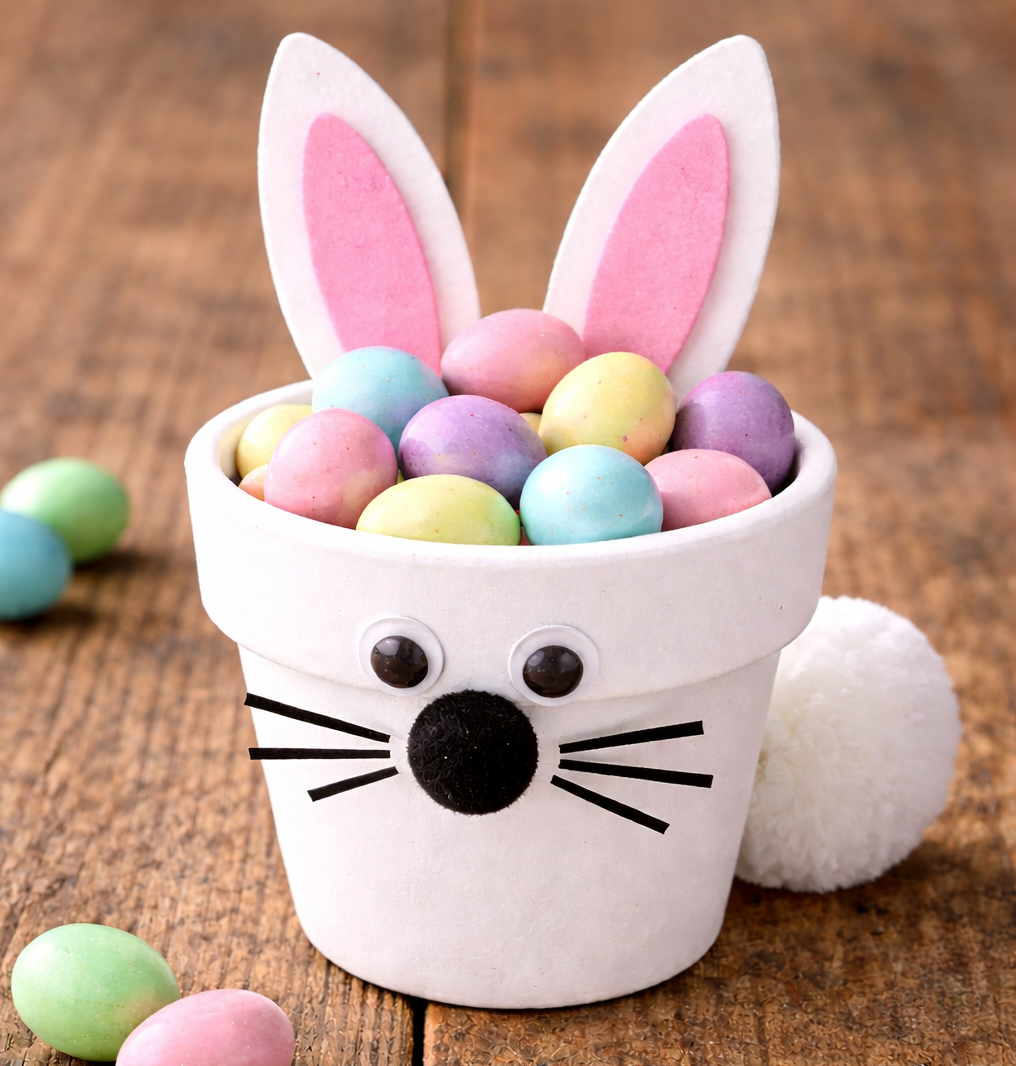
Supplies:
- Small terra cotta pot
- White craft paint and brush
- Black and white pom poms
- White, black, and pink construction paper or craft foam
- Googly eyes
- Glue
Instructions:
1
Paint the pot white and let it dry.
2
Cut two white ears from construction paper or craft foam. Add smaller pink accents to the ears, then glue them in place on the top rim of the pot.
3
Glue the googly eyes and black pom pom nose to the front, and the white pom pom tail to the back. Glue on black whiskers (or draw or paint them on). Fill your pot with treats for someone you love!
Paper Bag Bunny Basket
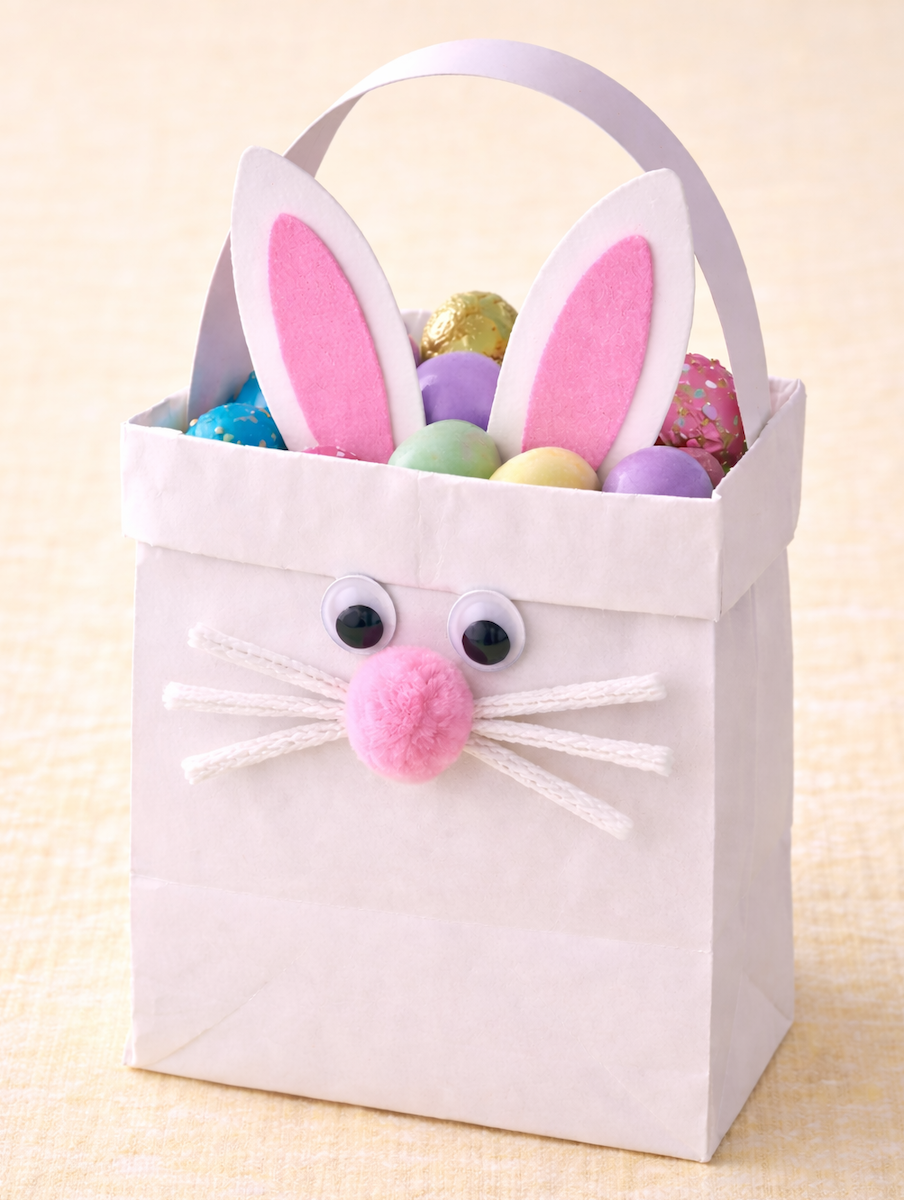
Supplies:
- White paper lunch bag
- White construction paper
- White and pink foam (or card stock)
- Googly eyes
- Pipe cleaners
- Pink pom pom
- Scissors
- Glue
Instructions:
1
Open the paper bag. Carefully fold the top edge outward and downward, make a sharp crease. Repeat several times until the bag is your preferred height.
2
Cut a strip of white construction paper for a handle, and glue it in place.
3
Cut two rabbit-ear shapes from the white foam pieces and smaller pink accent pieces. You can also use card stock for this step. Glue the pink pieces to the inside of the white pieces, creating the bunny’s ears.
4
Attach the googly eyes. Twist three pipe cleaners together in the middle to form whiskers. Glue them in place beneath the eyes with the pink pom pom nose on top.
5
Fill the bunny bag with candy or snacks, then stick the foam bunny ears into the bag, using the candy pieces to help hold them up. You can also glue the ears to the bag.
Coffee Filter Flowers Basket
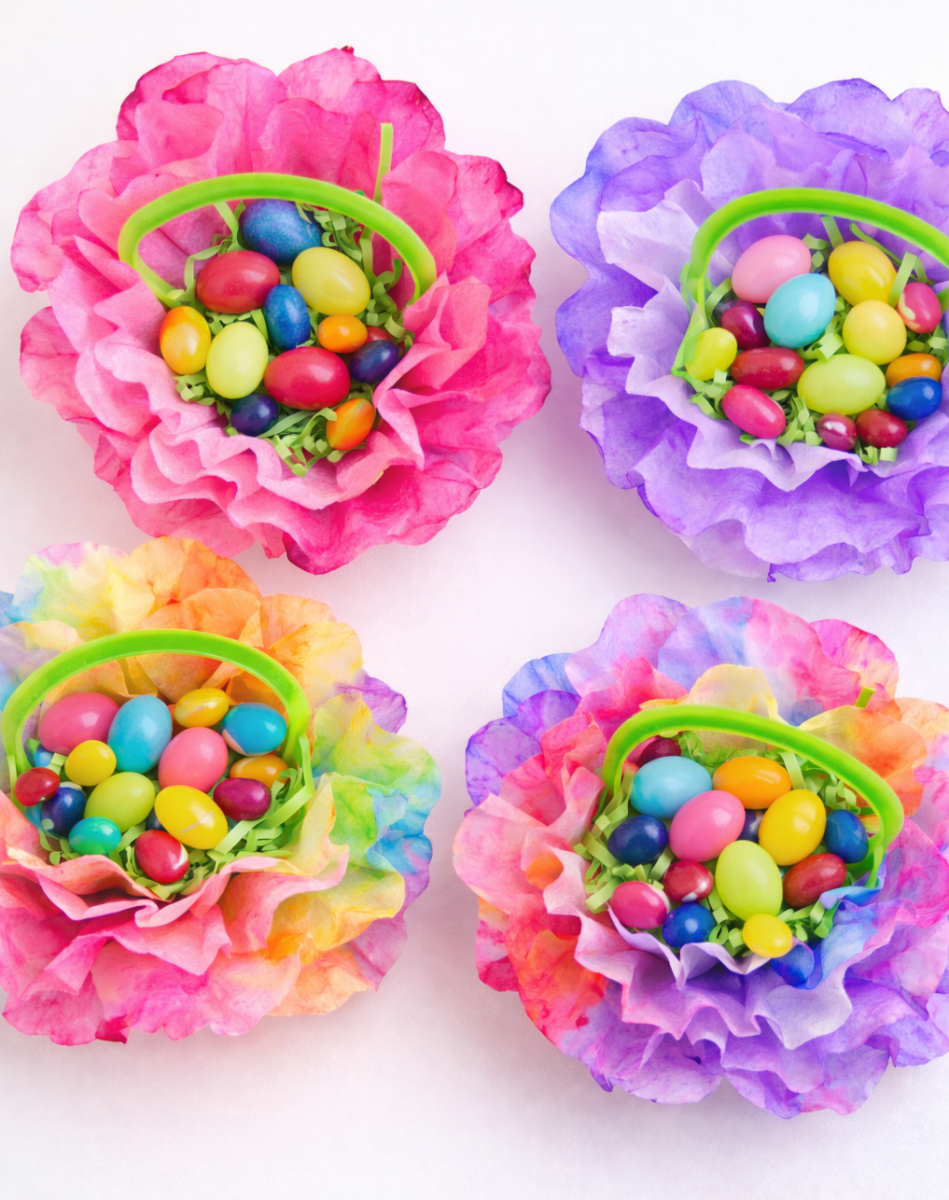
Supplies:
- Coffee filters
- Markers
- Water in a spray bottle
- Scissors
- Glue stick
- Paper plates (to protect work surface)
Instructions:
1
Stack four coffee filters together. Fold them in half, then in half again. Trim around the top edges to create a petal shape when the filters are opened again.
2
Spread each filter out on a plate. Color the filters with markers, scribbling randomly in a mix of colors. Leave some white space between colors for the best effect.
3
Spray each coffee filter with water, letting the colors blend and bleed into each other. When you’re happy with the results, leave the filters to dry completely.
4
Stack the four filters, turning each one slightly to create a fuller, more flower-like look. Glue each layer together. Fill your flower basket with a few treats like small candies for a beautiful Easter display.
Easter Egg Crafts for Kids
Plastic Egg Maracas Craft
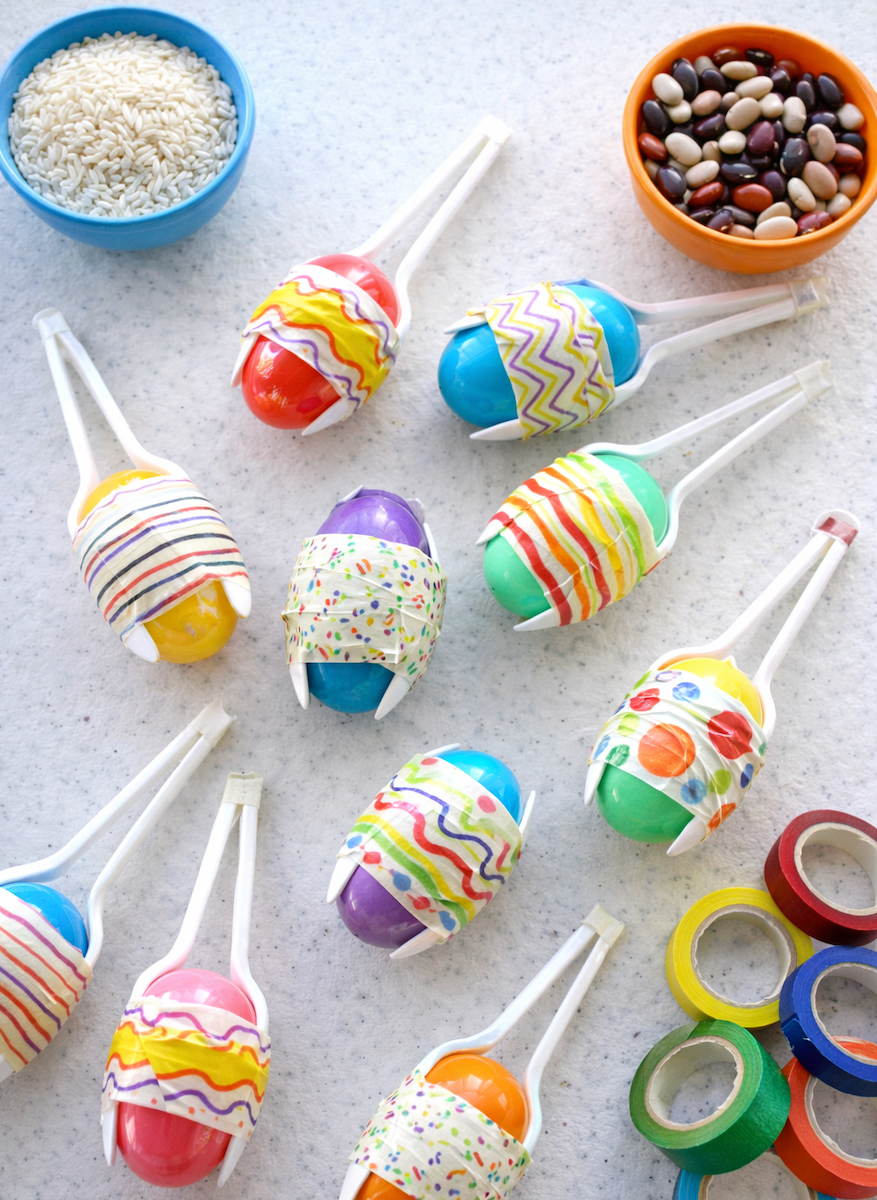
Supplies:
- Plastic Easter eggs
- Plastic spoons
- Dried rice and/or beans
- Washi tape or colorful duct tape
Instructions:
1
Fill each egg with a few beans or a spoonful of rice, and click them closed.
2
Place two spoons around the egg, one on either side. Use the washi tape or duct tape to hold them in place.
3
Wrap the tape around the spoon handles to hold them together. Your maracas are ready to shake, shake, shake!
Potato Stamp Eggs
Supplies:
- Raw potatoes, cut in half
- Plastic knife
- Craft paints
- Paper plate
- Plate
- Paper towels
Instructions:
1
Use the plastic knife to cut designs into the potato halves to create stamps.
2
Squirt some craft paint onto a paper plate. Dip the potato stamp into the paint, then press it onto the paper.
3
Wipe the stamp clean with a paper towel, and repeat with different paint colors.
Plastic Egg Circle Painting Craft
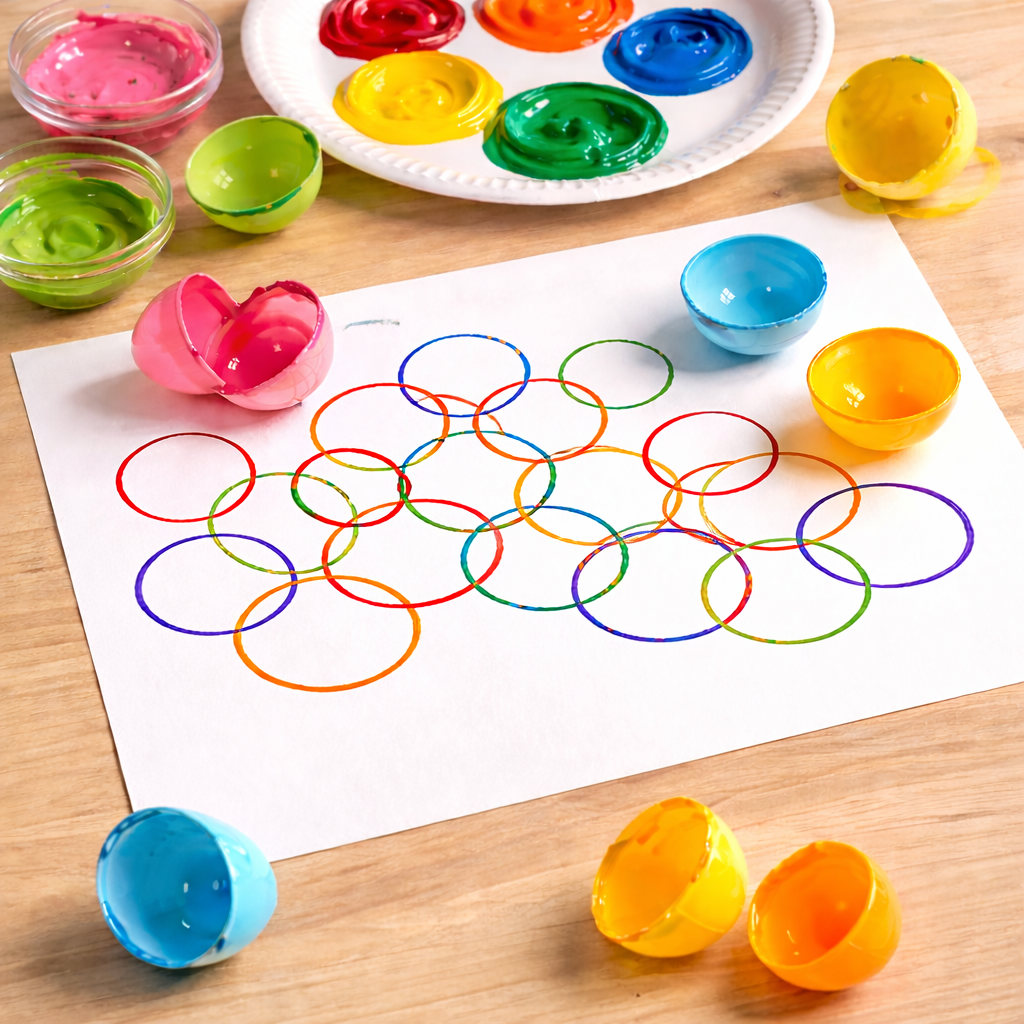
Supplies:
- Plastic Easter eggs
- Craft paint in a variety of colors
- Small disposable plates
- Plain white paper
Instructions:
1
Spread a little of each color of paint onto each plate, and lay out the plain white paper.
2
Open an egg and dip the open end of one half into the paint. Press it carefully onto the white paper to create a circle.
3
Repeat with other colors of paint, using different egg halves for each color. Have fun creating all sorts of interesting designs and patterns!
DIY Egg Tree
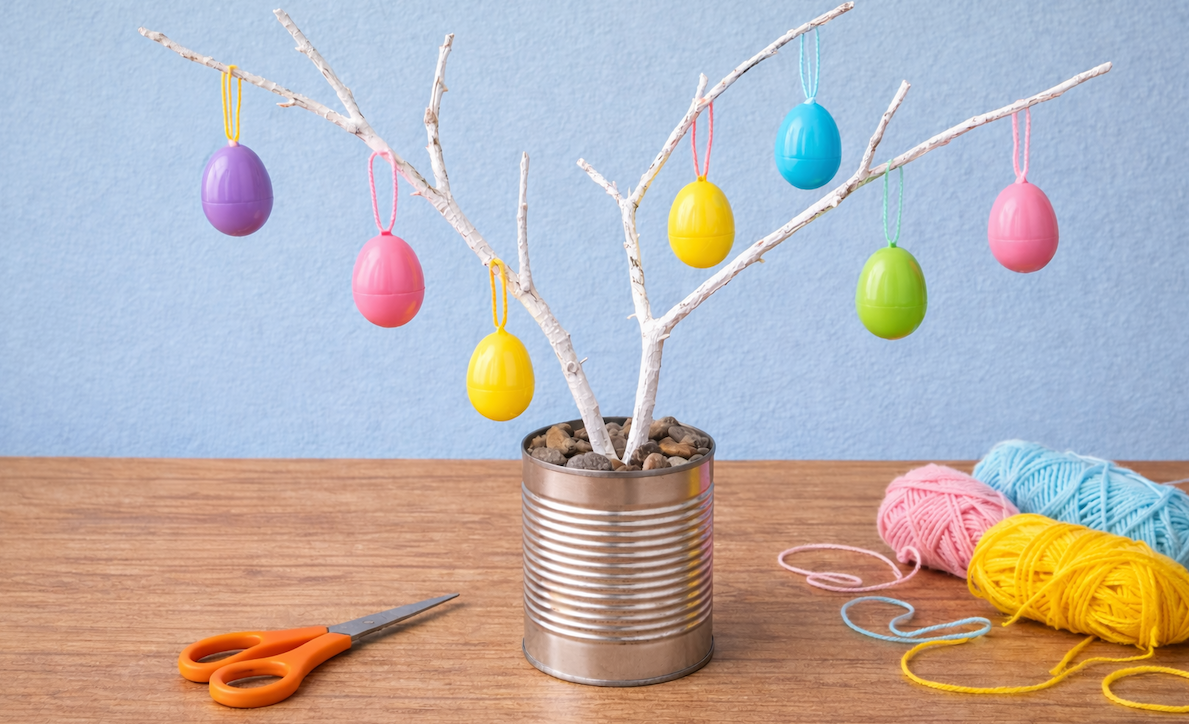
Supplies:
- Tree branch
- White paint and brush
- Empty tin can
- Rocks
- Plastic eggs
- Yarn or ribbon
- Hot glue
- Scissors
Instructions:
1
Paint the tree branch white and let it dry. Then, fill the can with rocks, using them to prop up and support the tree branch.
2
Cut lengths of yarn or ribbon and tie them into loops. Use the hot glue to attach the yarn loops to the top of the eggs. Have an adult do this step.
3
Hang your eggs from your tree! If you like, you can fill the eggs with treats for others to take and enjoy.
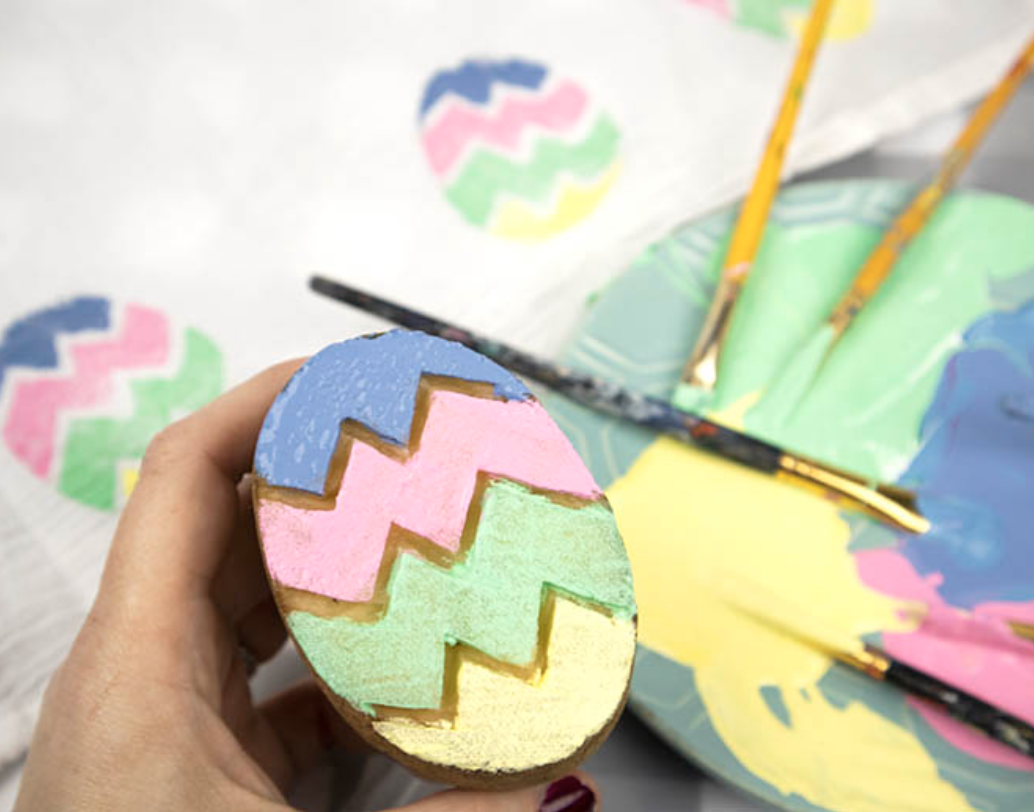
DIY Egg Tree
Supplies:
- Oval river rocks
- Craft paints and brushes
- Clear sealer spray (optional)
Instructions:
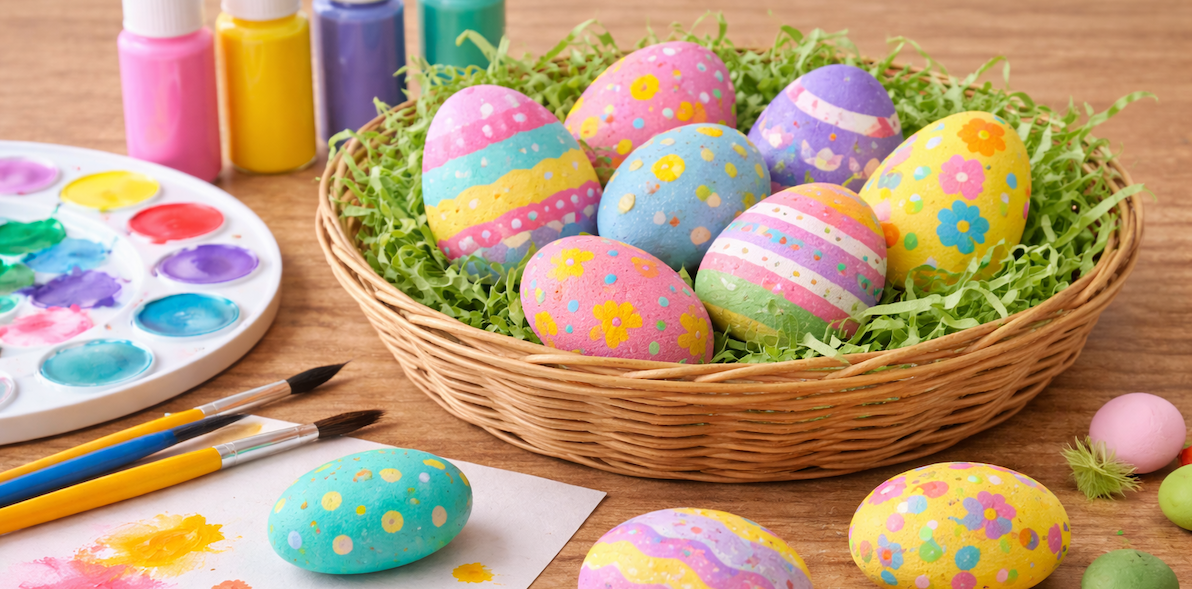
Paint the rocks to look like Easter eggs, with stripes, dots, flowers, and other patterns. If you’d like to display your rocks outdoors, seal them with a coat of clear spray first.
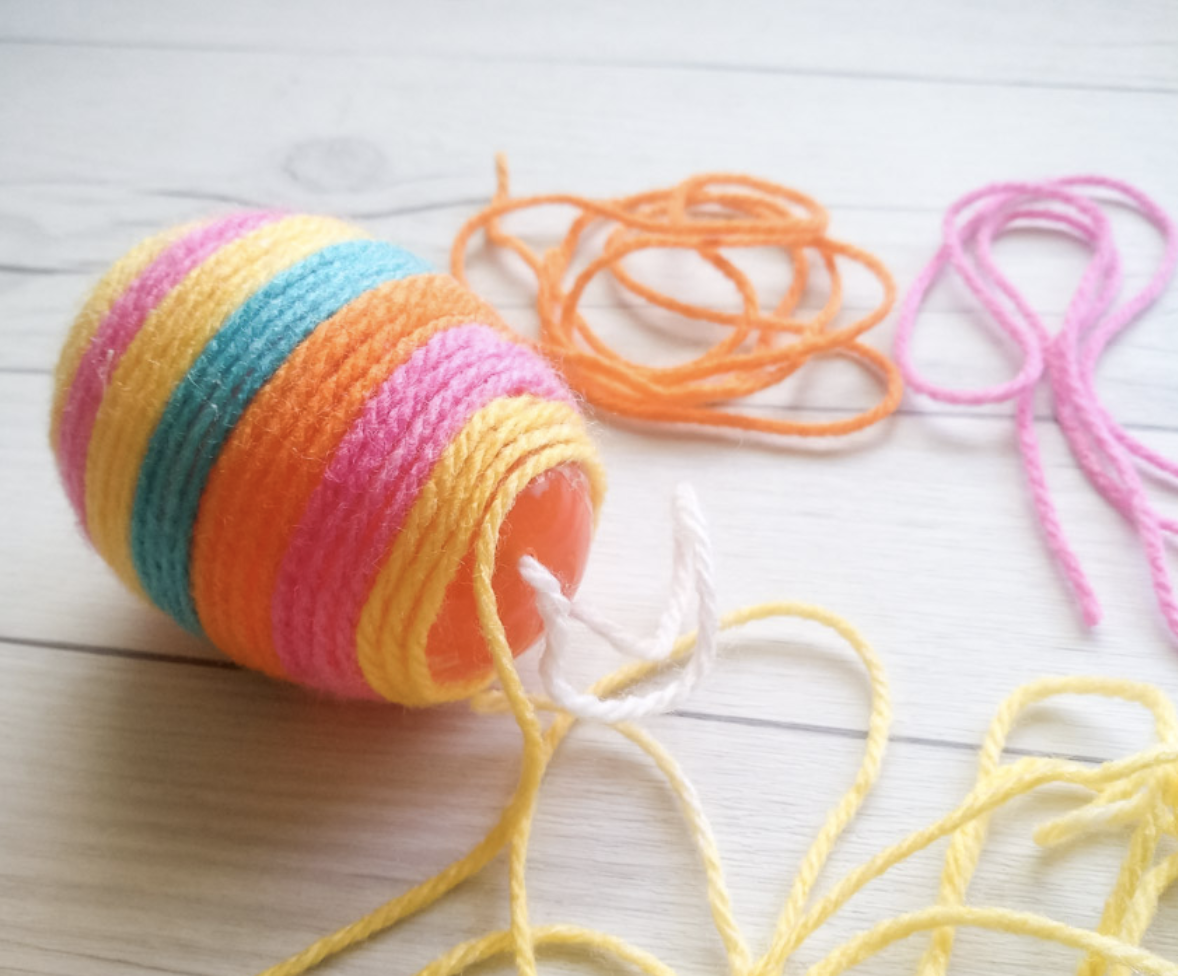
Yarn Wrapped Eggs
Supplies:
- Plastic eggs
- Yarn in your choice of colors
- Glue
- Scissors
Instructions:
1
Spread a thin layer of glue over an egg. Before the glue dries, begin wrapping yarn around the egg. Change colors every so often to create stripes. Add a loop of yarn at one end for a hanger.
2
Let your eggs dry, then display!
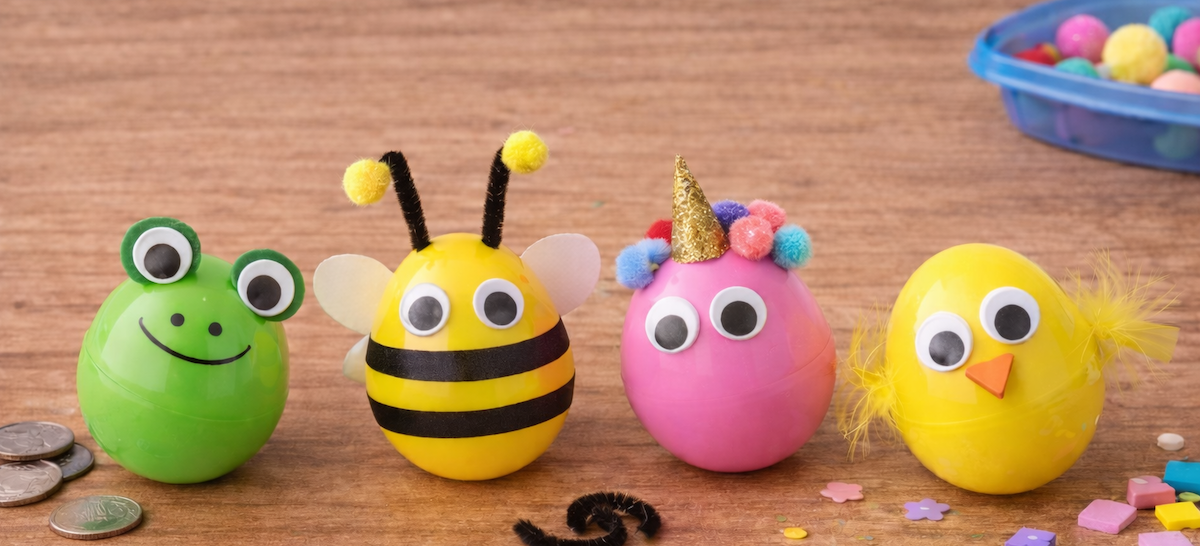
Wobbly Egg Characters
Supplies:
- Plastic eggs
- Googly eyes
- Playdough or modeling clay
- Weights such as nickels, nuts, or other small heavy items
- Embellishments like stickers, feathers, pipe cleaners, etc.
Instructions:
1
Open an egg and put a small amount of playdough or modeling clay in the bottom of the round half. Press a few nickels, nuts, or other weights into the dough, and close the egg. It should now stand upright, wobbling when you poke at it.
2
Decorate each egg with googly eyes and other embellishments. You could use black tape stripes, pipe cleaner antennae, and paper wings to make a bee; or, add an orange paper beak and yellow feather wings to make a baby chick.
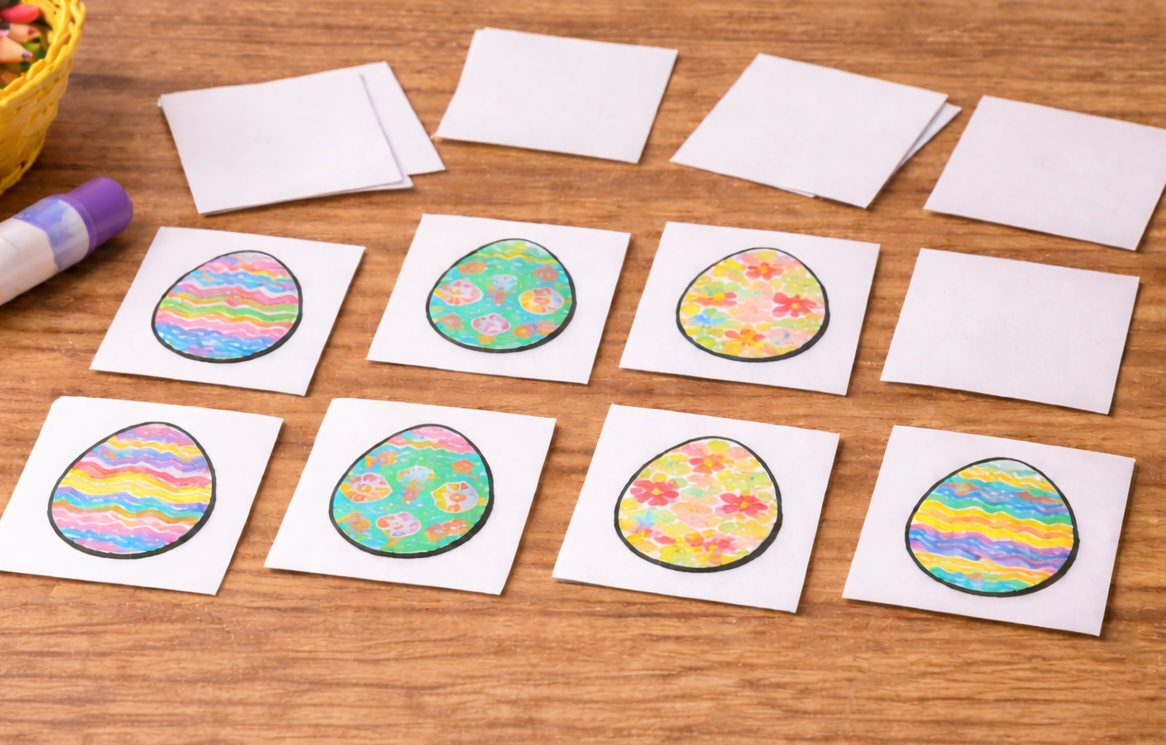
Easter Egg Matching Game
Supplies:
- 6 Eggs to Color coloring page from ABCmouse (at least 2 copies)
- Notecards
- Crayons or markers
- Scissors
- Glue stick
Instructions:
1
Color the eggs so you have matching pairs. You can make as many pairs as you like. Then cut out the eggs and glue one to each notecard.
2
To play, shuffle the cards and lay them out face down. Players take turns flipping two cards to see if they match. If they do, the player keeps them; if not, they turn the cards face down again and play passes to the next player. When all the matches have been claimed, the player with the most cards wins!
Plastic Egg Cupcakes
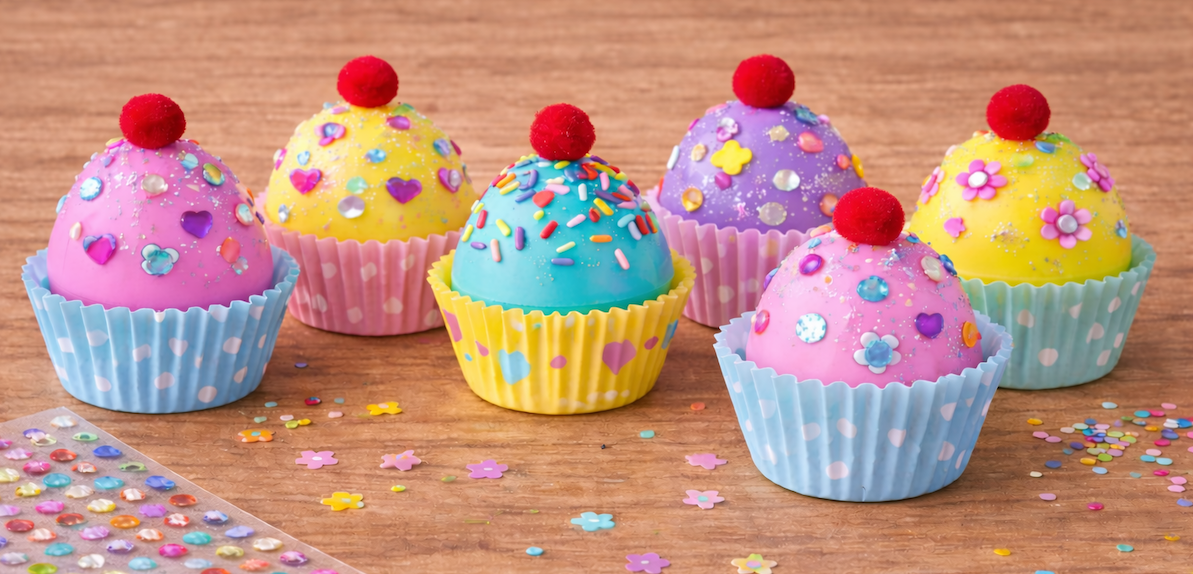
Supplies:
- Large plastic eggs
- Cupcake wrappers
- Embellishments like stickers, sprinkles, glitter, and pom poms
- Glue
Instructions:
1
Break each egg open. You’ll only need the rounded end for this craft. Set each rounded egg half into a cupcake wrapper, open side down.
2
Decorate the “cupcake” with embellishments like stickers, glitter, adhesive gems, etc. Finish with a red pom pom “cherry” on top!
More Easter Activities for Kids
Easter Jokes & Riddles
These family-friendly jokes are great for celebrations or getting a few giggles during dinner.
Easter Bingo
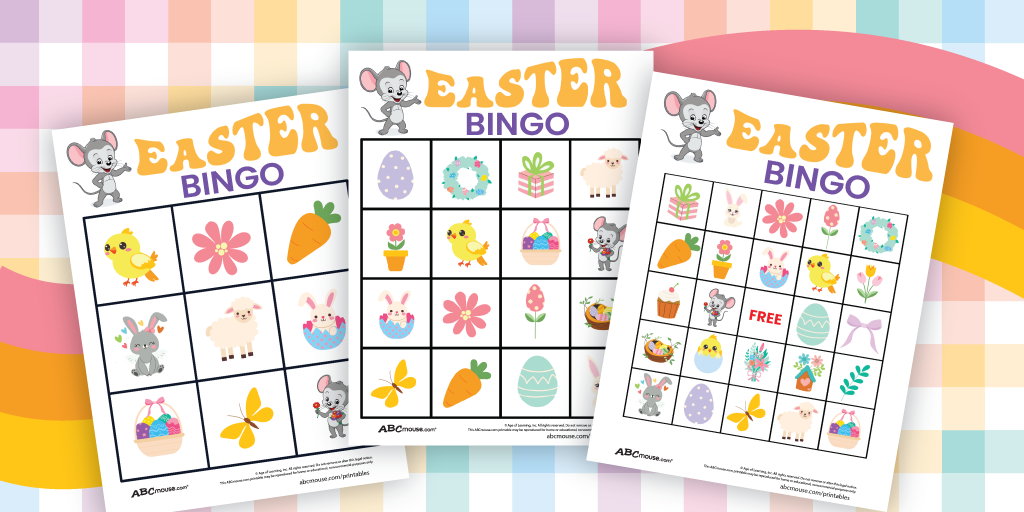
Whether playing with classmates, friends, or family members, Bingo adds an extra element of fun to Easter.
Easter Poems to Read with Kids
Seasonal poems bring a fresh spin to reading practice and can be enjoyed before bedtime…or anytime!
Legal Disclaimer: Any links to third-party resources are provided for informational purposes only. We are not affiliated with and do not sponsor/endorse these third parties and bear no responsibility for the accuracy of content on any external site.
Check out more activities from ABCmouse…
-

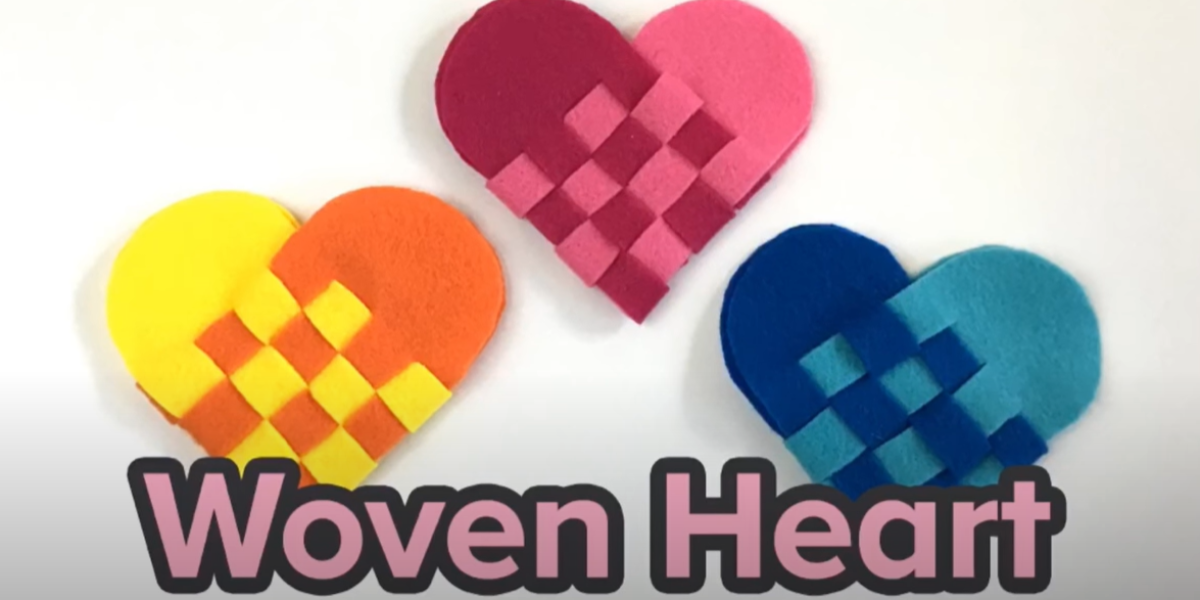
Woven Heart Craft for Kids
Make Valentine’s Day special with a woven heart craft for kids. This guide shows how to create colorful hearts with paper or felt, perfect for filling…
-

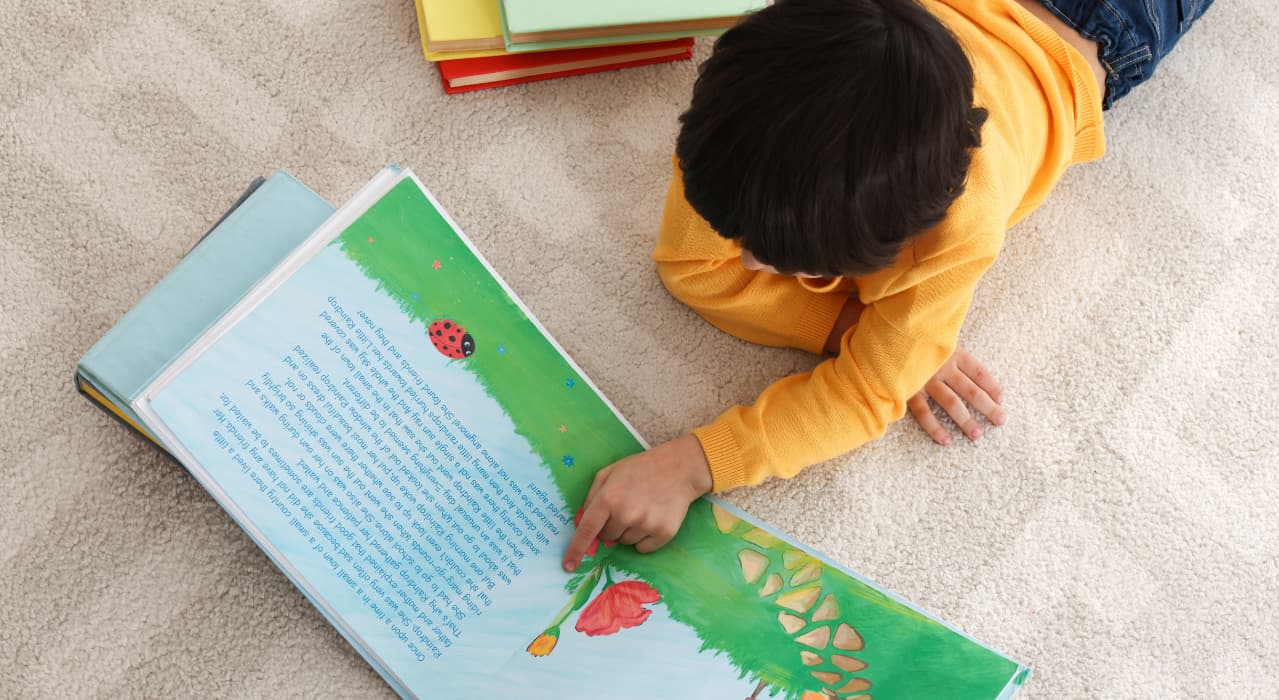
50+ PreK and Kindergarten Phonics Activities for Young Readers
Explore over 50 fun, effective phonics activities for PreK and Kindergarten! This collection features active games, online tools, printable worksheets, and hands-on ideas designed to build…
-

Heart Animals Valentine’s Day Craft for Kids
Celebrate Valentine’s Day with heart-shaped animal crafts kids can make with paper, scissors, and glue! From puppies to butterflies, these easy and fun crafts are perfect…
-

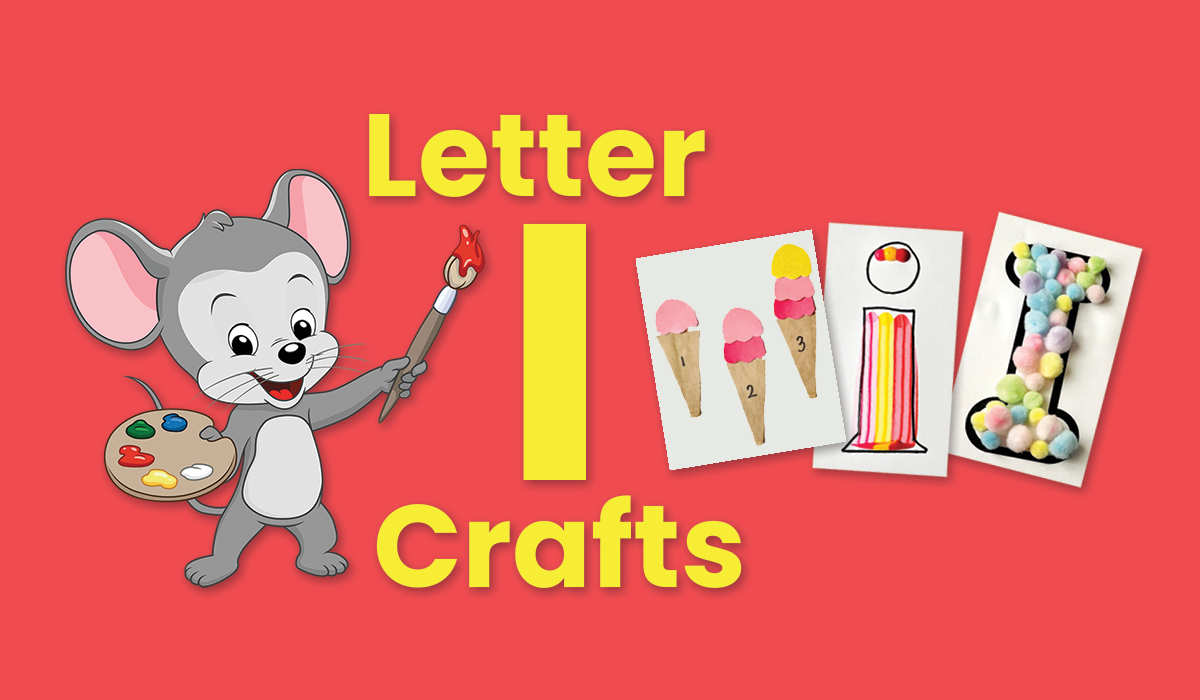
Letter I Crafts and Activities
Explore fun, hands-on letter I crafts and activities for preschoolers! From igloo stamping to ice painting, these creative ideas teach letter recognition and sounds through engaging…
-
Letter H Crafts and Activities
Explore hands-on letter H crafts and activities perfect for preschoolers! From bubble painting to horse-building, these projects introduce the shape and sound of H through engaging,…
-

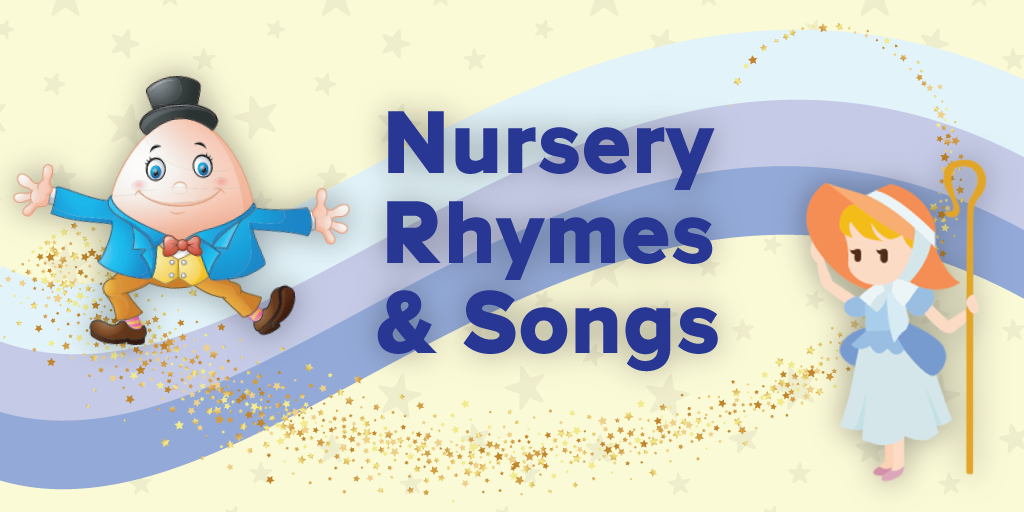
100+ Nursery Rhymes and Song Lyrics for Toddlers and Preschoolers
Explore 100 fun nursery rhymes and song lyrics for kids from ABCmouse, including classic and educational tunes to inspire young learners. Perfect for playtime, sing-alongs, and…