70+ Fun Christmas Crafts and Holiday Activities for Kids
Share
Celebrate the season with Christmas cheer for the whole family! From silly games to tasty and giftable crafts, free printables, and joyful holiday songs, there’s something fun for everyone—kids and grown-ups alike!
Table of Contents – Click to Jump to Each Category
Add even more fun to the holidays with a wide variety of seasonal activities, including Christmas crafts that are simple, giftable, edible or just for decoration. You’ll also find hilarious jokes, free Christmas Bingo cards (plus other merry-making games), and festive coloring pages, all designed for kids and families to enjoy together.
From preschoolers to adults, kids of all ages will find creative ways to celebrate the season and enjoy some laughter and cheer together!

More Holiday Fun! Check out our coloring pages and craft ideas to help you celebrate or learn more about Kwanzaa and Hanukkah.
Giftable Holiday Crafts
Homemade Christmas crafts often turn into treasured keepsakes. Pick a few to make, and hand them out to teachers, neighbors, friends, and family.
Melted Crayon Ornament
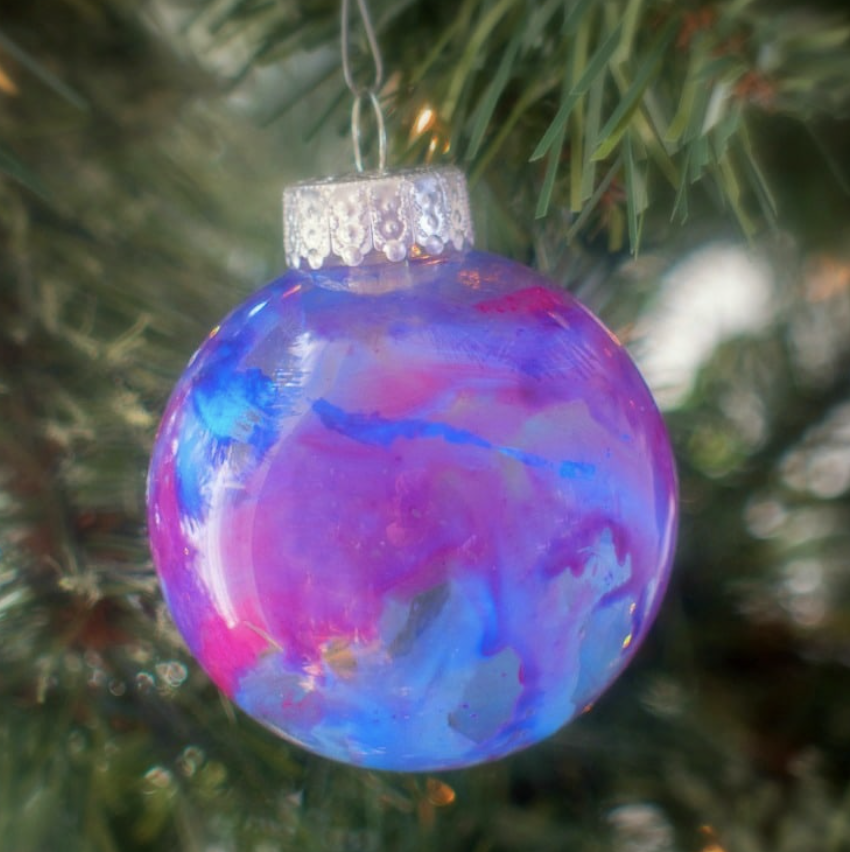
Supplies:
- Fillable clear glass ornaments
- Old crayons, broken apart
- Hair dryer
- Pliers
Instructions:
1
Remove the tops from the ornament. Place several small pieces of broken crayon into the ornament. (Start with just a few; you can add more if needed.)
2
Hold the ornament carefully by the neck using the pliers. Use the hair dryer to melt the crayon pieces, turning the ornament carefully and slowly to create swirled patterns.
3
When you’re satisfied with the design, turn off the hair dryer and let the ornament cool. Replace the top, and it’s ready to display.
Paint Chip Tree Cards
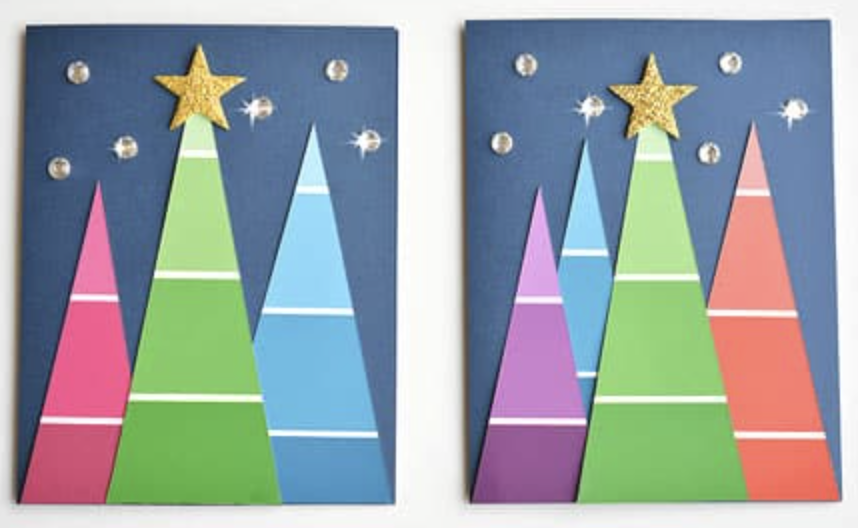
Supplies:
- Paint chip samples in your choice of colors
- Card stock
- Star stickers
- Gem stickers
- Scissors
- Glue
Instructions:
1
Fold the card stock in half to create a card. Cut various sizes of triangles from the paint chips as shown.
2
Arrange the paint chips on the front of the card, and glue them in place. Add a star sticker to the top of the tallest tree.
3
Add gem stickers to represent stars or snow. Write your message inside!
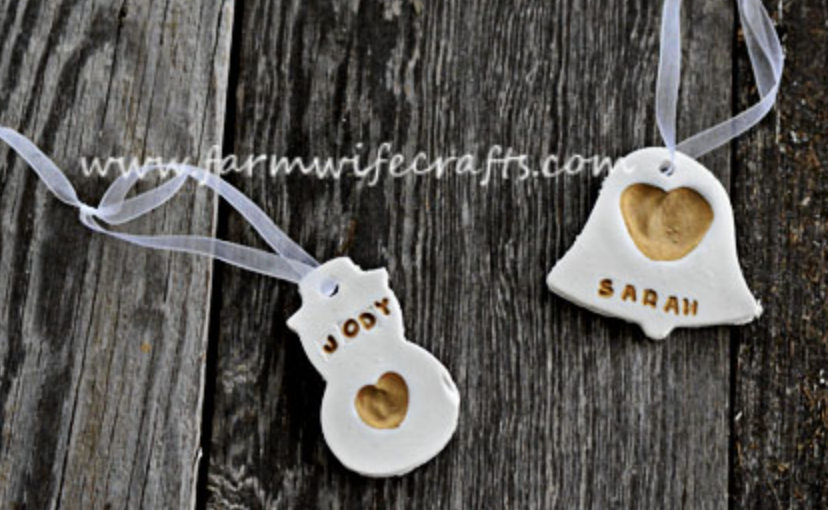
Thumbprint Christmas Ornament
Supplies:
- Christmas cookie cutters
- Air dry clay
- Rolling pin
- Letter/number stamps
- Gold paint pen or gold paint and small brush
- Drinking straw
- Ribbon
- Clear acrylic sealer
Instructions:
1
Roll out the clay about ¼ inch thick, cut desired shapes from the clay, and remove extra.
2
Press two thumbprints into the clay in the middle, forming a heart shape as shown.
3
Use the drinking straw to poke a hanging hole near the top and the letter/number stamps to add your child’s name and year. Dry the clay according to package directions.
3
Use the gold paint pen or paint and small brush to fill in the heart and accent the letters/numbers. Let it dry. Spray lightly with sealer and allow to dry, then add a ribbon hanger.
Santa Ball Ornament Craft
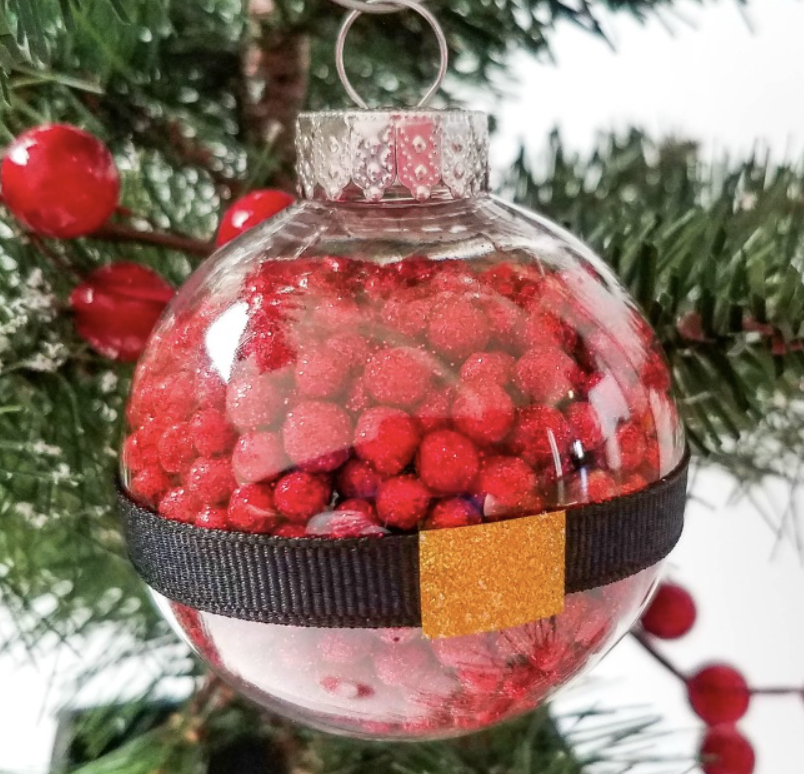
Supplies:
- Fillable plastic ball ornament
- Small red glitter pom poms
- Scissors
- 1/4″ wide black ribbon
- Gold glitter washi tape
- Glue dots
Instructions:
1
Cut a piece of black ribbon to fit around the middle of the ornament. Glue into place with glue dots.
2
Cut a buckle from the washi tape and attach it to the belt.
3
Remove the top from the ornament and fill it with red pom poms. Reattach the hanger and your ornament is done!
Beaded Candy Cane Ornament
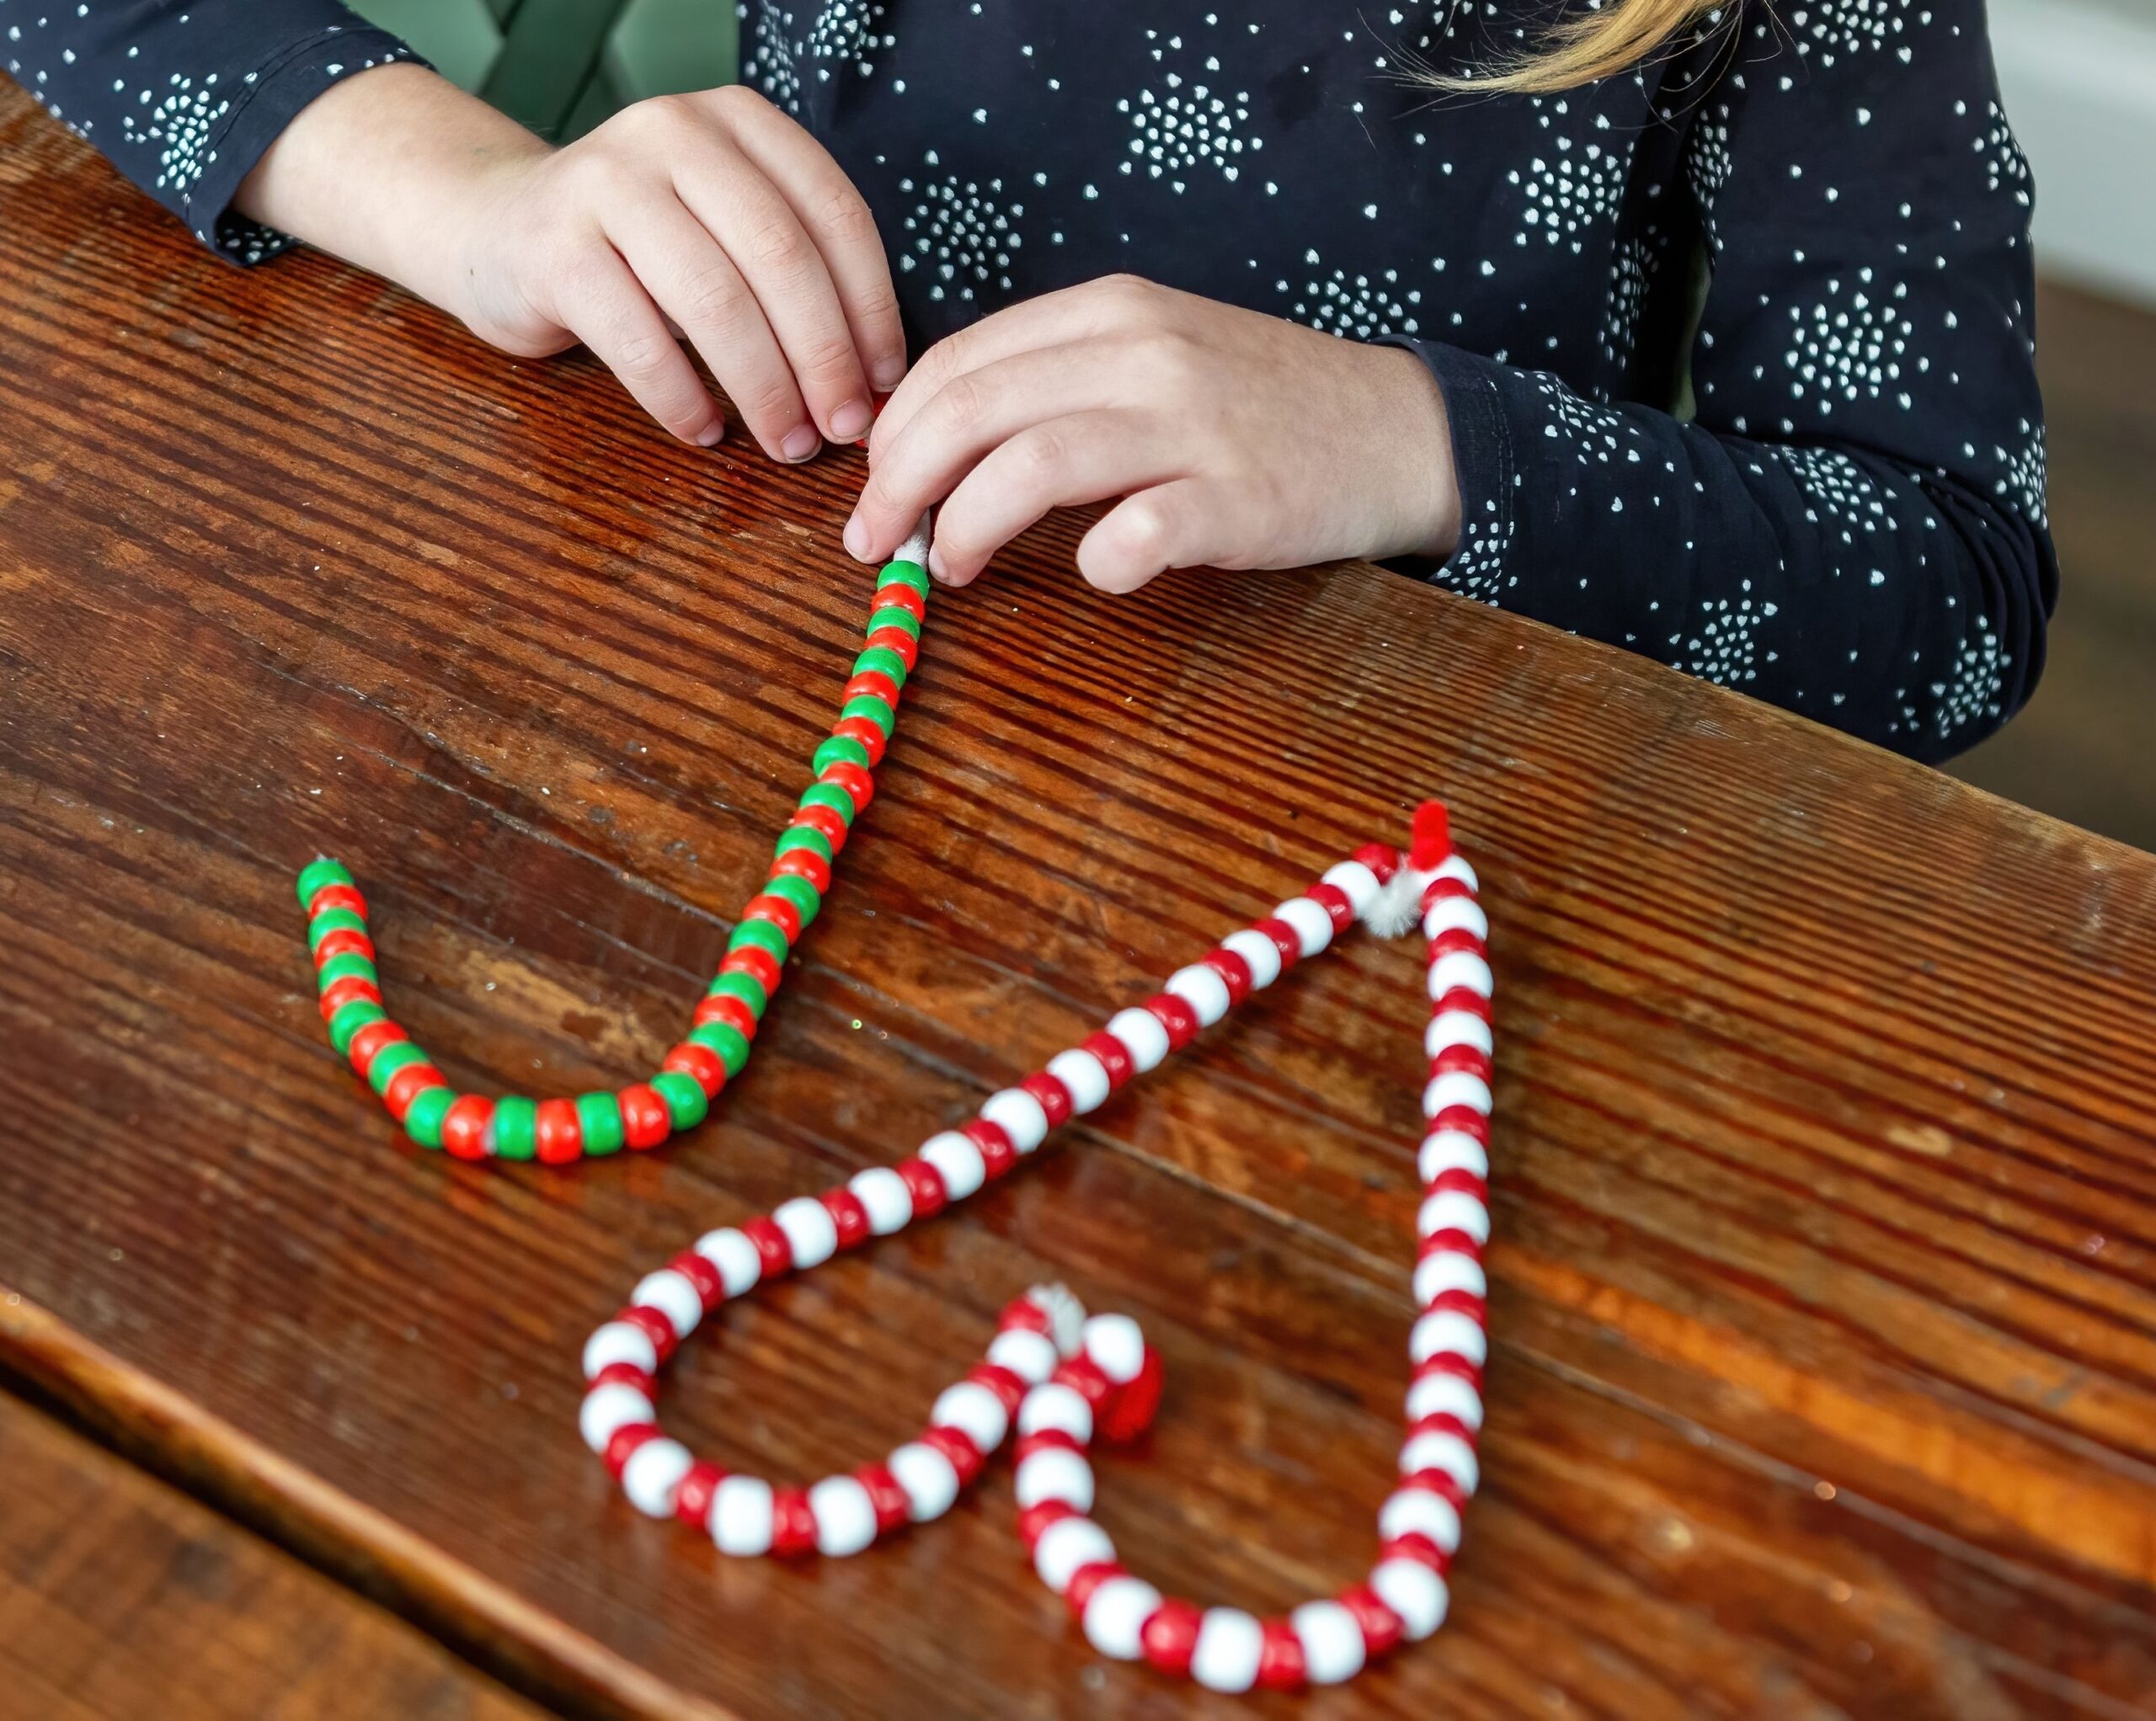
Supplies:
- White pipe cleaners
- Red and white beads
- Scissors (optional)
Instructions:
1
String a white bead onto a pipe cleaner, and loop the pipe cleaner through to hold it in place.
2
Add red and white beads alternately until you reach your desired length. Finish by looping the pipe cleaner around and through the bead as you did at the start.
3
Bend the pipe cleaner into a candy cane shape, and give it to a friend of family member to hang on their tree!
Fingerprint String of Lights Photo Frame
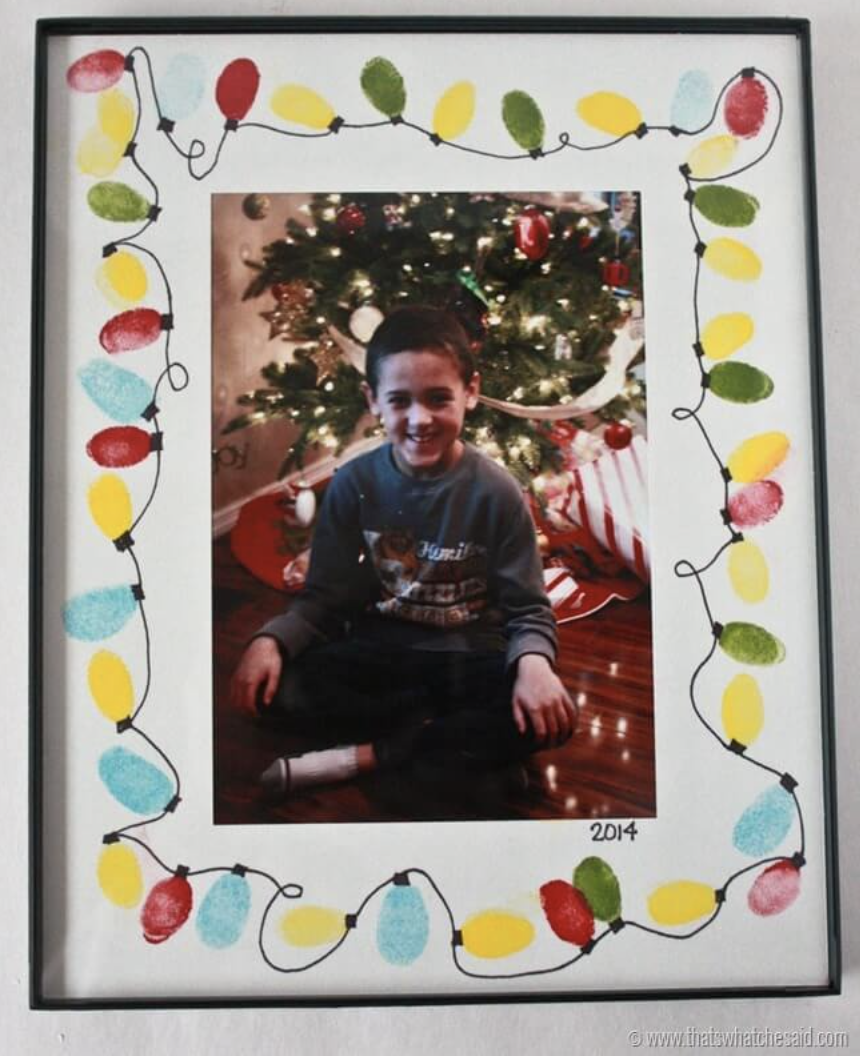
Supplies:
- White photo mat with frame to match
- Colored washable ink pads
- Black marker
Instructions:
1
Use index fingers to make fingerprints in different colors scattered around the photo mat as shown. Add bulb bases and cord with black marker.
2
Use your mat to frame a favorite photo, and place it in the frame!
Scrabble Tile Ornaments
Supplies:
- Scrabble tiles
- Ribbon slightly wider than the tiles
- Twine
- Small embellishments
- Glue
- Scissors
- Hot glue (adult supervision required)
Instructions:
1
Choose the words or names you’d like to spell out from the tiles. Lay them out vertically on the ribbon, then cut a piece of ribbon about three inches longer.
2
Cut a piece of twine for a hanger. Lay it across the ribbon horizontally close to the top. Fold the ribbon over the twine and glue it in place. Tie the twine in a loop.
3
Turn the ribbon over and arrange your Scrabble tiles and embellishments, gluing them in place once you’re happy with the design.
Tip: To keep the ribbon from fraying at the end, cut it with pinking shears or seal with clear nail polish.
Melted Snowman Ornament
Supplies:
- Fillable clear plastic ornament
- Mini styrofoam balls
- White glitter
- Mini black pom poms
- Orange craft foam
- Twigs
- Small scrap of fabric
- Scissors
Instructions:
1
Remove the top of the ornament and fill it about one-third of the way with styrofoam balls and about half a teaspoon of white glitter.
2
Add in your snowman pieces: some black pom poms for eyes, mouth, and buttons, two small twigs or pretzel sticks for arms; a small orange triangle cut from paper for the nose, and a strip of fabric for the scarf.
3
Put the top back on, and your ornament is complete!
Tip: Our example features all edible ingredients, including sugar for the snow, edible candies for the buttons, eyes, and smile, and pretzel sticks for the snowman’s arm.
Reindeer Mason Jar
Supplies:
- Mason jar
- Brown craft paint and brush
- Brown felt
- Googly eyes
- Brown pipe cleaners
- Red pom pom
- Hot glue (adult supervision required)
- Scissors
Instructions:
1
Paint the entire jar brown. It may take several coats for full coverage. Allow the jar to dry completely.
2
Cut two ears from felt, and attach to the rim with hot glue. Twist the pipe cleaners to form antlers, and glue them into place.
3
Attach the googly eyes and red nose. Now, fill your jar with treats and give it to someone special!
Baked Cinnamon Ornaments
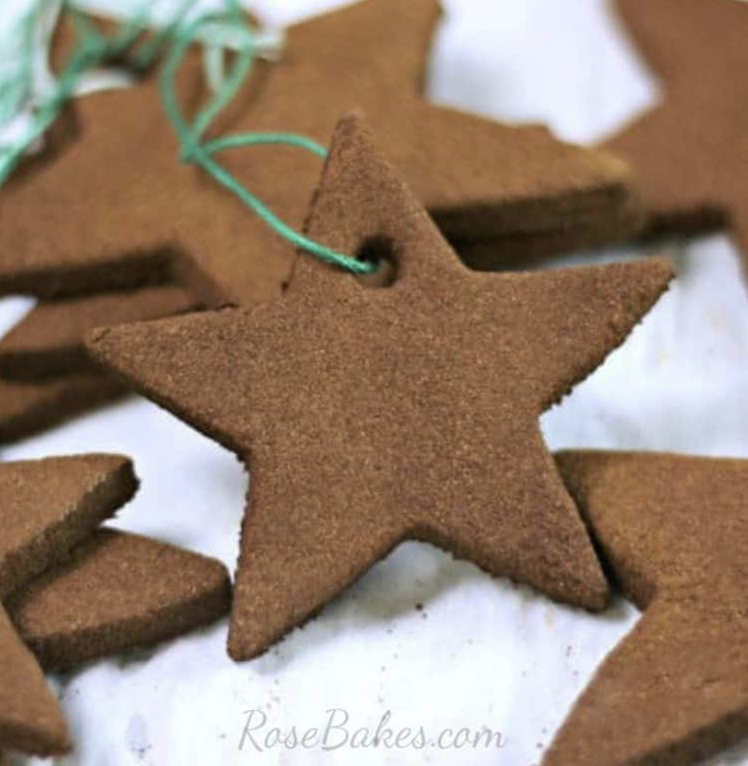
Supplies:
- 3/4 cup applesauce
- 1 to 1¼ cup ground cinnamon
- Cookie cutters
- Drinking straw
- Colorful ribbon or baker’s twine and scissors
- Baking sheet
- Spatula
Instructions:
1
Preheat oven to 200 degrees F.
2
Mix one cup cinnamon with applesauce, adding more cinnamon as needed until a soft dough forms.
3
Dust a surface with cinnamon and roll out the dough. Use cookie cutters to cut any shapes you desire. Use the drinking straw to poke a hole for hanging near the top of each.
4
Carefully transfer the shapes to a baking sheet. Bake the dough in the oven for several hours until fully dried out. Once cool, add ribbon hangers.
Tip: We suggest adult supervision for every step of this craft.
Easy DIY Luminaries
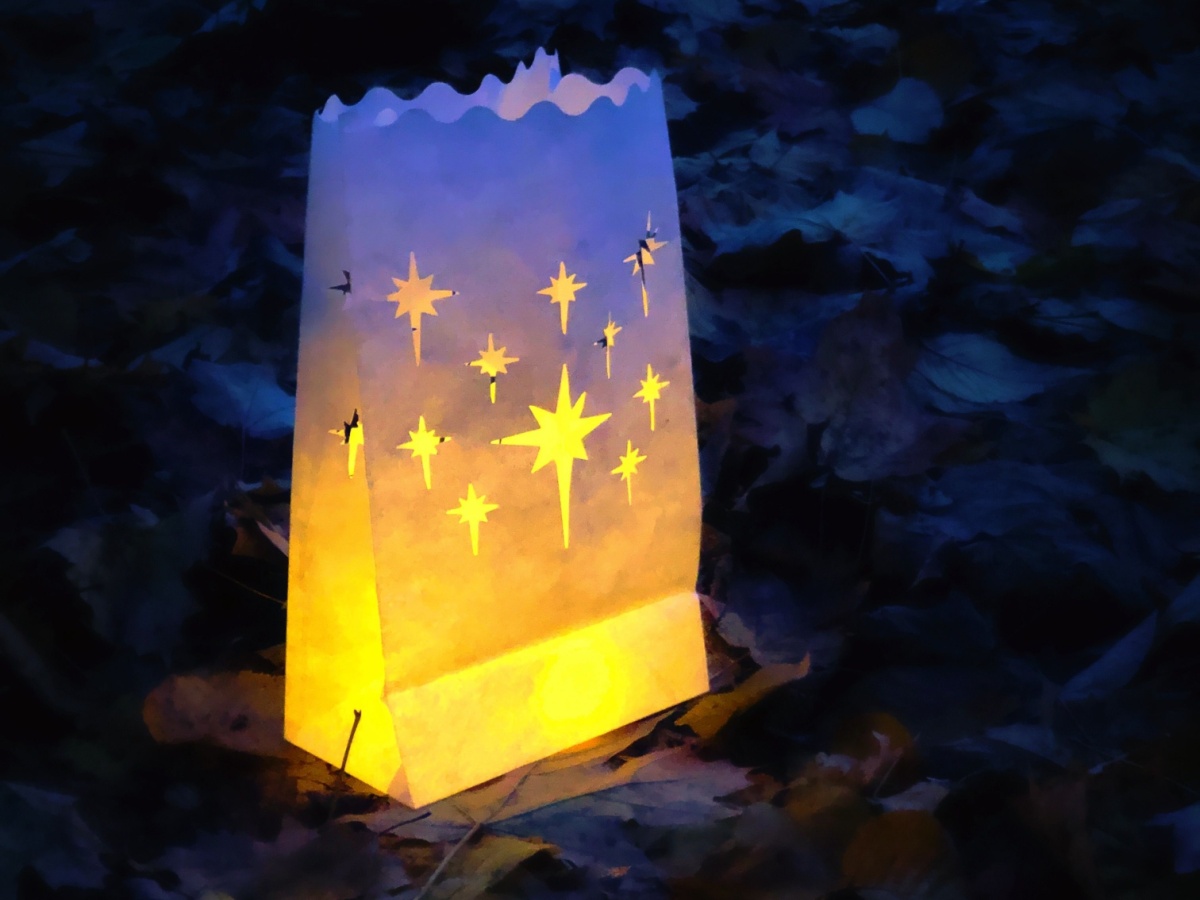
Supplies:
- Small white paper bags
- Scissors
- Hole punch
- Ruler
- Pencil
- Small pebbles
- Flameless tealights
Instructions:
1
Decide what height(s) you’d like your luminaries to be. Use the ruler to mark lines on the bags, then cut along them to trim your bags to height. Cut curves, scallops, or points for a unique look.
2
Open up the bags, and use the hole punch (or other paper punches) to create designs along the top edges, as far as the hole punch will reach.
3
Place a layer of pebbles in the bottom of each bag, and set a flameless tealight on top to shine after dark!
Clay Pot Snowman
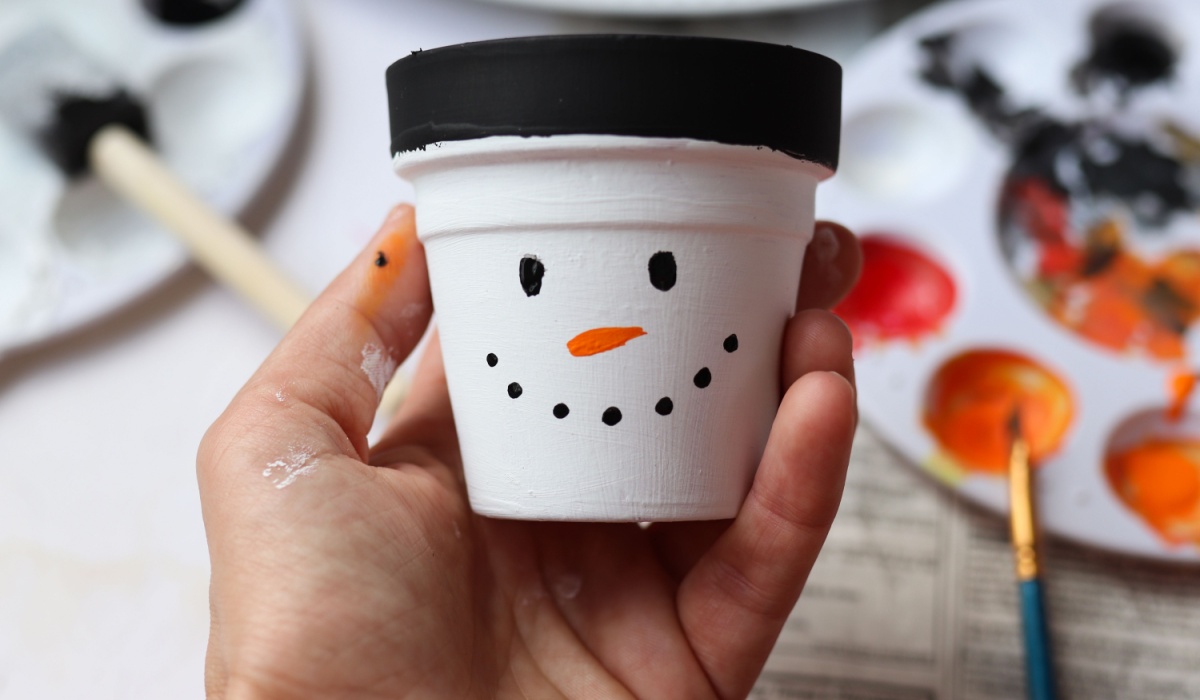
Supplies:
- Terra cotta clay pot
- White, black, and orange acrylic paint
- Small paintbrush
- Foam brush or larger paintbrush
- Palette or paper plate
- Cup of water
- Paper towels or scrap newspaper
Instructions:
1
Lay down newspaper or scrap paper to protect your table.
2
Using a foam brush or wide paintbrush, paint the outside of the clay pot with white acrylic paint. Apply 2–3 coats if needed for full coverage, letting each coat dry.
3
Once the base is dry, paint the top rim of the pot with black acrylic paint to create the “hat” band. Allow to dry.
4
Once the base is dry, paint the top rim of the pot with black acrylic paint to create the “hat” band. Allow to dry.
5
Use black paint and a small brush to paint two round eyes. Dip the brush handle tip or a fine brush into black paint to dot small circles in a curved line for the mouth (like coal). Paint a small orange triangle in the center for the carrot nose.
6
Seal with clear acrylic spray or Mod Podge if you’d like to protect the paint.
Clove and Orange Pomander
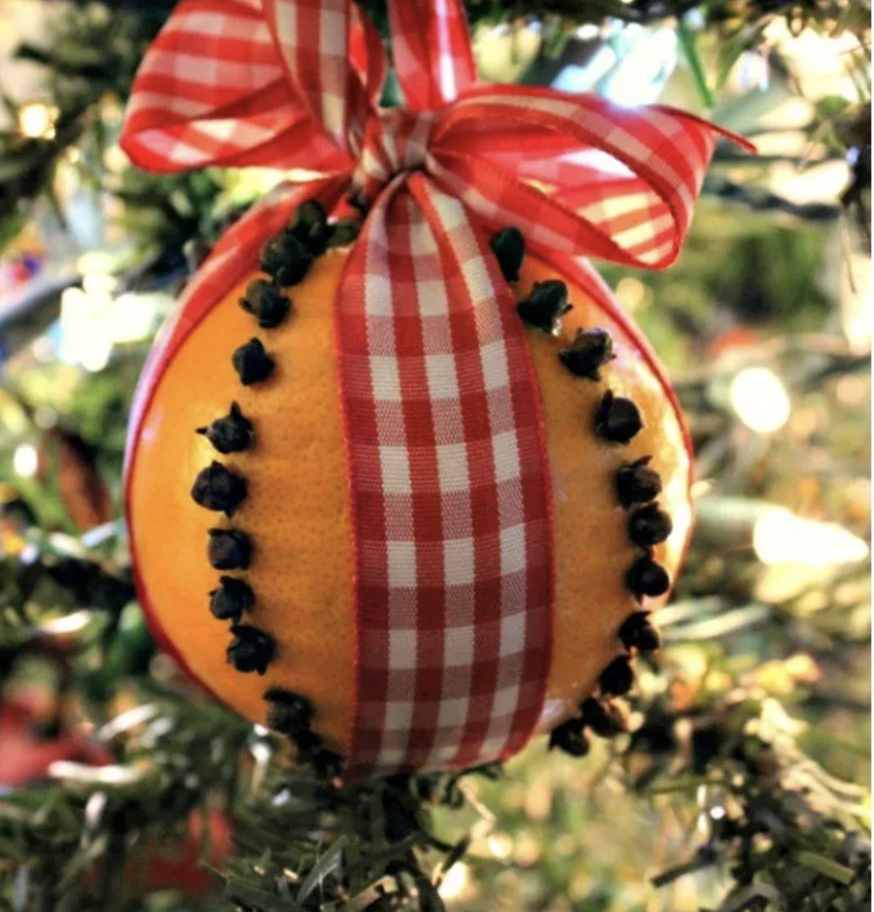
Supplies:
- Orange or tangerine
- Whole cloves
- Ribbon
- Toothpick
Instructions:
1
Remove any stickers and wash the orange. Wrap ribbon around the orange to create a bow and hanging loop.
2
Use a toothpick to poke holes into the orange in any pattern you like. Push the pointed end of each clove into the orange.
3
Give as a gift to use as a seasonal scent. Discard pomander at the first sign of mold or mildew or allow to dry.
Tip: Fresh pomanders like this one last for a few days. Drying them with cloves and spices extends their life to several years but takes times and patience. To dry a pomander, leave it in a paper bag with spices like cinnamon, nutmeg, and orris root, turning it regularly for several weeks until it shrinks and hardens. Keep an eye out for mold and mildew and discard it if it forms.
Gingerbread House Ornaments
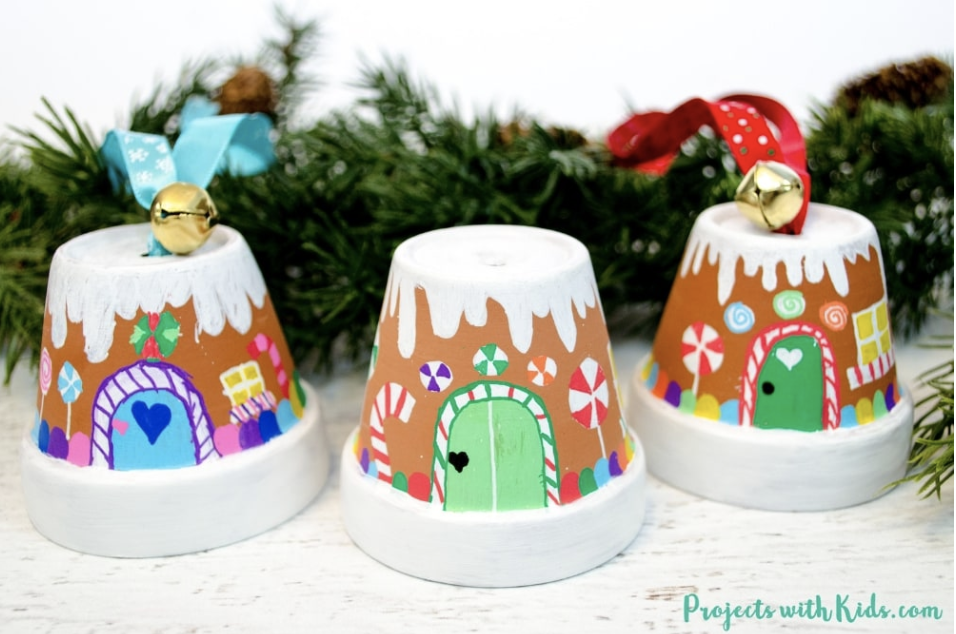
Supplies:
- Small terra cotta pot
- Paint pens
- Ribbon
- Jingle bell
- Scissors
Instructions:
1
Turn the pot upside down and decorate it to look like a gingerbread house. If you like, you can glue on glitter, gems, and other embellishments too.
2
When the paint is dry, cut a piece of ribbon. String the jingle bell onto the ribbon, then push the two ends into the pot from the top. Turn the pot over and tie a knot in the ribbon, creating a loop. Your ornament is ready to hang.
Easy DIY Christmas Crafts for Kids
Toddlers, preschoolers, and kindergarteners can get in on the creative fun with these simple craft ideas for little kids. Adult supervision is recommended for each craft.
Printable Christmas Crafts (with Templates)
Supplies:
- Printable Christmas Crafts Template
- Scissors
- Glue
- Crayons, markers, or colored pencils
Instructions:
1
Print out all 10 printable Christmas craft templates or pick and choose your favorites to create at home or in the classroom.
2
Follow the instructions on each printable, coloring and cutting along the dotted lines and gluing the decorations into place.
3
Use your printable crafts to decorate your home or give as a gift.
Wooden Spoon Reindeer Puppet
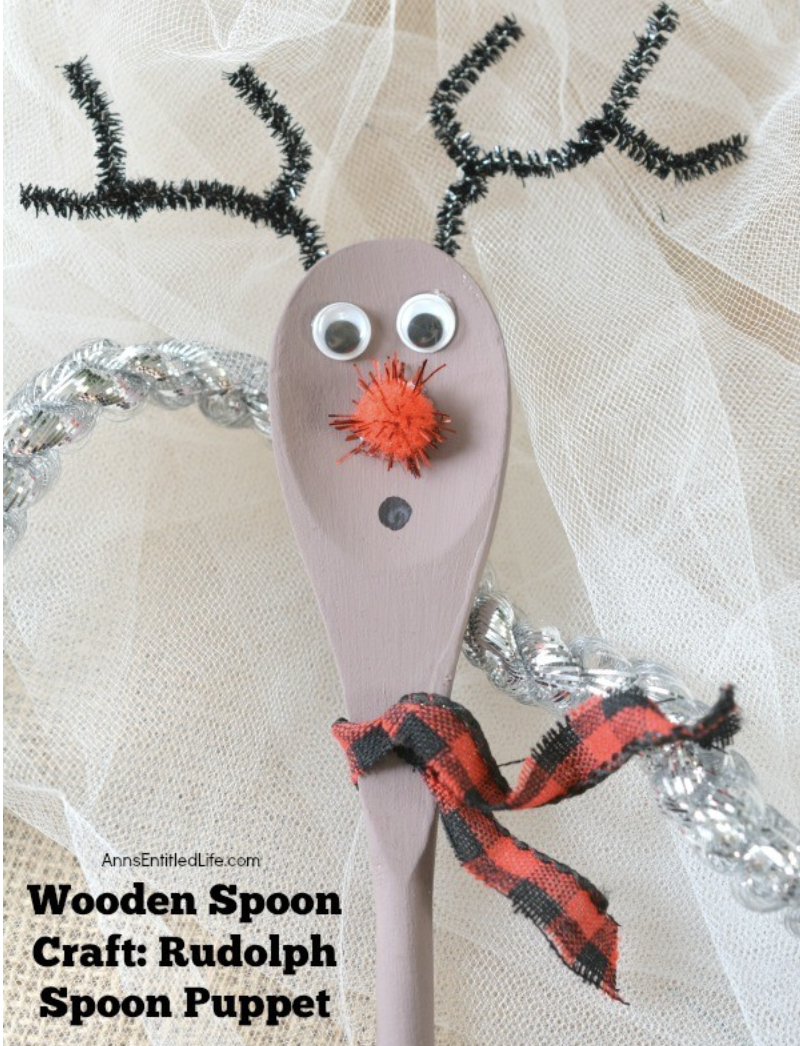
Supplies:
- Wooden spoon
- Brown craft paint and brush
- Googly eyes
- Red pom pom
- Black pipe cleaners
- Small strip of cloth
- Glue
- Scissors
- Black marker
Instructions:
1
Paint the wooden spoon brown and let dry.
2
Use glue to attach the googly eyes and red pom pom nose. Draw a mouth with the marker.
3
Bend the pipe cleaners to form antlers, using smaller pieces to make the prongs. Glue into place on the back of the spoon.
4
Tie the strip of cloth around the base of the spoon where it narrows into the handle to form a scarf. Your reindeer puppet is done!
Paper Straw Wreath Ornament

Supplies:
- Paper drinking straws in colors or patterns of your choice
- Beads
- Pipe cleaners
- String
- Ribbon
- Scissors
Instructions:
1
Cut the straws into pieces about one inch long.
2
String beads and straw pieces onto pipe cleaners in any pattern you like. Bend the pipe cleaner into a circle and twist the ends together.
3
Cut a piece of string for a hanger, and tie it onto the top of the wreath. Finish by tying a ribbon bow around the string, and your wreath is ready to hang!
Paper Chain Countdown
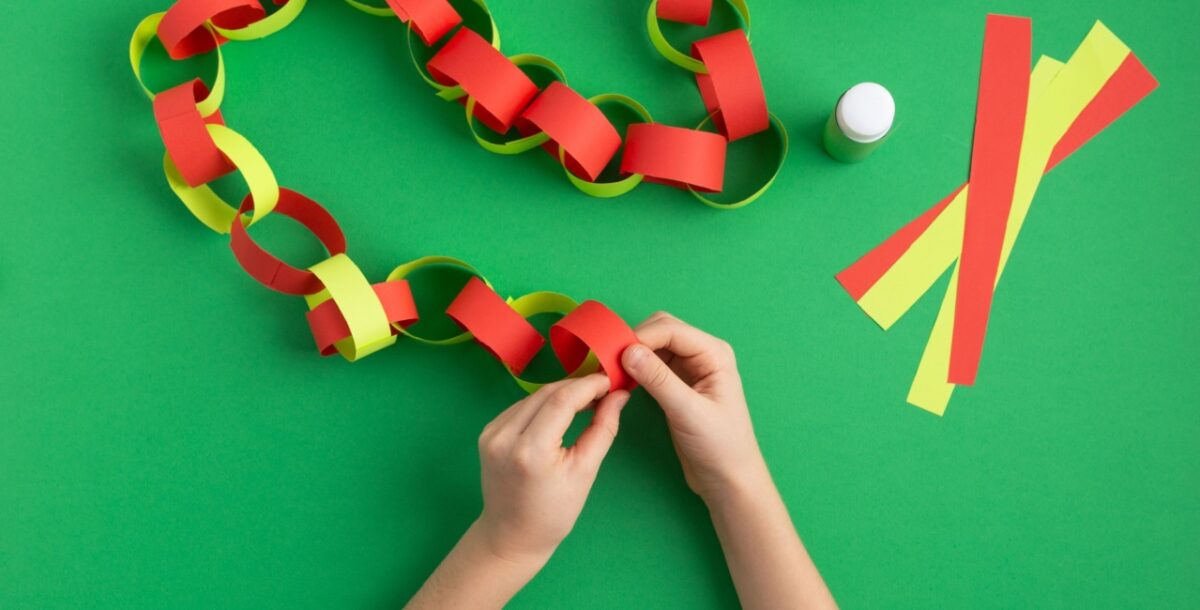
Supplies:
- Construction paper in red and green (or colors of your choice)
- Scissors
- Glue stick or small stapler
- Marker
Instructions:
1
Cut the construction paper into strips about one inch wide and six inches long. Cut 12 red strips and 12 green strips.
2
Start the chain by bending one strip of red construction paper into a loop. Fasten the end with the glue stick or stapler.
3
Now, thread a strip of green paper through the first loop, bending it to form the second loop in the chain. Glue or staple into place.
4
Continue until you’ve made a chain of 24 loops. Use the marker to number the loops 1 to 24.
4
Hang your chain, dangling straight down. Each day in December, tear off one loop, counting down the days until Christmas!
Reindeer Pom Pom Magnets
Supplies:
- 2” Brown pom poms
- Small red pom poms
- Googly eyes
- Pipe cleaners
- Disk magnets
- Scissors
- Glue
Instructions:
1
Glue the googly eyes and red pom pom onto the brown pom pom to create the reindeer’s face.
2
Trim the pipe cleaners into smaller pieces. Twist them together to form antlers. Glue into place.
3
Attach the magnet to the back of the pom pom reindeer (hot glue may work best).
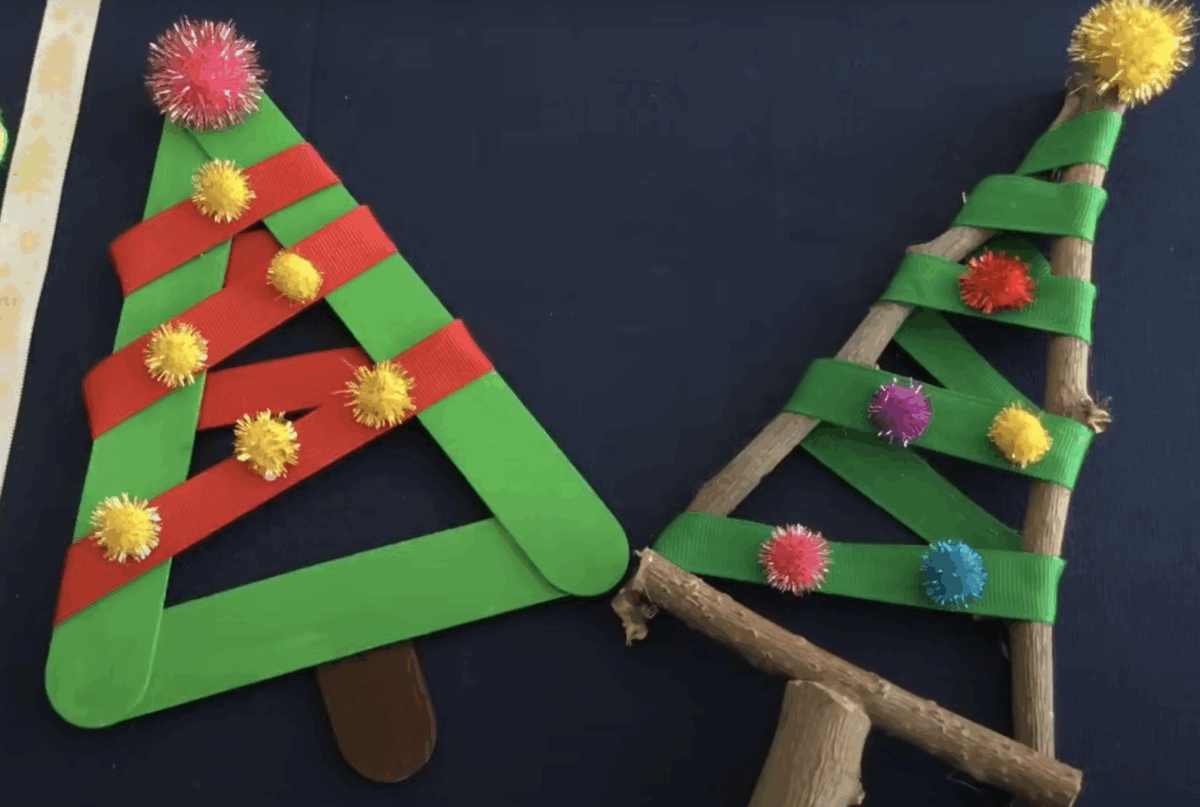
Supplies:
- Wood craft sticks or twigs
- Glue
- Craft paint and brushes
- Ribbon
- Pom Poms
Instructions:
1
Glue the craft sticks or twigs together to form a triangle (tree) as shown in the video, and let dry.
2
If using craft sticks, paint them green (or any color you like) and let dry.
3
Wrap ribbon around the tree as garland. Then glue pom poms or other decorations in place as ornaments. Add a ribbon hanger to the top, if desired.
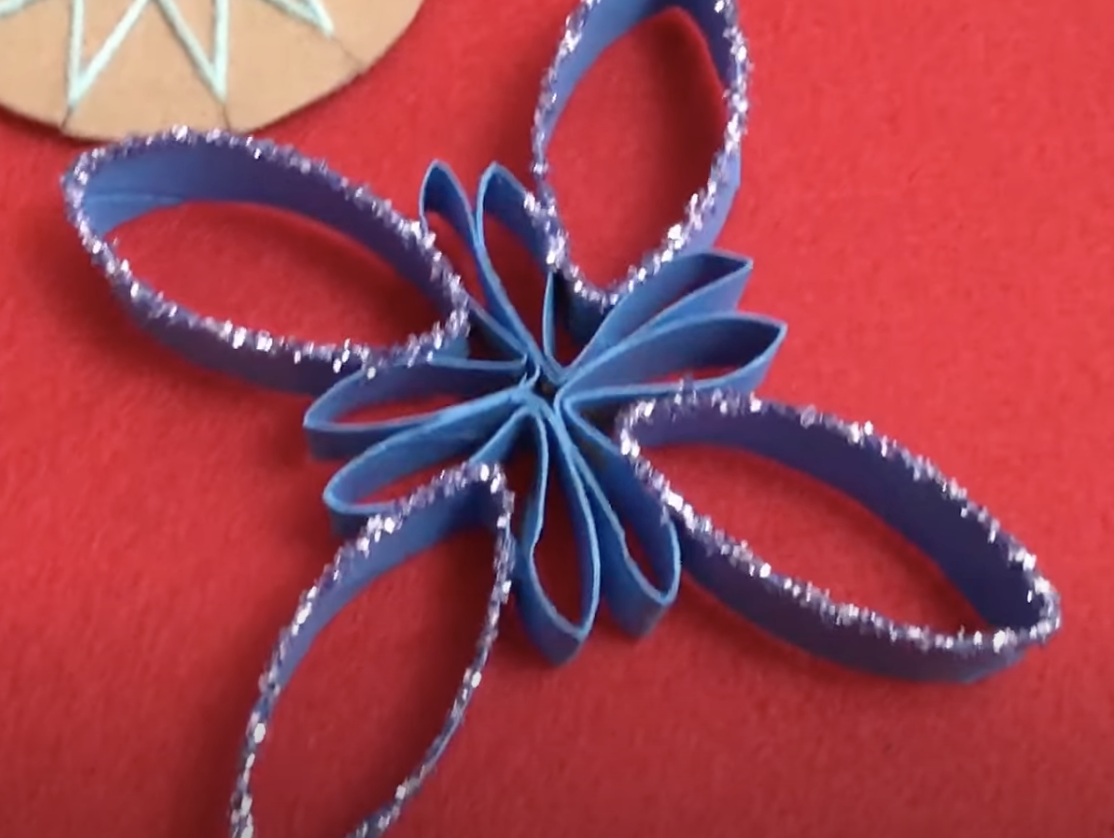
Supplies:
- Cardboard tube
- Craft paint and brush
- Pencil
- Ruler
- Scissors
- Glue
- Glitter
Instructions:
1
Paint the tube the color of your choice (white, blue, red, or green) and allow it to dry.
2
Mark the tube at half-inch intervals down the side. Press the tube flat gently and cut along the lines to make small loops.
3
Lay the loops into a design you like, then glue in place and let dry.
4
Give the whole surface, inside and out, another coat of paint. Allow it to dry. To apply glitter, paint the edges with glue, dip into glitter, let dry.
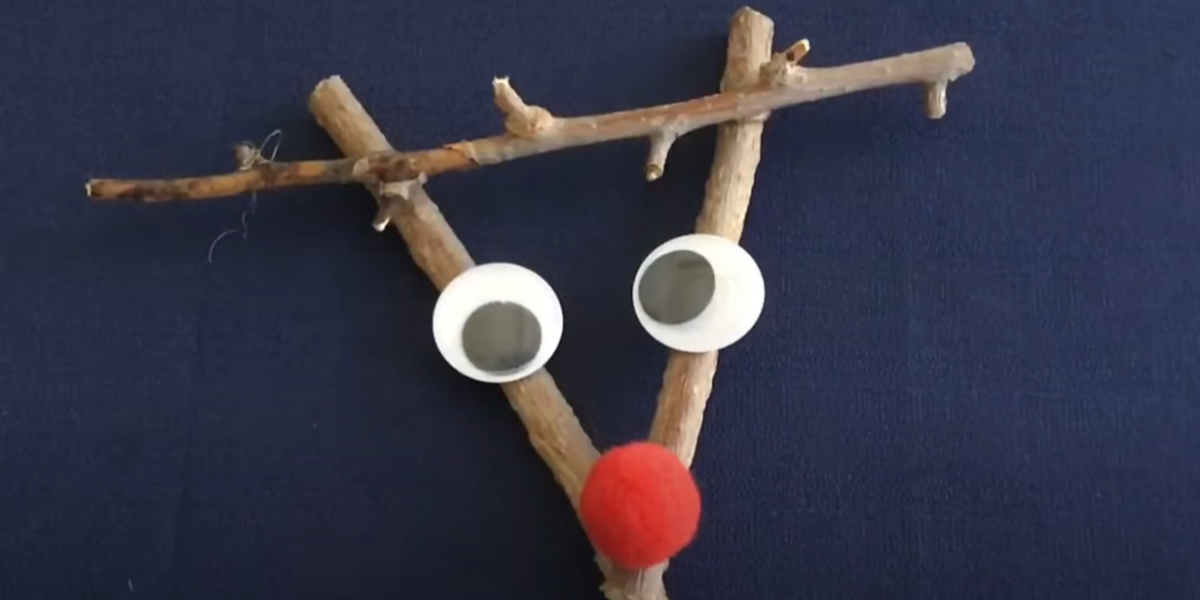
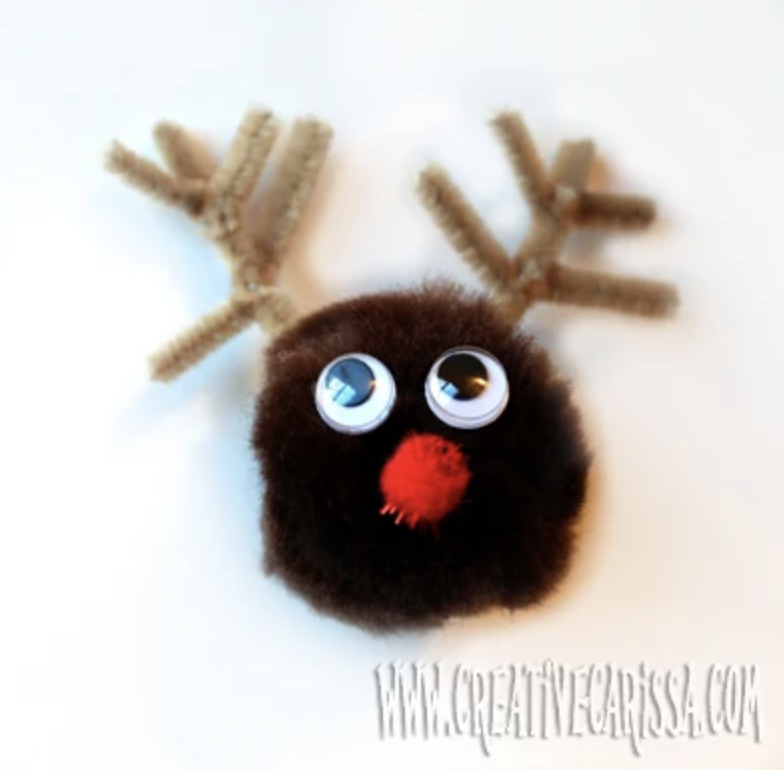
Supplies:
- Twigs
- Glue
- Googly eyes
- Red pom pom
Instructions:
1
Glue the craft sticks or twigs together to form a triangle as shown in the video, and let dry.
2
Glue two eyes in place, along with a red pom pom for a nose. Add a ribbon hanger to the top if you like.
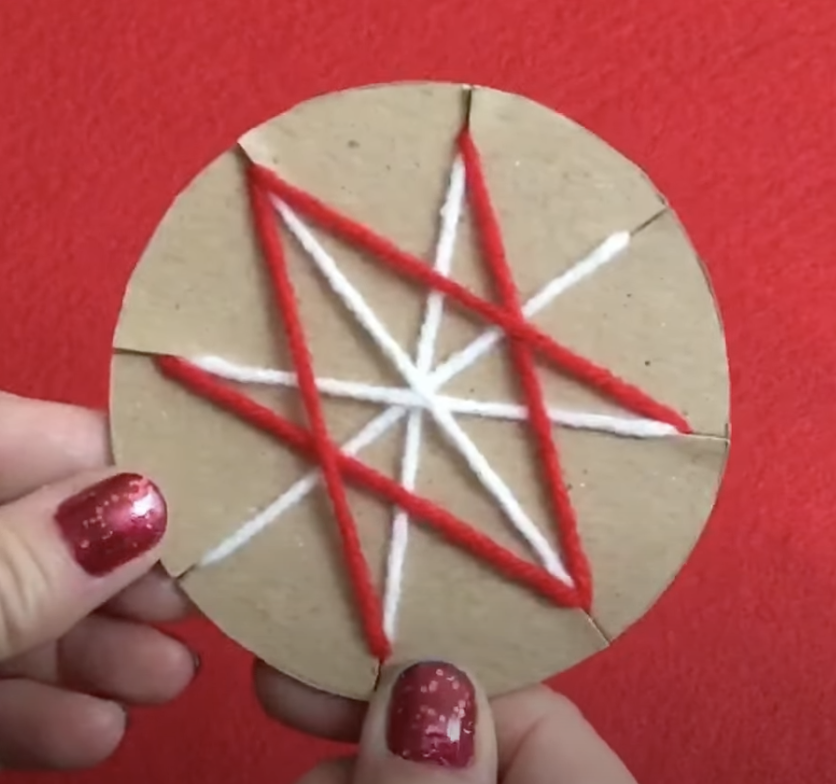
Supplies:
- Cardboard
- Yarn
- Scissors
- Pencil
Instructions:
1
Trace and cut a circle from cardboard.
2
Use the pencil to mark evenly-spaced lines around the edges as shown. Cut a short slit at each mark.
3
Tape a piece of yarn in place at the back of the cardboard. Now, begin wrapping it from one slit to another, creating any design you like. Tuck the end in on the back, and repeat with other colors.


Edible Christmas Crafts and Activities
Crafting gets even better when the project turns into a delicious at the end! These are fun ideas for holiday gatherings or holiday snacks at home.
Ice Cream Cone Trees

Supplies:
- Sugar cones
- Green frosting
- Candies for decorating
- Small spatula or plastic knife
- Wax paper
Instructions:
1
Place the cones upside-down on a piece of wax paper.
2
Spread frosting all over the cone using the spatula or knife.
3
Add candies to decorate the tree. You can also sprinkle it with shredded coconut to represent snow.
Chocolate Covered Marshmallow Reindeer
Supplies:
- Chocolate melting wafers or chocolate chips
- Large marshmallows
- Mini pretzel twists
- Red M&Ms
- Candy eyes
- Lollipop sticks
Instructions:
1
Break the mini pretzels in half to create antlers, and set aside.
2
Push a lollipop stick into the bottom of each marshmallow.
3
Melt the chocolate according to the directions on the package. (Kids may need adult supervision.)
4
Dip a marshmallow into the chocolate, covering the entire surface. Insert an antler into each side of the marshmallow. (Make a slit with a small knife to make this process easier.)
5
Attach the candy eyes and red M&M nose to the front.
Tip: Push the completed sticks into a glass of dried rice, corn, or beans to hold them as the chocolate sets.
Chocolate Dipped Candy Canes
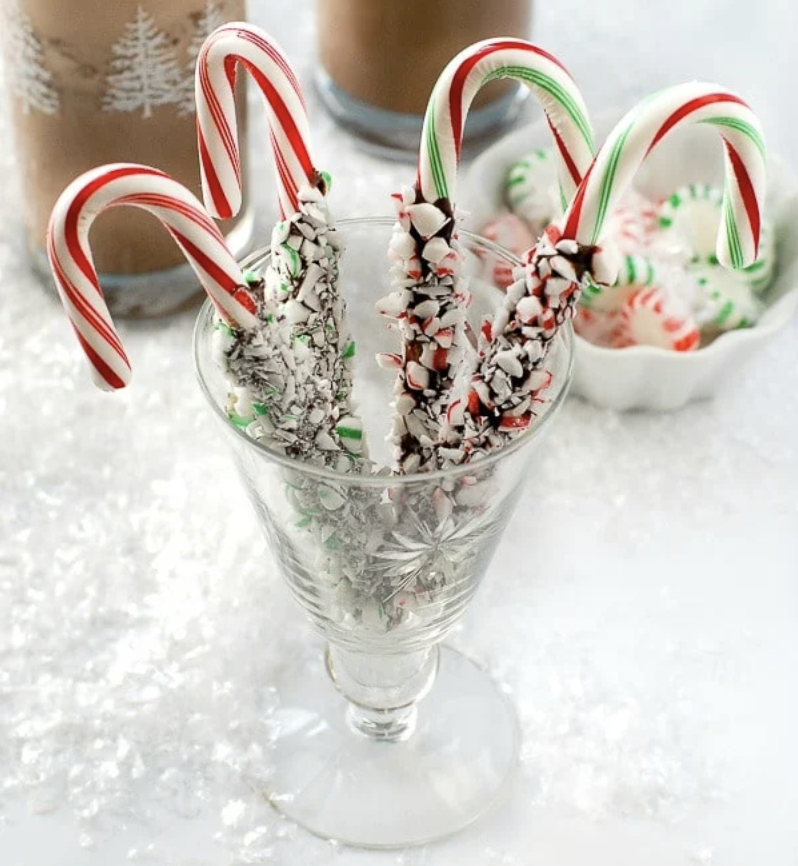
Supplies:
- Unwrapped candy canes
- Chocolate melting wafers or chocolate chips
- Plastic zipper bag
- Rolling pin
- Wax paper
Instructions:
1
Place one or two candy canes into the zipper bag and seal. Use the rolling pin to crush the candy canes into smaller pieces. Empty the pieces onto a shallow plate.
2
Melt the chocolate according to the instructions on the package. (Kids may need adult supervision.)
3
Dip the candy cane about half way into the chocolate, then roll in the crushed candy.
4
Place finished candy canes on wax paper to set.
Christmas Pretzel Treats
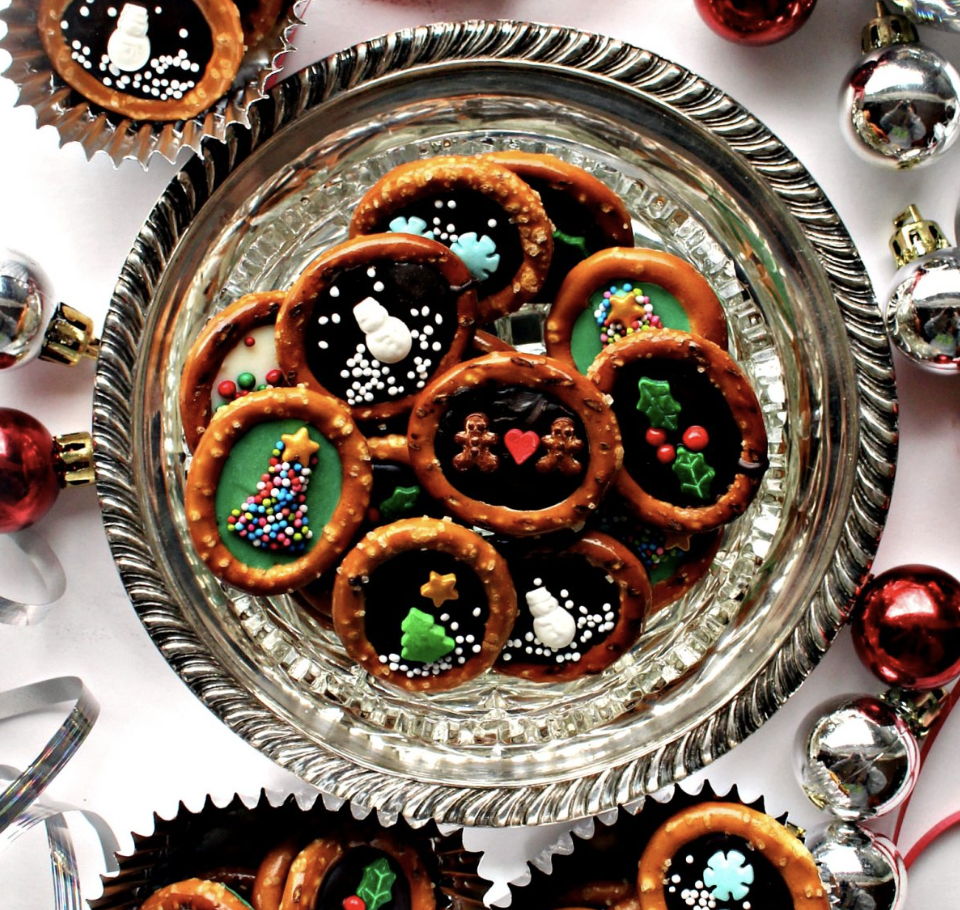
Supplies:
- Pretzel rings
- Chocolate melting wafers or chocolate chips
- Sprinkles
- Wax paper
- Spoon
Instructions:
1
Lay the pretzels out on the wax paper and melt the chocolate according to the directions on the package.
2
Use the spoon to drop chocolate into the middle of each pretzel ring. Decorate with sprinkles. Allow the chocolate to set before eating.
Fruity Christmas Tree
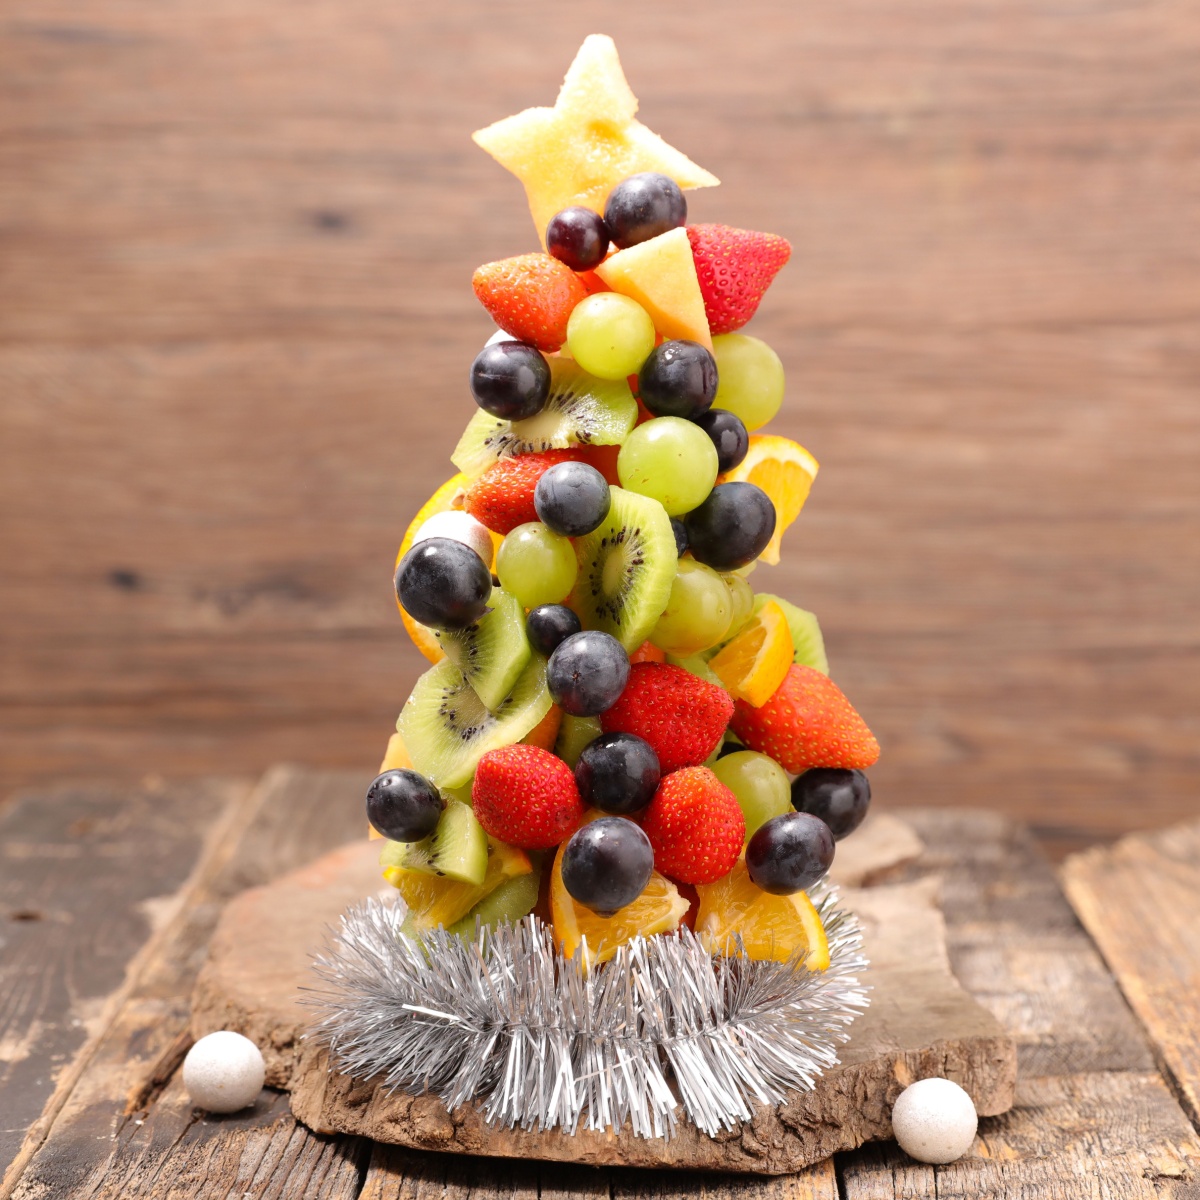
Supplies:
- Styrofoam cone
- Toothpicks
- Green grapes and red strawberry chunks (or fruit of your choice)
- Plastic wrap
Instructions:
1
Wrap the styrofoam cone in plastic wrap and set it upright on a plate.
2
Starting at the bottom, insert a toothpick into each piece of fruit, then push it through the plastic wrap into the cone. Fill the tree all the way to the top, then display and dine.
Cereal Candy Canes
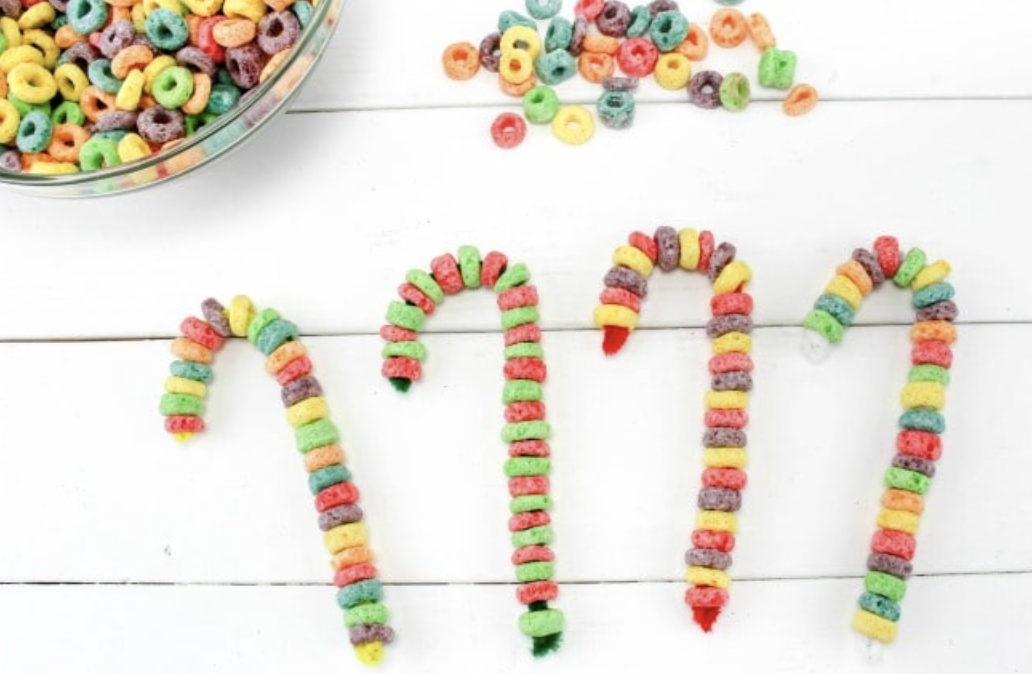
Supplies:
- Pipe cleaners
- Froot Loops, Cheerios, or other ring-shaped cereal
Instructions:
1
Place the first piece of cereal on the pipe cleaner, and bend the end of the pipe cleaner around to hold it in place.
2
String more cereal pieces onto the pipe cleaner in alternating colors. Finish by bending the end of the pipe cleaner around, then bending the whole thing into a candy cane shape.
Tip: Hang these from a glass of milk for a fun Christmas-themed breakfast for kids. Have them slide the cereal into a bowl to enjoy their milk.
Christmas Candy Trees
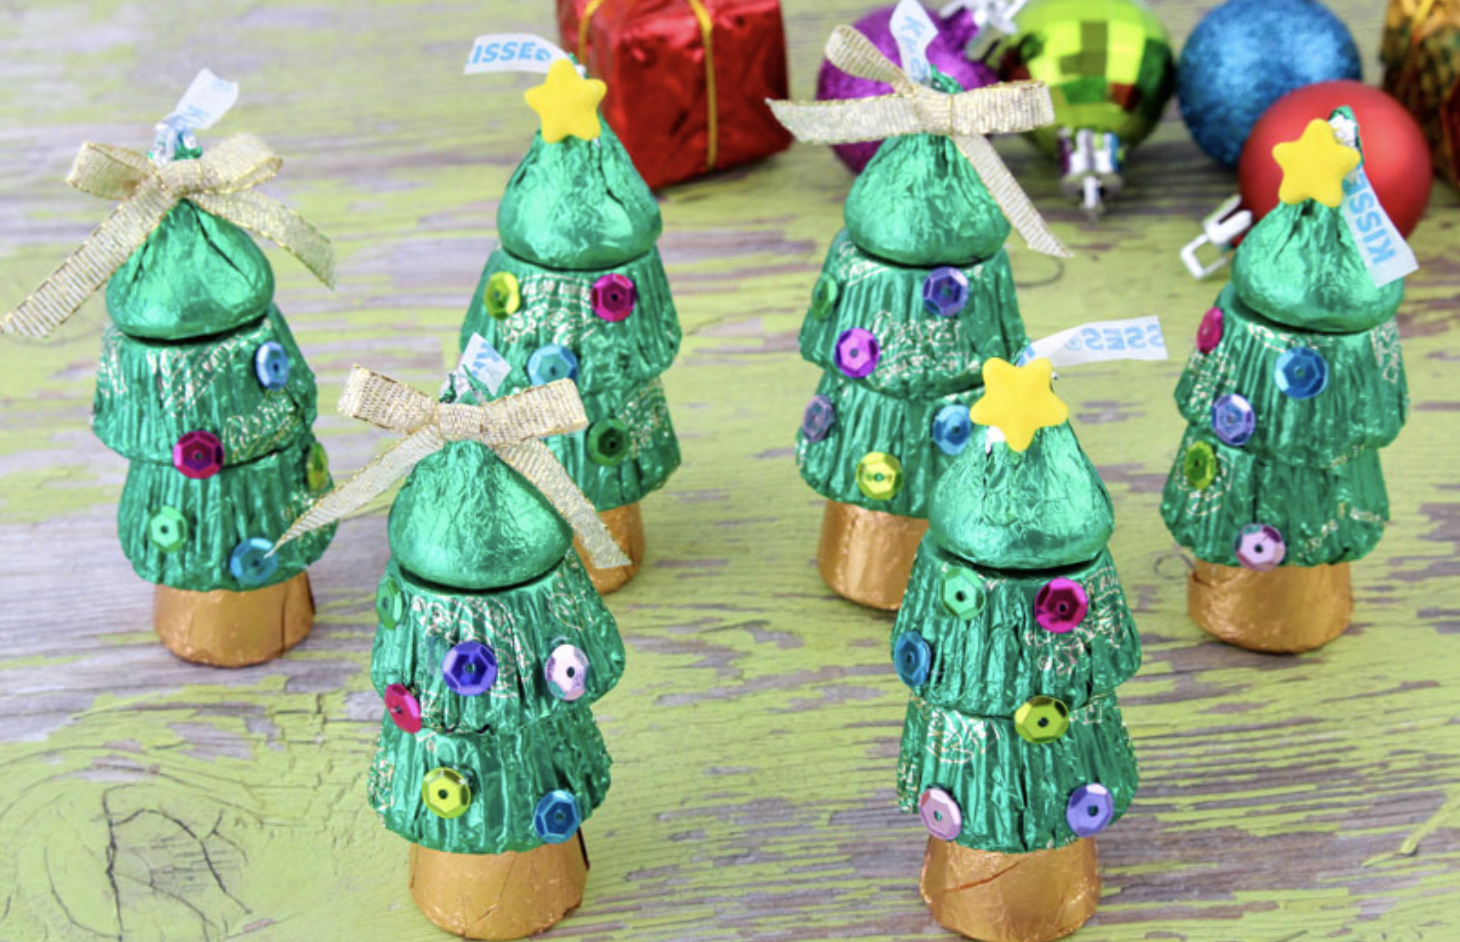
Supplies:
- Reese’s Mini Peanut Butter Cups in green wrappers
- Hershey’s Kisses in green wrappers
- Rolos
- Gold ribbon
- Sequins and stars
- Glue
Instructions:
1
Using glue to hold them together, stack one Rolo, two upside-down peanut butter cups, and one Hershey’s Kiss on top.
2
Glue on sequins to decorate. Add stars or ribbon bows to the tops.
Grinch Kabobs
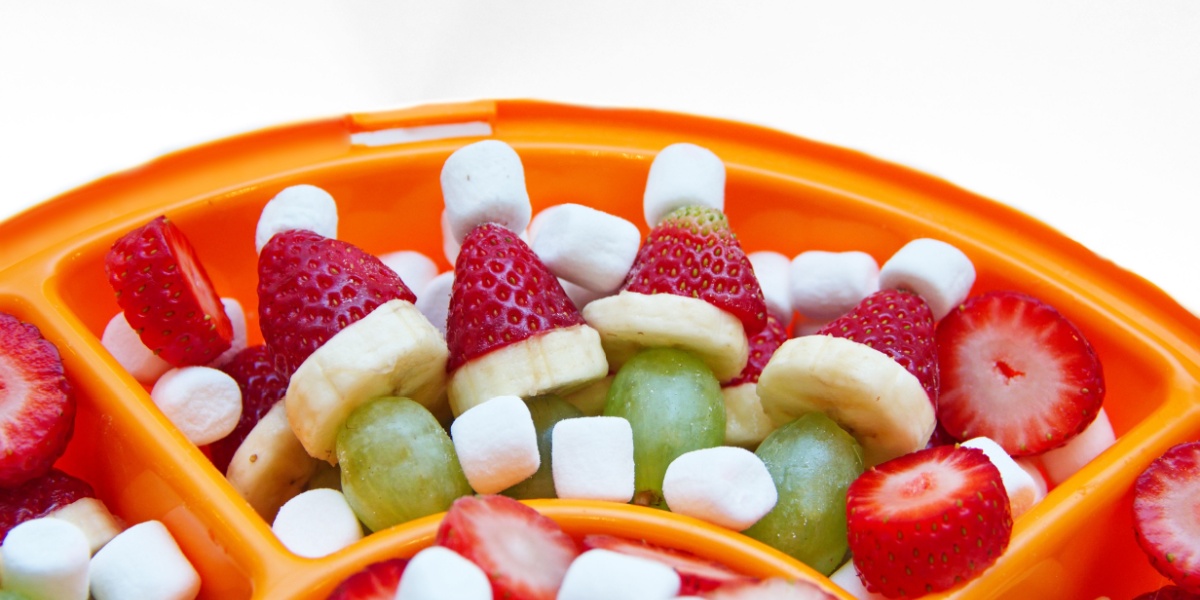
Supplies:
- Green grapes
- Banana slices
- Strawberries
- Mini marshmallows
- Wood skewers
Instructions:
1
Stack a grape, banana slice, upside-down strawberry, and mini marshmallow onto a skewer. Repeat on each skewer with remaining ingredients, and enjoy your treat!
Holiday Decorations to Make With Kids
Have fun spending time together and creating festive holiday decor for anywhere in your home. You can look forward to pulling out these DIY decorations year after year!
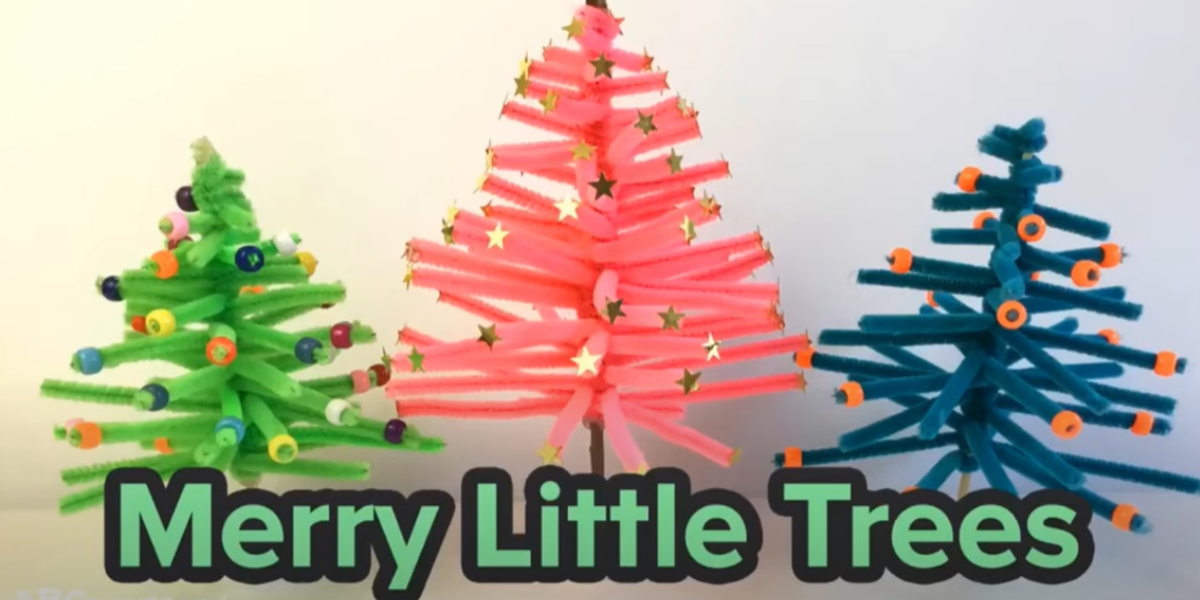
Supplies:
- Pipe cleaners
- Wooden skewer
- Plastic bottle cap
- Beads or sequins
Instructions:
1
Cut pipe cleaners into shorter lengths, from about one inch to six inches.
2
Starting at the top of the skewer, wrap one of the shortest pipe cleaners around the skewer a couple of times, letting the end stick out to form a branch. Just below, wrap another short pipe cleaner, letting the end stick out in a different direction.
3
Continue down the skewer, using longer pipe cleaners as you go. Stop when there are a few inches of skewer left to form the trunk.
4
Poke a hole into the bottom of the bottle cap, just large enough to stick the skewer through. (Kids will need adult help with this step.) Place the skewer through the hole. Now, decorate your tree by pushing beads or sequins onto the ends of the pipe cleaners. Be creative and decorate your tree however you like!
Santa Binoculars
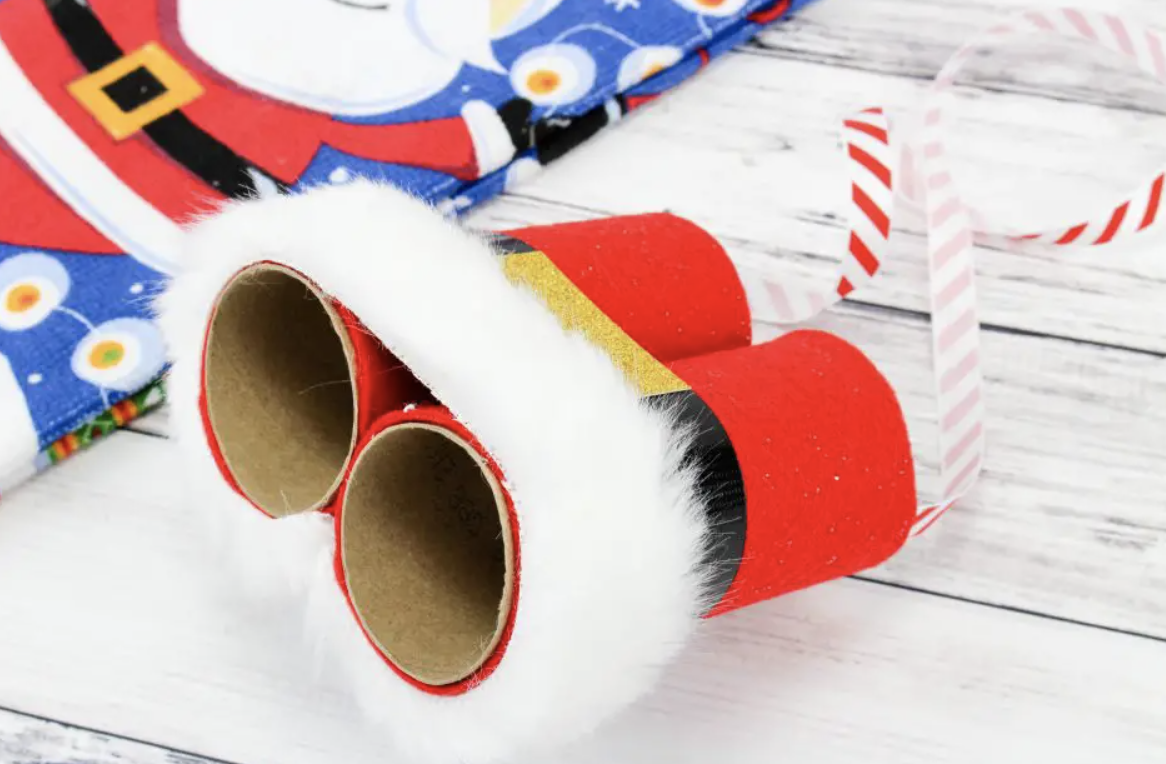
Supplies:
- Two empty toilet paper cardboard tubes
- Red felt (or red craft paint and brush)
- Black duct tape
- Gold paper
- Strip of white faux fur
- Ribbon or string
- Hot glue gun (Adult supervision required)
- Scissors
Instructions:
1
Cover the cardboard tubes with red felt and glue into place, OR paint the cardboard tubes red and let try.
2
Lay the tubes side by side. (You may find this step easier if you use paperclips to hold them in place while you work.) Wrap a strip of black tape around them to make the “belt.”
3
Cut a square buckle from the gold paper and glue it into place as shown. Wrap the strip of faux fur around the end and glue into place. Cut a strip of ribbon for a strap, and glue it into place on the insides of the tubes.
4
Use your “binoculars” when you “spy to see if reindeer really know how to fly!”
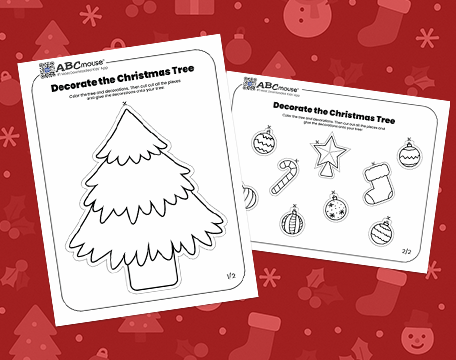
Ornament Garland
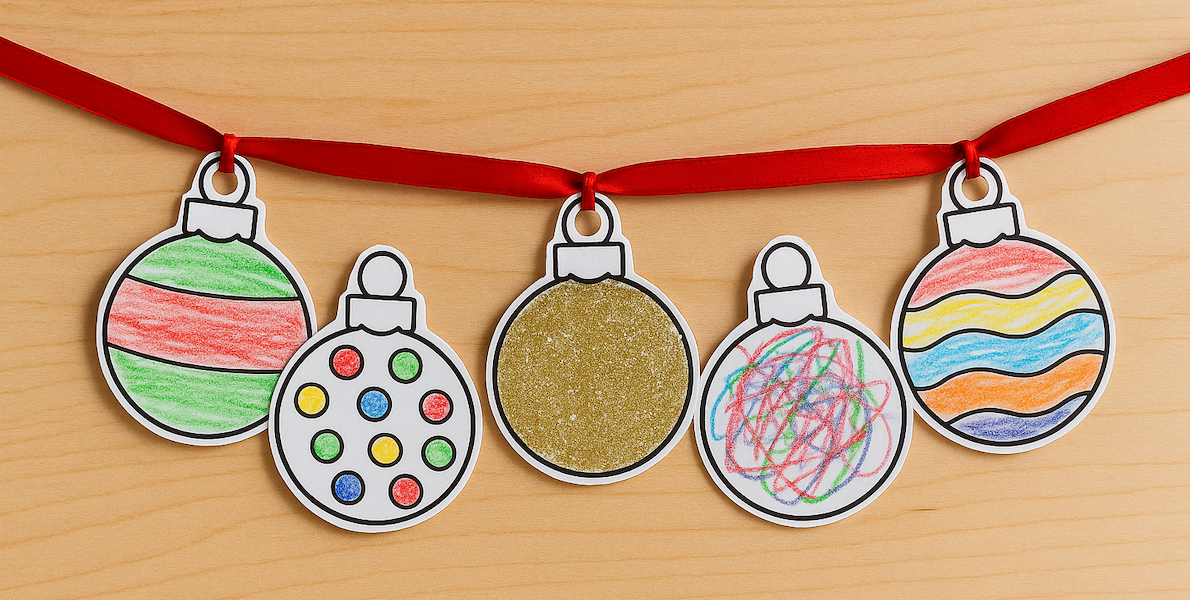
Supplies:
- Simple Plain Ornaments printable coloring pages from ABCmouse
- Printer paper or cardstock
- Ribbon or string
- Crayons, markers, glitter, or other art supplies
- Scissors
- Hole punch
Instructions:
1
Print the coloring pages on paper or card stock. You can use the small (6 to a page) or medium (4 to a page), or a mix of the two.
2
Cut out each ornament. Use the crayons, markers, and other art supplies to decorate each ornament however you like.
3
Punch a hole in the top of each ornament, where the hanger loop is. String the ornaments onto the ribbon or string, tying them in place if needed. Hang your garland along a mantlepiece or doorway!
Fuzzy Santa Claus
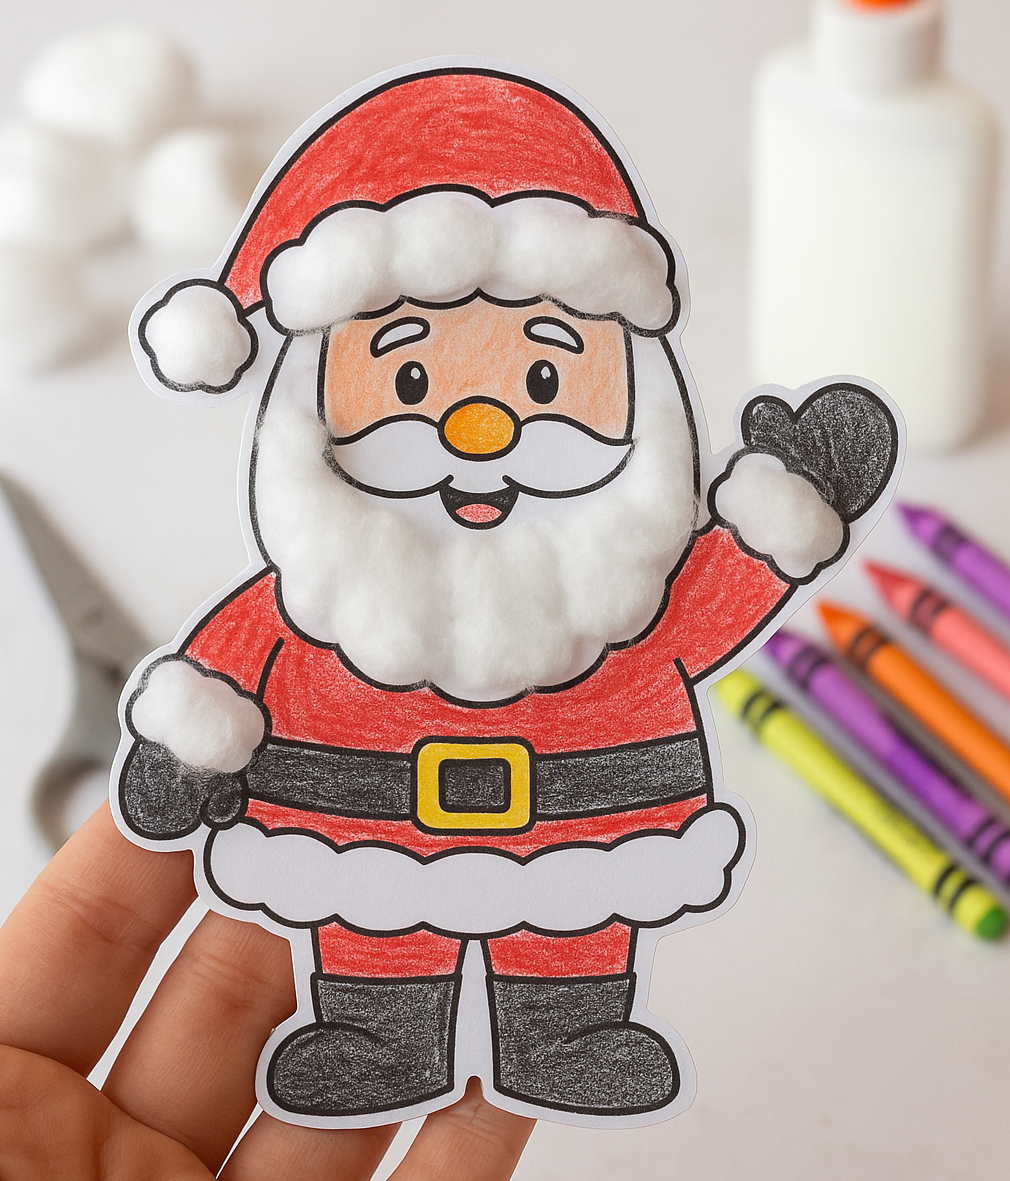
Supplies:
- Happy Santa coloring page from ABCmouse
- Cardstock
- Crayons or markers
- Cotton balls
- Glue
- Scissors
Instructions:
1
Print the coloring page on card stock. Use the scissors to trim around the edges of Santa’s outline.
2
Color in Santa, leaving his beard, mustache, and fur trim white.
3
Squirt some glue onto a piece of scrap paper. Dip a cotton ball into the glue and press it onto Santa’s beard, mustache, or fur trim. Repeat until all the white areas are covered in cotton balls, and allow to dry.
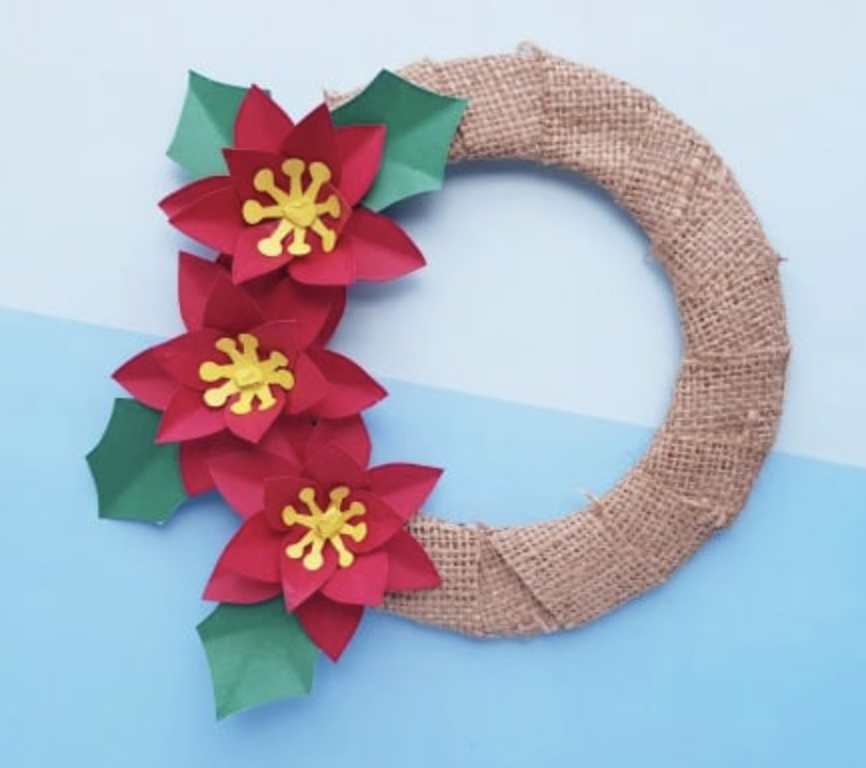
Burlap Christmas Wreath
Supplies:
- Cardboard or card stock
- Two plates or bowls, one larger than the other (to use for templates)
- Burlap ribbon or strips about 2 inches wide
- Red, green, and yellow cardstock or construction paper
- Twine
- Glue
- Scissors
- Pencil
Instructions:
1
Trace around the plates or bowls to create a wreath shape, then cut out the wreath form.
2
Glue one end of the burlap ribbon in place on the back of the wreath, then wrap around until the wreath is completely covered. Tuck the end of the ribbon in and glue into place.
3
Cut out petals, leaves, and stamens to form paper poinsettias. You can use the templates from The Flying Couponer, or create your own design.
4
Glue the poinsettias together and attach to your wreath. Glue a twine hanger to the back of your wreath, and display!
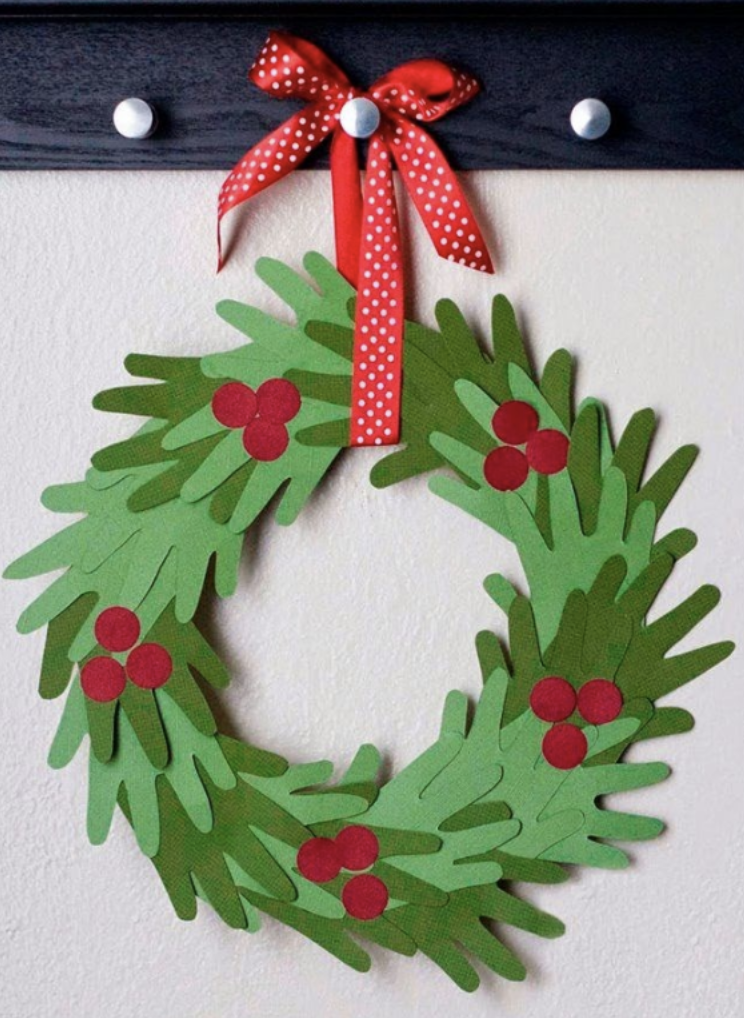
Handprint Christmas Wreath
Supplies:
- Cardboard or cardstock
- Two plates or bowls, one larger than the other (to use for templates)
- Green and red construction paper
- Ribbon
- Pencil
- Scissors
- Glue stick
Instructions:
1
Trace around the plates or bowls to create a wreath shape, then cut out the wreath form.
2
Glue one end of the burlap ribbon in place on the back of the wreath, then wrap around until the wreath is completely covered. Tuck the end of the ribbon in and glue into place.
3
Cut out petals, leaves, and stamens to form paper poinsettias. You can use the templates from The Flying Couponer, or create your own design.
4
Glue the poinsettias together and attach to your wreath. Glue a twine hanger to the back of your wreath, and display!
Gingerbread Man Garland
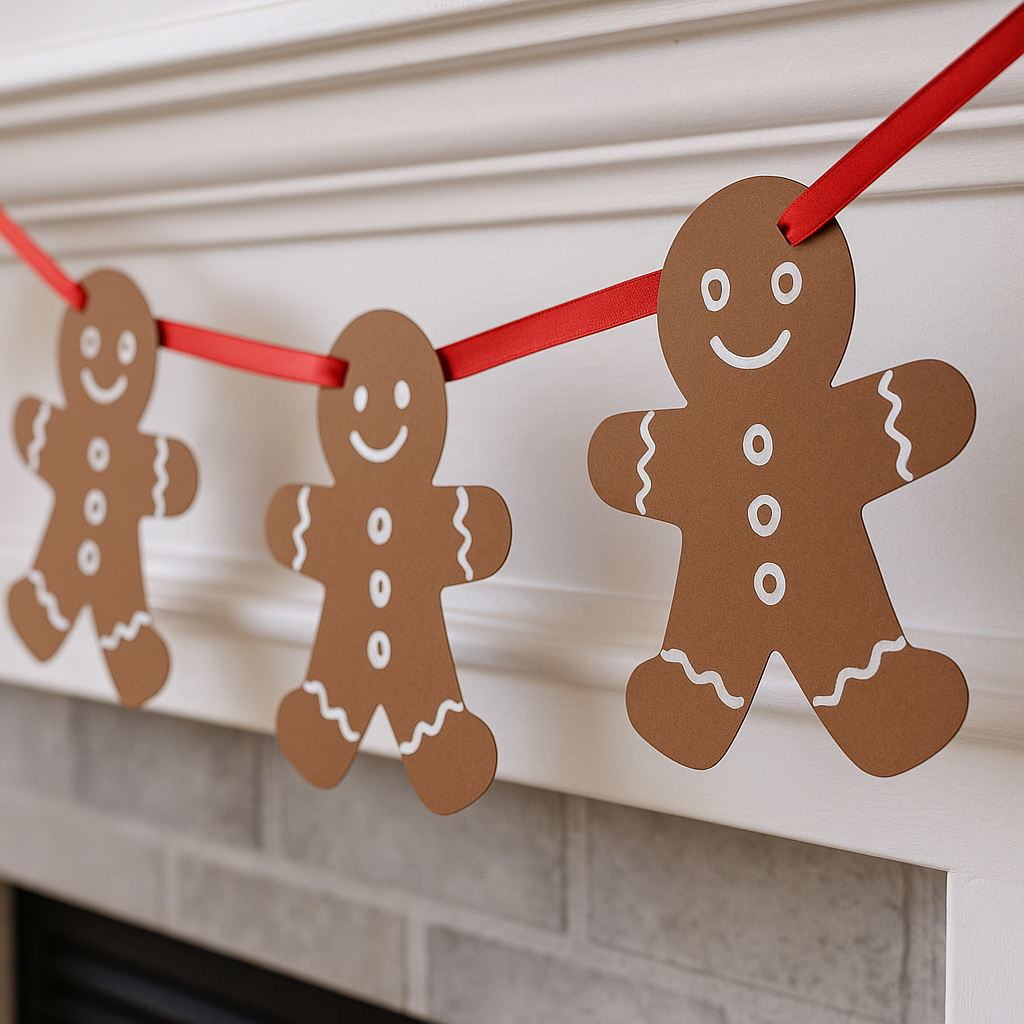
Supplies:
- Gingerbread Man Coloring Pages from ABCmouse
- Brown cardstock
- White paint and brush, or white chalk marker
- Ribbon
- Staple
- Scissors
- Beads, glitter, or other art supplies (optional)
- Glue (optional)
Instructions:
1
Print the gingerbread man coloring pages on brown card stock. You can use the sheet of Simple Gingerbread Man Outlines or sheet of 6 Gingerbread Men.
2
Cut out each gingerbread man. Use white paint or the chalk marker to fill in the markings, or decorate using art supplies however you like.
3
Cut a long strip of ribbon. Staple each gingerbread man at the top of his head onto the ribbon, evenly spaced. Hang your garland for decoration!
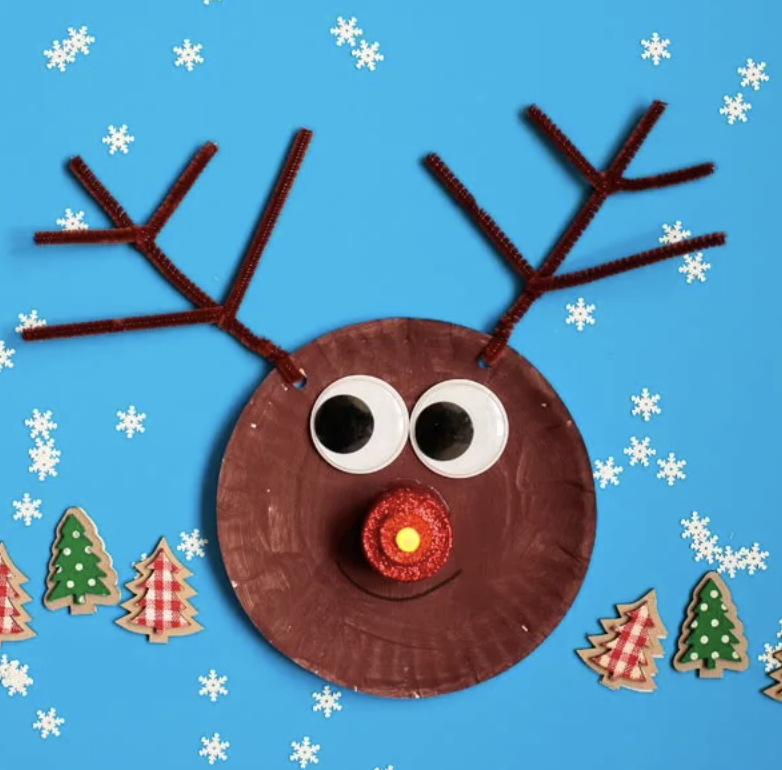
Glowing Nose Rudolph
Supplies:
- Small paper plate
- Brown paint and brush
- Brown pipe cleaners
- Large googly eyes
- Red flameless tealight
- Hole punch
- Black marker
- Scissors
- Glue
Instructions:
1
Paint the paper plate brown and let it dry.
2
Cut and twist the brown pipe cleaners to form antlers, punch two holes in the top of the paper plate, and attach the antlers as shown.
3
Glue the googly eyes in place.
4
Cut a small hole in the middle of the paper plate so you’ll be able to reach the switch for the tealight. Glue the tealight in place overtop, being careful not to glue the switch itself.
5
Use the black marker to draw a smiling mouth. Switch on the light for Rudolph’s glowing nose!
Glitter Stars
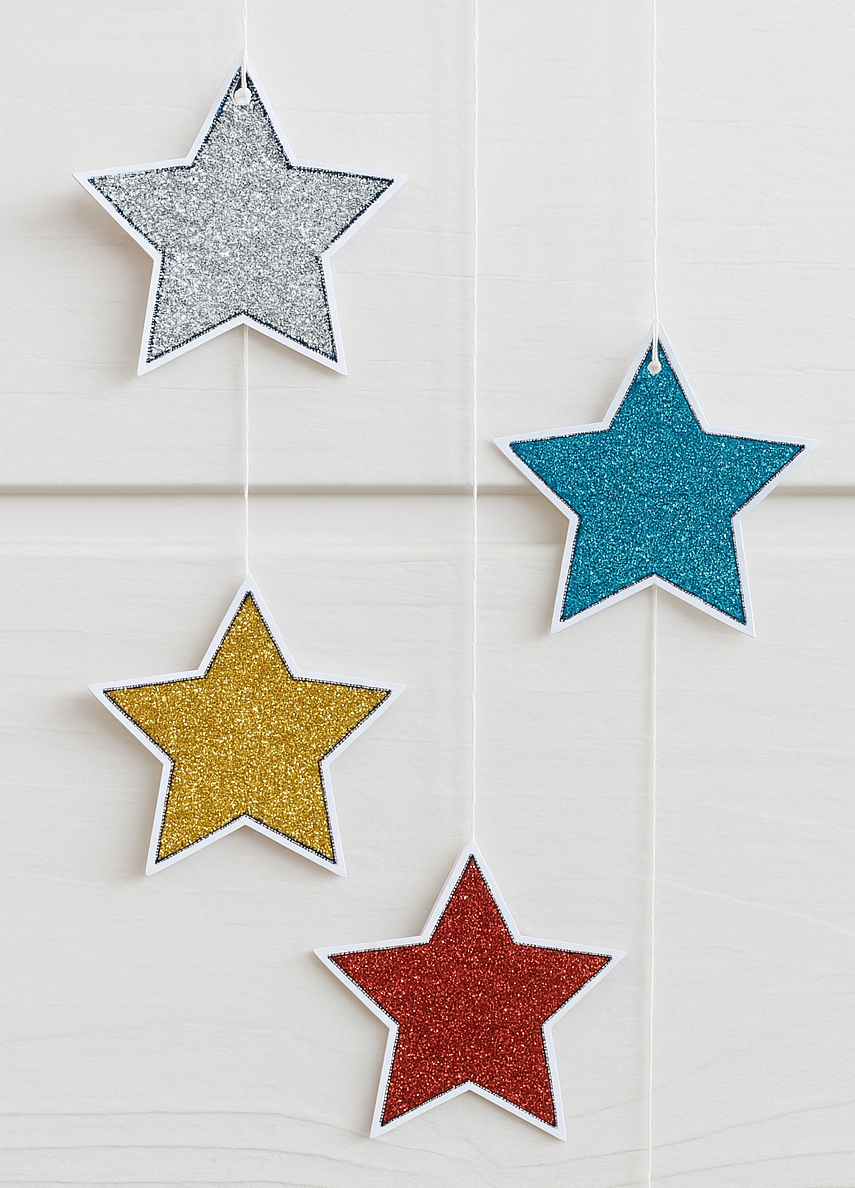
Supplies:
- Printable star activity pages from ABCmouse
- Cardstock
- Glitter and glue, or glitter glue
- Scissors
- Hole punch
- White thread
Instructions:
1
Print the ABCmouse star coloring pages of your choice onto card stock. We recommended using the Three Sizes of Stars or Trace the Stars.
2
Cut out each star, and punch a hole in the top point of each.
3
Use the glue and glitter (or glitter glue) to fill in each star. If you’ll be hanging the garland in a place where both sides are visible, fill in the front and the back. Let the stars dry completely.
4
Add hanging loops of white thread, and hang your stars wherever you like!
Pom Pom Painting Christmas Tree

Supplies:
- Green cardstock
- Craft paint in colors of your choice
- Pom poms
- Clothespins
- Scissors
- Pencil
Instructions:
1
Draw and cut out a basic Christmas tree shape from the green card stock.
2
Attach a clothespin to each pom pom to turn it into a “paintbrush.”
3
Pour a little paint of each color into shallow bowls, or onto a paper plate. Dip a pom pom into one color of paint, and dot it onto the tree in random places.
4
Choose a new pom pom and repeat. Continue until you’re satisfied with the decoration on your tree. Let it dry, and display!
Tip: Use different sizes of pom poms to create various sizes of dots.
Paper Ball Reindeer
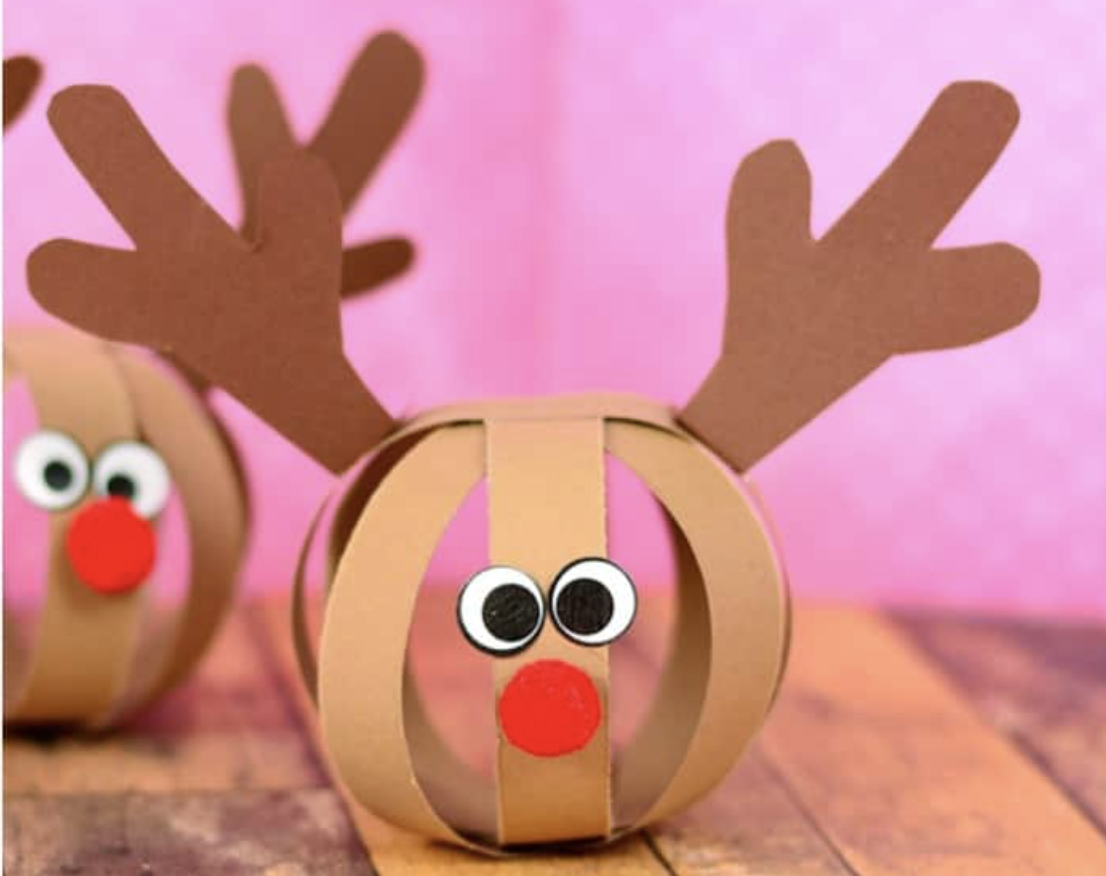
Supplies:
- Light brown and dark brown construction paper
- Googly eyes
- Red pom pom
- Scissors
- Ruler
- Pencil
- Glue
Instructions:
1
Use the ruler and pencil to make marks about one inch apart along the short side of the light brown construction paper. Cut the paper into strips along the marks.
2
Use the ruler to lightly mark the middle of each paper strip.
3
Lay one strip flat on the table and apply a small amount of glue to the middle. Lay another strip across it to form a cross. Repeat with two more strips, laying each diagonally to form a splayed star shape. Allow to dry completely.
4
Lift both ends of one strip and bend them up to form a loop. Glue it in place. Bend each of the remaining strips to continue forming the paper sphere. Let glue dry.
5
Cut antlers from the darker construction paper and glue them in place. Add the googly eyes and red pom pom nose as shown.
Christmas Joy Sign
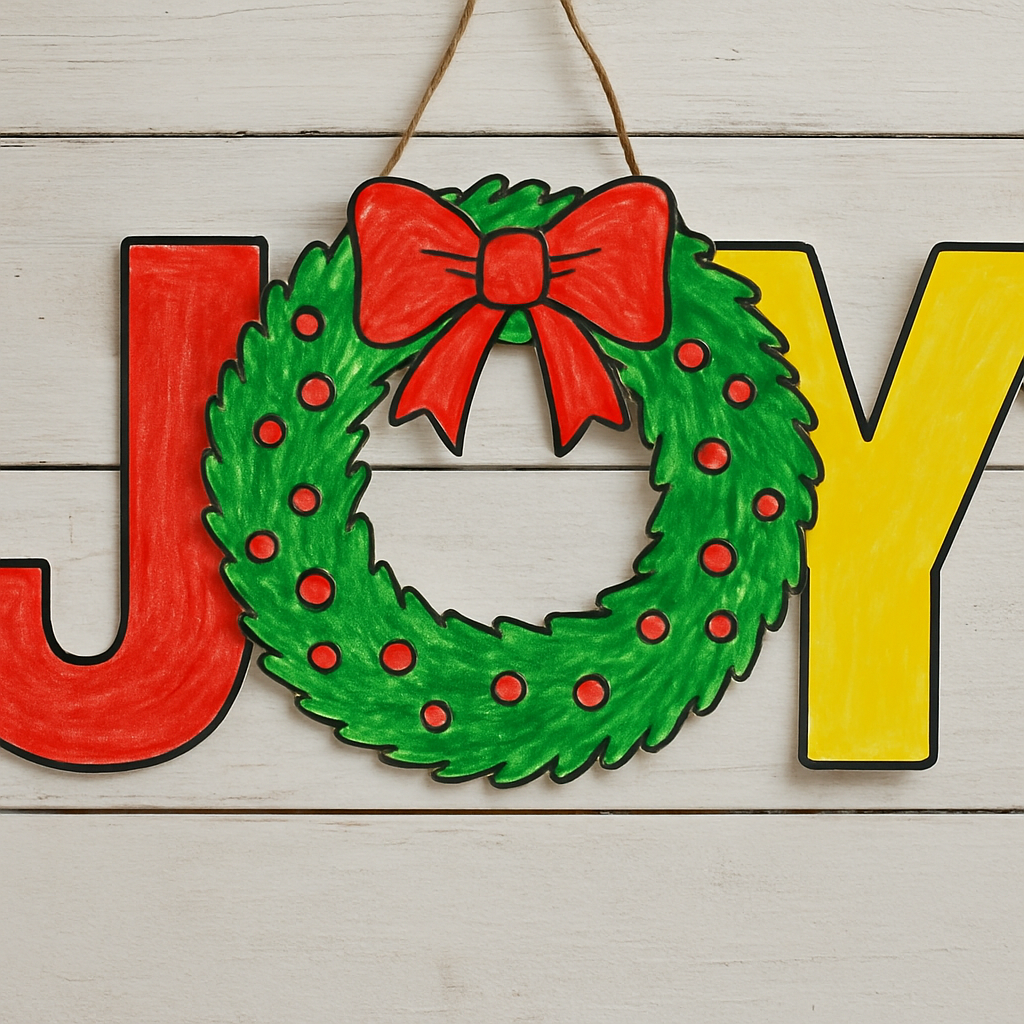
Supplies:
- Printable Merry Christmas Wreath coloring page from ABCmouse
- Capital Letter J coloring page from ABCmouse
- Capital Letter Y coloring page from ABCmouse
- Cardstock
- Markers
- Scissors
- Glue stick
Instructions:
1
Print the coloring pages on cardstock. Cut out the letters, and trim around the outside of the wreath. Color the letters and wreath any way you like.
2
Lay out the letters and wreath to spell JOY, with the wreath as the O. Glue the three together, slightly overlapping. Hang your merry sign!
Christmas Games & Activities
Mix some friendly competition into your holiday parties or playdates with these simple and silly ideas for kids of all ages.
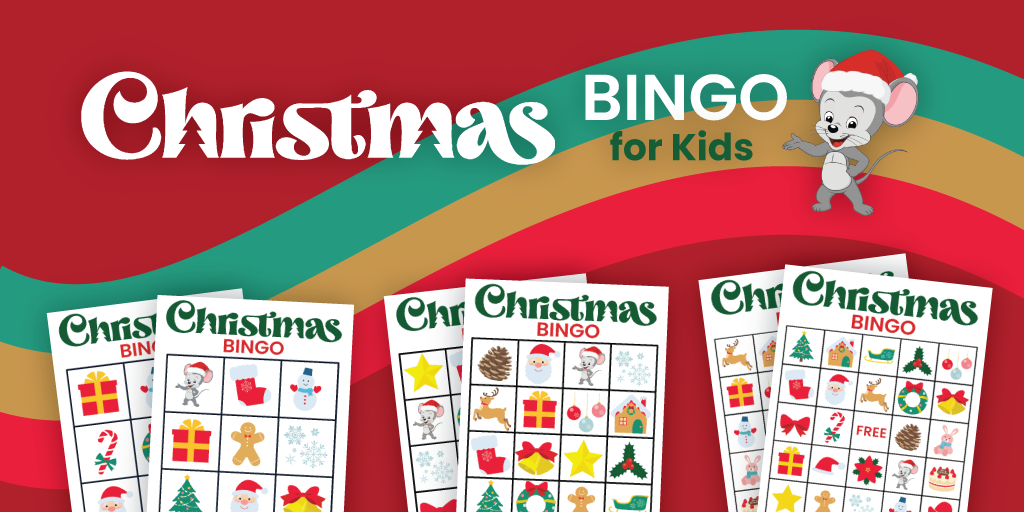
Whether you’re cozy at home, hosting a party, or celebrating in the classroom, these free holiday Bingo cards bring fun for all ages. With three different options to pick from, you can tailor the game to different ages or the amount of time you have.
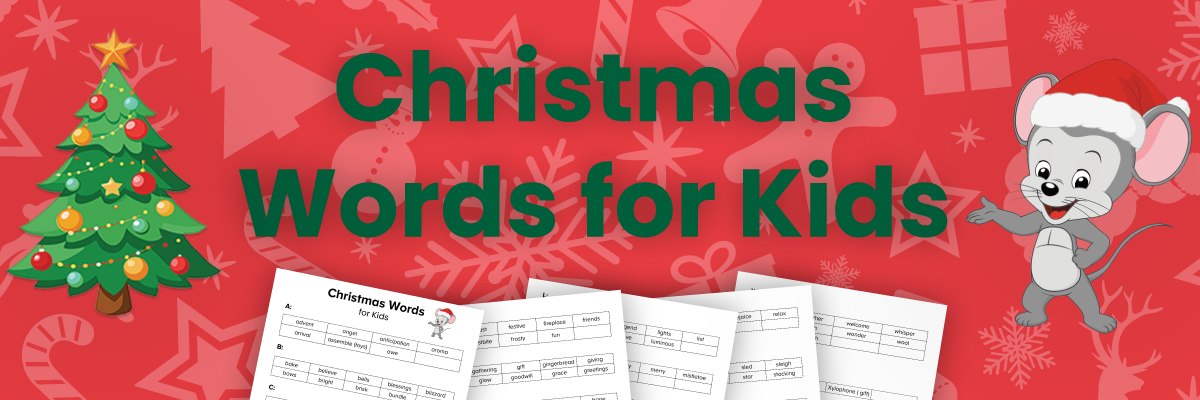
Our free printable Christmas Words List features simple words for younger children and more challenging words with definitions. You’ll also find Christmas words for every letter of the alphabet. They’re perfect for playing charades or pictionary.
Pin the Nose on Rudolph
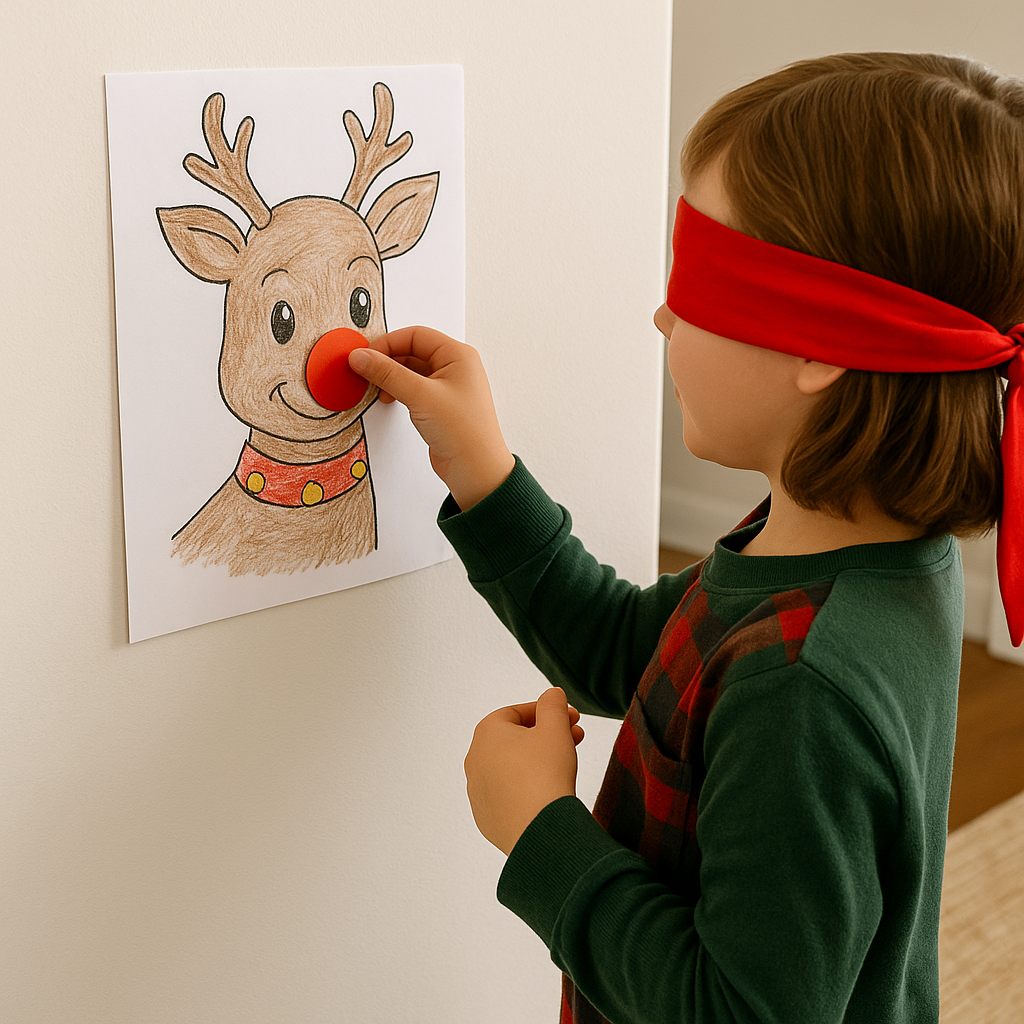
Supplies:
- Reindeer coloring pages
- Blind fold
- Red circle trimmed from construction paper
Choose a design from our collection of Reindeer Coloring Pages, and color it however you like. Hang the picture on the wall of a room with lots of empty space. Blindfold each guest in turn, and give them a red circle cut out of construction paper with a piece of tape on the back. Spin them around a few times and let them go—see who can get the nose the closest to the right place!
Santa Says
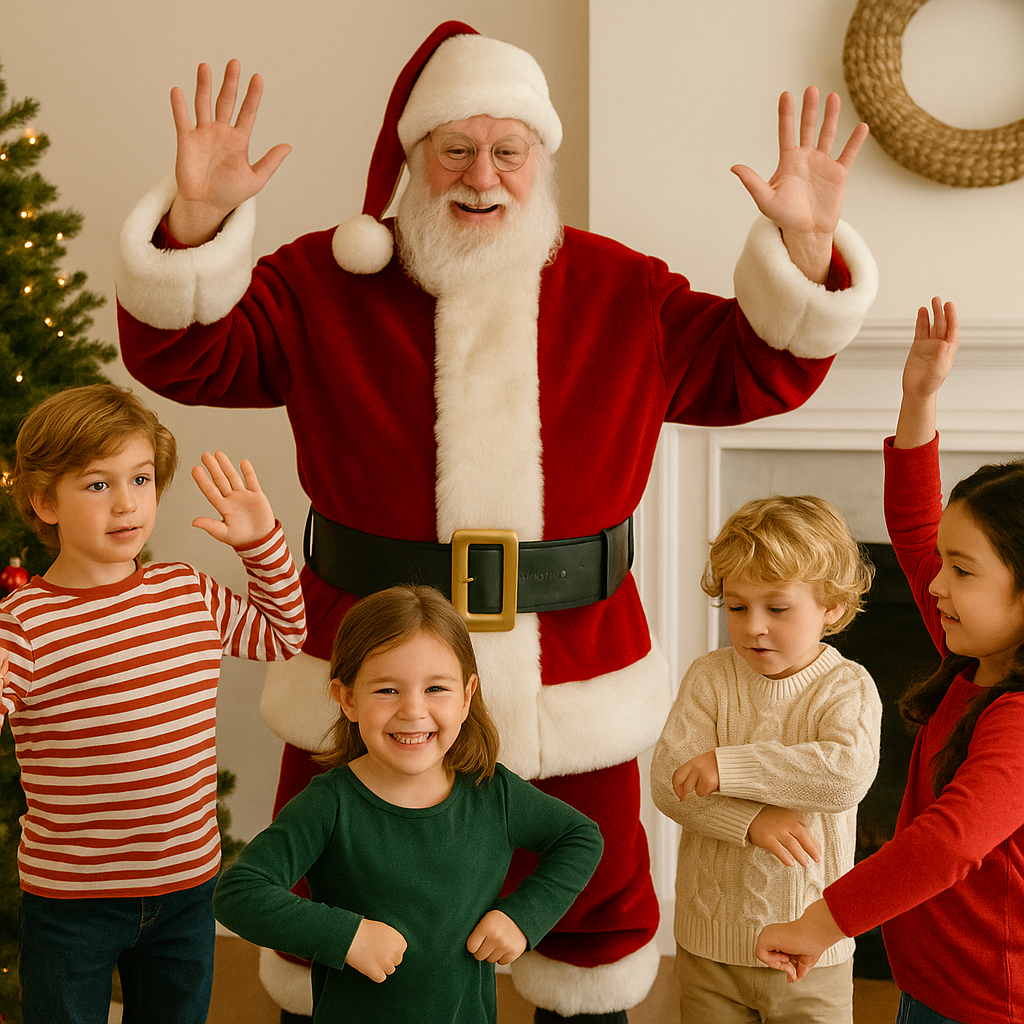
Supplies:
- A room or outdoor area with a decent amount of space in it.
Give a holiday twist to the classic game Simon Says by playing Santa Says instead. Have fun coming up with holiday movements like “Santa says shake your belly like a bowl full of jelly” or “Santa says pretend you’re wrapping a present.”
Snowman Race

Supplies:
- Rolls of toilet paper
- Hats
- Scarves
Break the group into teams, and have each team choose a “snowman.” Give each team a roll of toilet paper, plus a hat and scarf. When the game starts, each team races to wrap their “snowman” entirely in toilet paper, finishing off with the hat and scarf. First to finish wins!
Reindeer Ring Toss

Supplies:
- Reindeer antler head band
- Red and white pipe cleaners
Twist the pipe cleaners together to form rings that will fit around the antlers. Choose a player to be the “reindeer” and wear the antlers. The rest of the players take turns trying to toss rings over the antlers!
Draw the Snowman

Supplies:
- Paper
- Pencil, marker, or crayon
- Blindfolds
Give each player a piece of paper and a pencil, marker, or crayon. Blindfold the players. Give them one minute to draw a snowman on their paper, including head, middle, and body, eyes, nose, mouth, hat, and arms. Remove your blindfolds and see how everyone’s snowmen turned out!
Snowball Toss
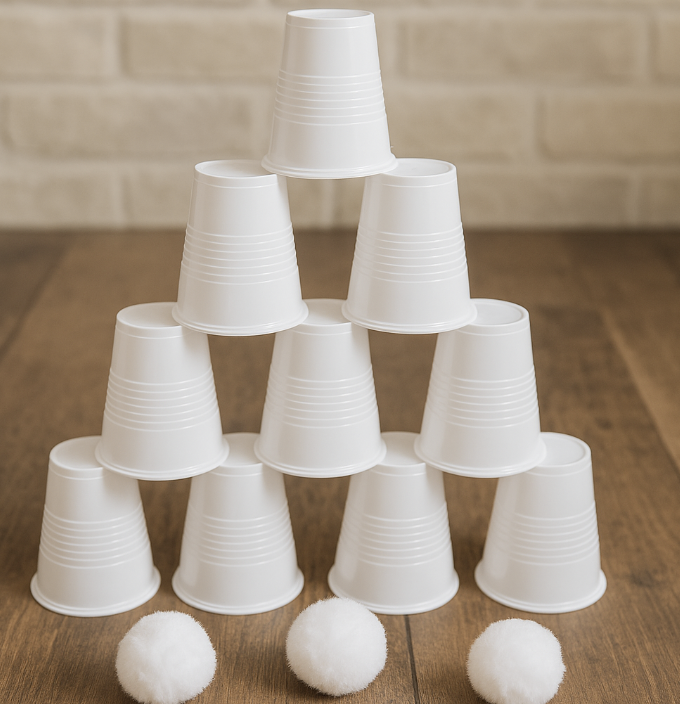
Supplies:
- White styrofoam, plastic, or paper cups
- White pom poms
Stack the cups into a pyramid, then take turns tossing the pom poms to try and knock the cups down.
More Simple Christmas Games for Kids
Jingle Bell Cup Toss
Set out red and green plastic cups, then take turns trying to toss small jingle bells into each. This fun twist on the standard ball toss game is perfect for the jolly season!
Christmas Name That Tune
This is a holiday classic. Each player hums a few notes from a Christmas song, and other players take turns trying to guess it. Start with just a couple of notes, then add more if players need more clues.
Merry Christmas Word Challenge
Write the words “MERRY CHRISTMAS” across the top of a piece of paper. Then, see how many words you can make from those letters! For example: rice, mist, hairy, etc.
Mini Candy Cane Search and Find
Hide mini candy canes in a variety of places around the room or house, then set your guests loose to see who can find the most!
Christmas Song Musical Chairs
Here’s another classic that’s easy to put a holiday spin on. Simply use Christmas songs for the music!
Cookie Decorating Contest
Provide prebaked sugar cookies, along with frosting, sprinkles, and other decorations. Each guest has 5 minutes to decorate their cookie however they like. Award prizes for the best designs.
Christmas Printable Coloring Pages, Jokes, Puzzles, & Trivia for Kids
Free printables provide a great quiet activity during the hectic holiday season. Print them out to enjoy during downtown at home or in the classroom. The jokes and trivia questions make a fun addition to meals or time in the car.
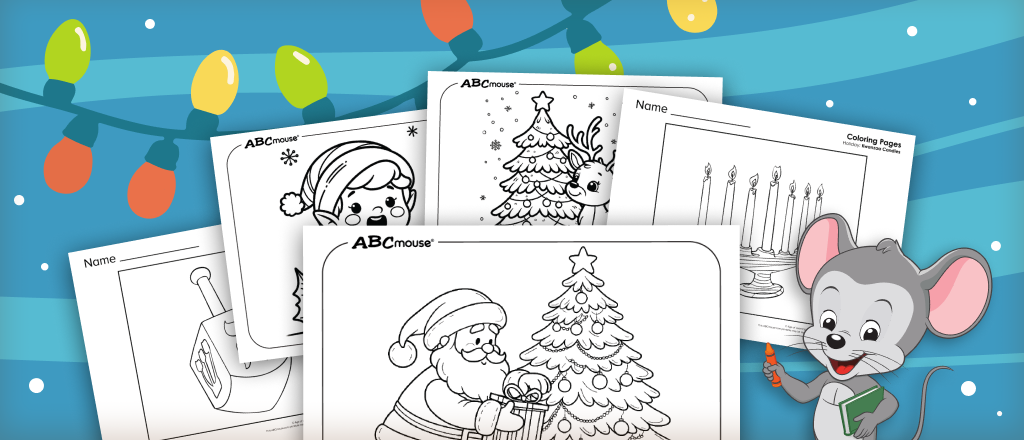
From Christmas wishes and Hanukkah and Kwanzaa coloring pages to scenes with Santa, reindeer, gingerbread, and so much more, this huge collection of free printable holiday coloring pages has something for everyone.

Test your Christmas knowledge with 125+ trivia questions for families, including easy and tricky questions and questions about classic Christmas movies and songs, holiday traditions and foods, and so much more! Plus, these come with answers, so no one has to spend Christmas stumped!
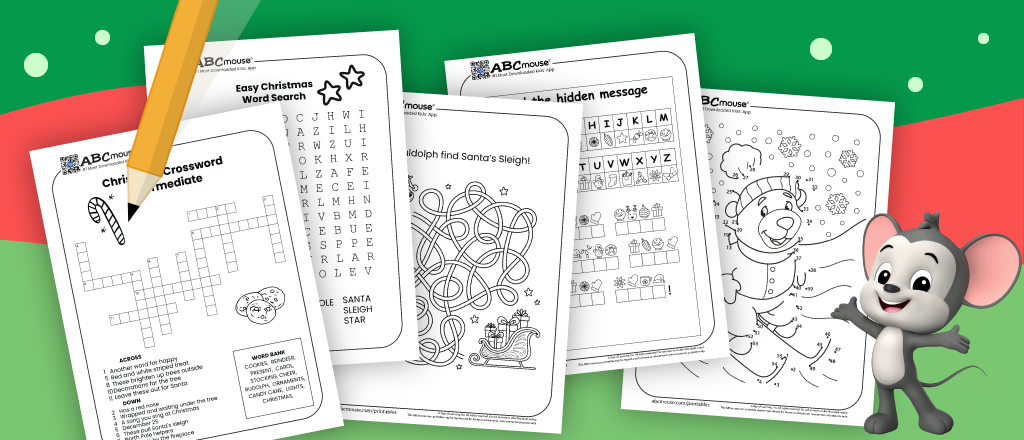
From word searches and scrambles to crossword puzzles and I Spy games, these printables offer plenty of festive fun—just download, print, and play! To help out young learners, each Christmas word search and word scramble includes an answer key, and the crossword puzzles come with helpful word banks.
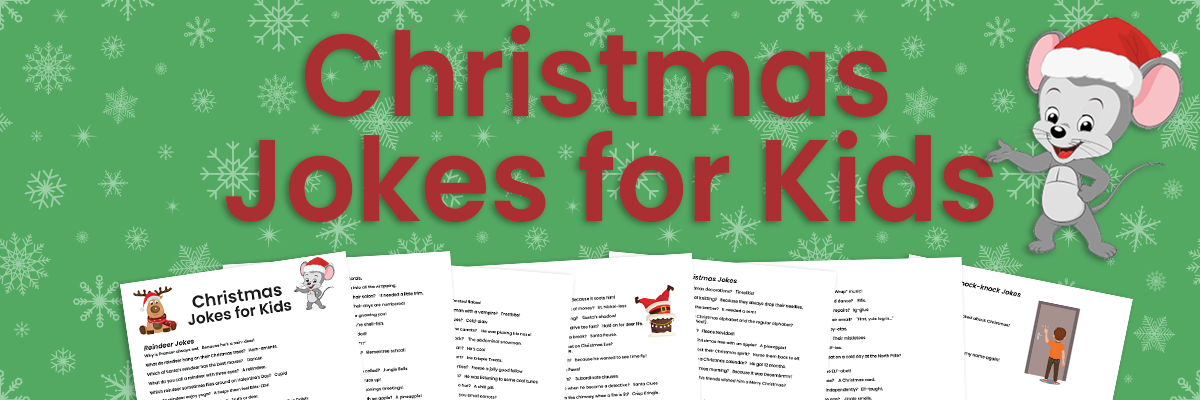
These free printable Christmas jokes will have the entire crew in stitches as they hear the punchlines to jokes featuring Santa, his reindeer, snowmen, and other stars of the holiday season.
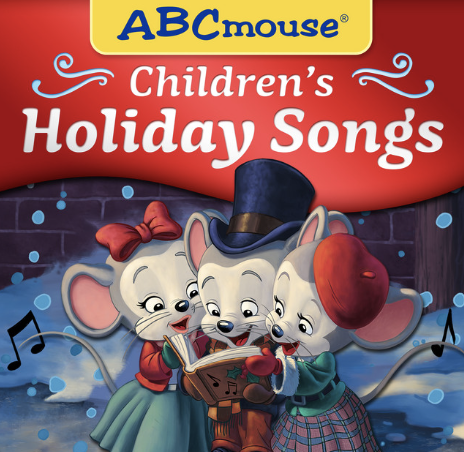
Winter Holiday Songs and Videos
These catchy tunes help kids celebrate the season and learn about other winter holidays.
Sing and Dance Along!
Jingle Bells
Kids will delight in listening and singing along with a well-tune as they watch ABC, DoReMi, and 123 zip through a winter wonderland.
We Wish You a Merry Christmas and More
Sing along to one of the most beloved Christmas songs of all time with this video that’s perfect for kids.
“Happy Kwanzaa!”
This original song honors the rich traditions and values of Kwanzaa, bringing to life its seven principles in a way that’s fun and easy for kids to understand.
Hanukkah Oh Hanukkah
Join kids as they light the menorah, dance the hora, and spin the dreidel in this classic Hanukkah tune!
Happy Holidays, Prehistoric Pals!
What would it have been like if dinosaurs celebrated the winter holidays? Find out with this fun song!
Children’s Holiday Songs Playlist on Spotify
Looking for more holiday songs for kids? Check out our Spotify playlist, with more than a dozen terrific songs for a variety of holidays


Legal disclaimer: Any links to third-party resources are provided for informational purposes only. We are not affiliated with and do not sponsor/endorse these third parties and bear no responsibility for the accuracy of content on any external site.
-

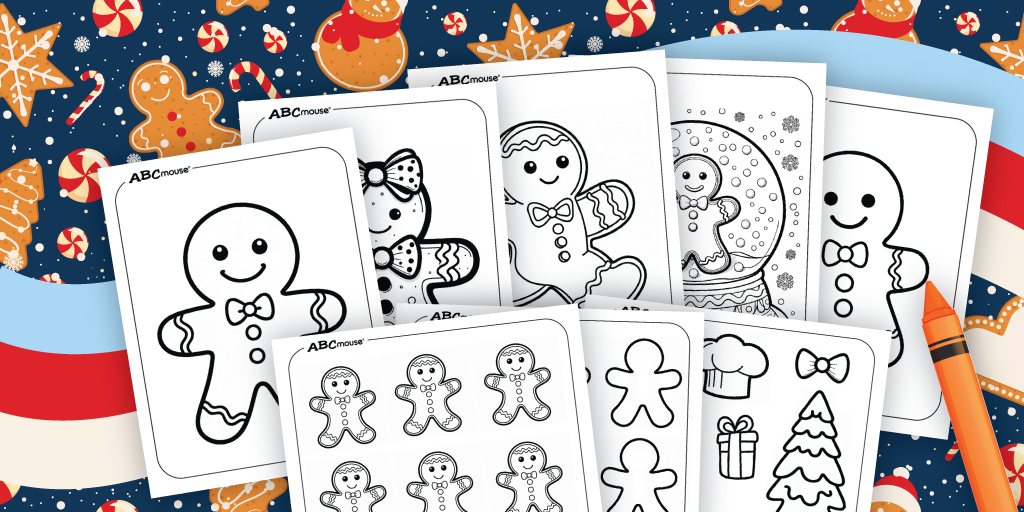
Gingerbread Man Coloring Pages
Download our free printable gingerbread man coloring pages for kids, featuring gingerbread families, festive scenes, and fun activities. Perfect for holiday celebrations or indoor fun, these…
-
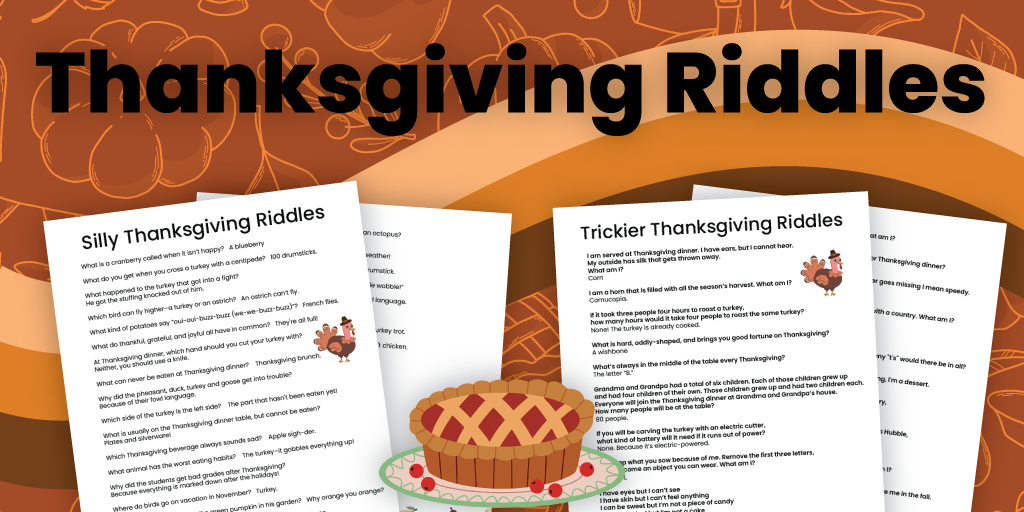
Thanksgiving Riddles for Kids
Looking for a fun way to entertain the family this Thanksgiving? Check out these 50 silly and tricky Thanksgiving riddles that kids and adults will enjoy!…
-
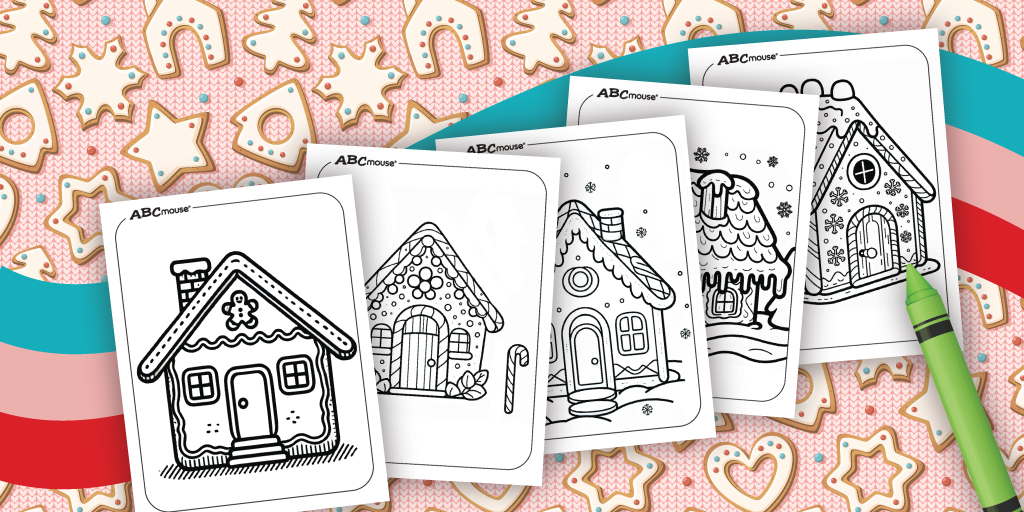
Gingerbread House Coloring Pages
Discover festive gingerbread house coloring pages perfect for kids of all ages. These free printables offer creative fun and holiday spirit, from simple designs to intricate…
-

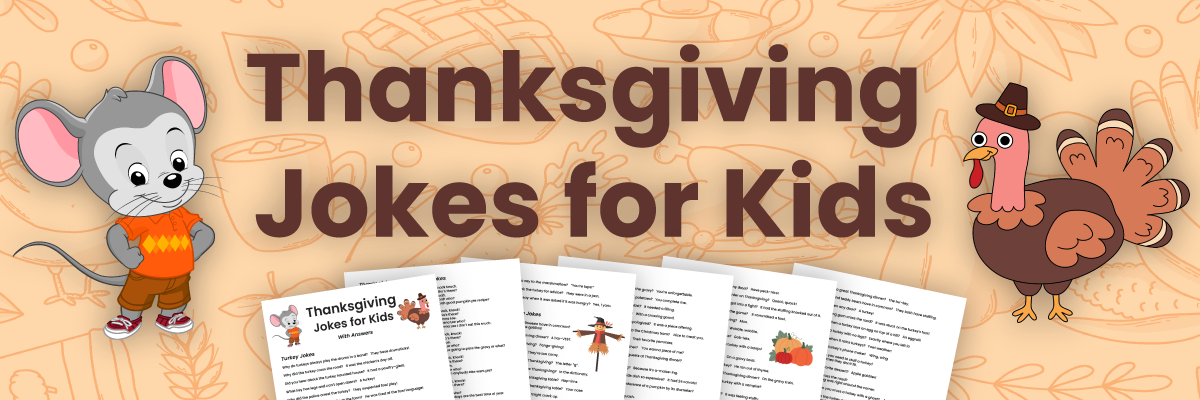
Thanksgiving Jokes for Kids
Enjoy over 100 Thanksgiving jokes for kids, including turkey jokes, food puns, and knock-knock humor. Perfect for family gatherings, these printable jokes will keep the fun…
-
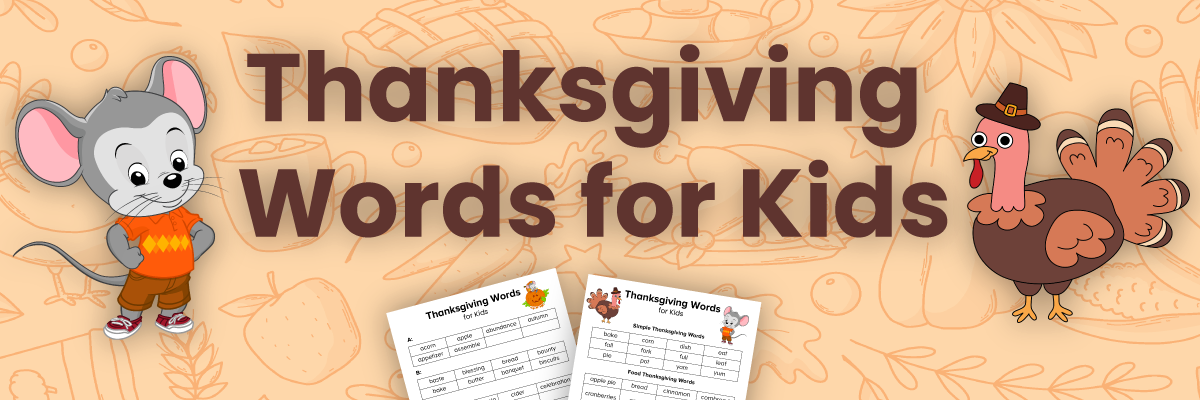
Thanksgiving Words for Kids
Expand your child’s vocabulary with free printable Thanksgiving word lists! Explore seasonal words, thankful terms, A-Z lists, and fun holiday activities.
-
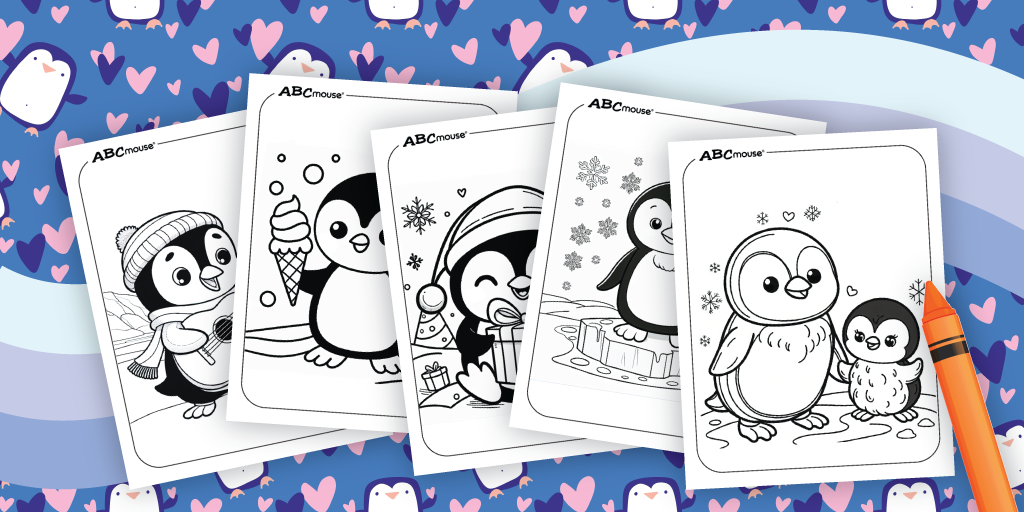
Penguin Coloring Pages
Explore our collection of 30+ adorable penguin coloring pages, perfect for kids of all ages. From simple designs to more detailed scenes, these free printables offer…