Share
32 St. Patrick’s Day Crafts & Activities Featuring Rainbows, Leprechauns, Shamrocks, and More!
Looking for fun St. Patrick’s Day craft ideas for kids and families? It’s your lucky day!
Get ready to celebrate all things Irish with these fun and easy St. Patrick’s Day crafts! They’re perfect for toddlers, preschoolers, and elementary school students and are designed to be completed at home or in the classroom. You’ll find ideas for shamrocks, lucky clovers, leprechauns, rainbows, pots of gold, and more. Gather up your supplies and get ready to add hands-on creativity to your St. Patrick’s Day celebration!
Easy St. Patrick’s Day Crafts for Toddlers and Preschoolers
Pom Pom Rainbow
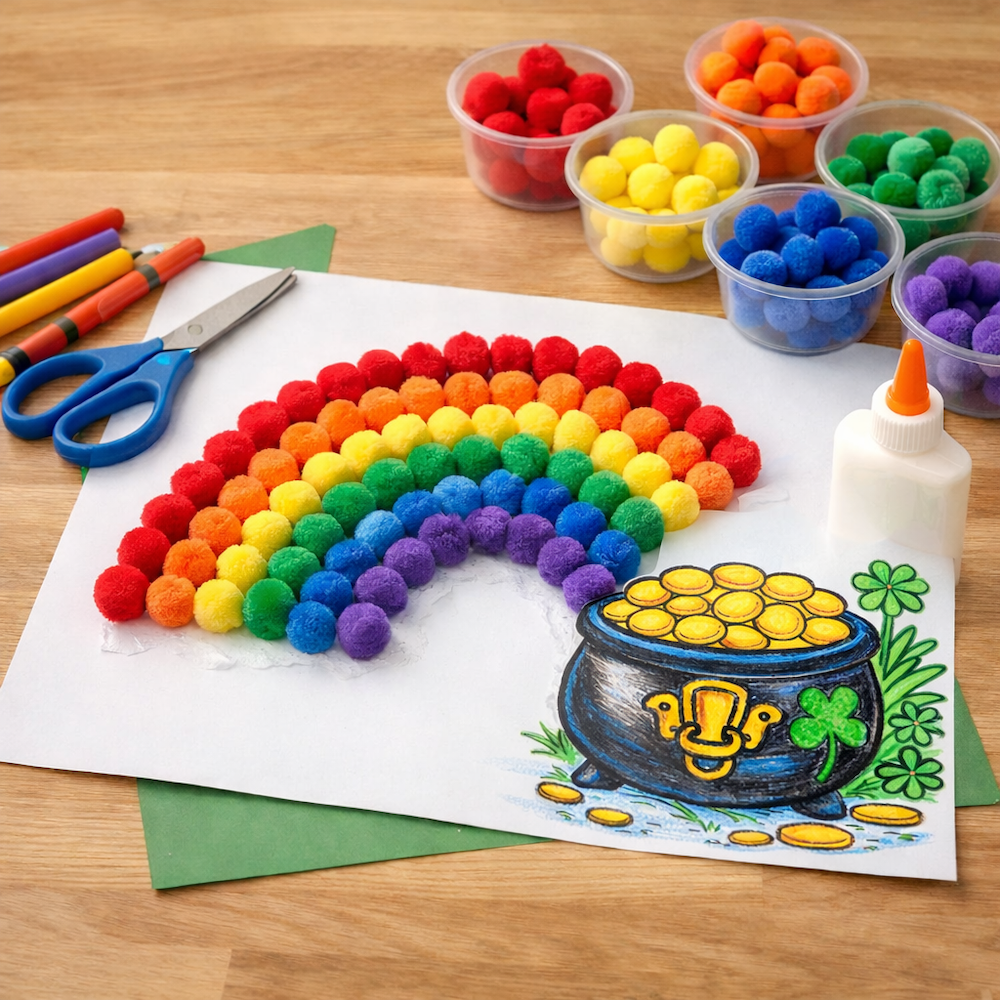
Supplies:
- Pot of Gold coloring page from ABCmouse
- Scissors
- Crayons or markers
- Pom poms in red, orange, yellow, green, blue, indigo, and violet
- Paper
- Glue
Instructions:
1
Color in the pot of gold and cut it out. Glue it to the bottom right corner of the paper.
2
On a large piece of paper, spread a thin layer of glue to form a rainbow arc that ends in the pot of gold.
3
Press pom poms into place into the glue to form the colorful arcs in this order: red (outside), orange, yellow, green, blue, indigo, and violet. Allow to dry, then display your craft!
Leprechaun Hat Crown

Supplies:
- Leprechaun’s Lucky Hat coloring page from ABCmouse
- Crayons or markers
- Green construction paper
- Glue
- Scissors
- Stapler (optional)
Instructions:
1
Color in and cut out the leprechaun hat. Cut several strips of paper and glue or staple them end to end. Form the long strip into a crown to fit your child’s head, glue or staple into place, and trim any excess.
2
Glue the leprechaun hat to the front of the crown, and wear your St. Patrick’s Day craft all day long!
Shamrock Wand
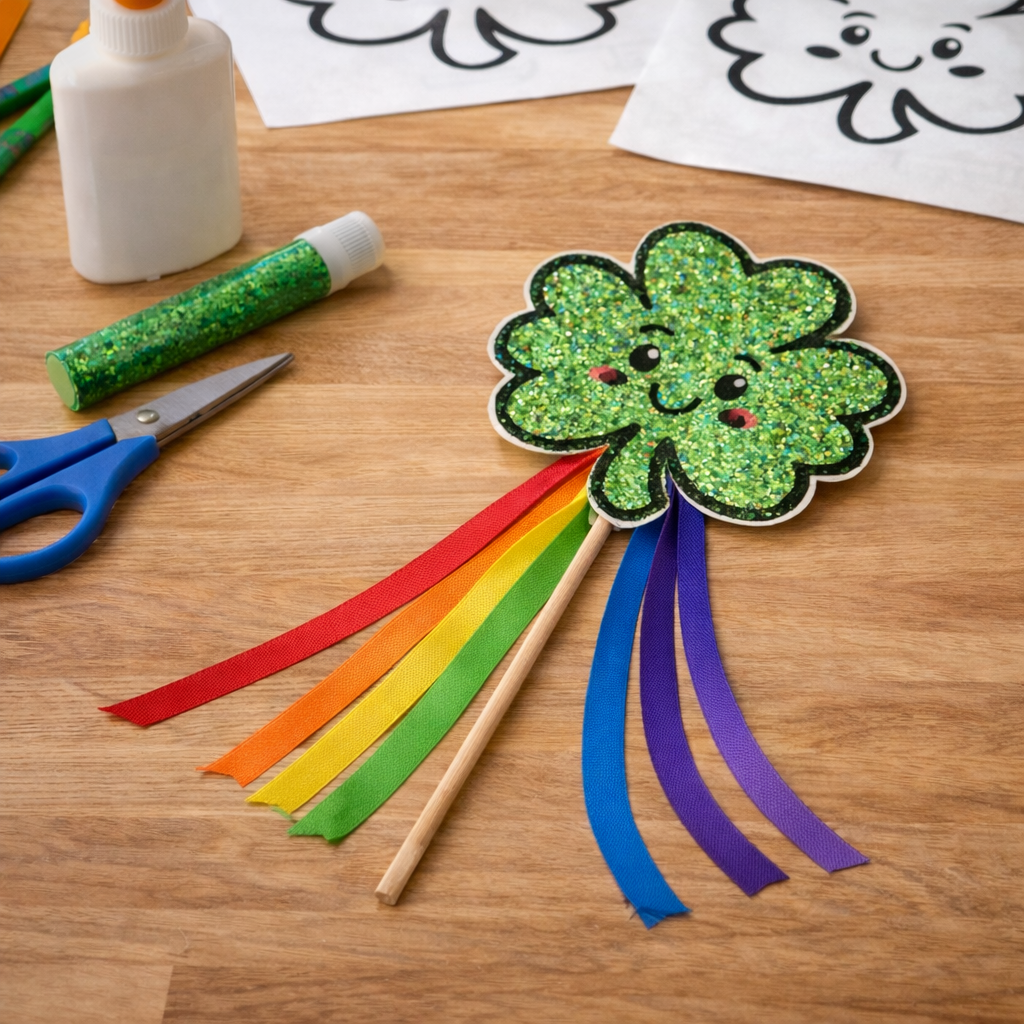
Supplies:
- 2 copies of Smiling Shamrock coloring page from ABCmouse
- Green glitter glue
- Wood skewer or chopstick
- Scissors
- Glue
- Ribbons in rainbow colors
Instructions:
1
Use the glitter glue to fill in the shamrock shape on each page, and allow them to dry. Cut out each shamrock.
2
Cut lengths of ribbon in your choice of colors.Glue the shamrocks together back-to-back, with the end of the skewer or chopstick and the ribbon ends sandwiched between. Let dry.
3
Wave your wand to grant luck to all on St. Paddy’s Day!
Paper Plate Pot of Gold
Supplies:
- Paper plate
- Black craft paint and brush
- Gold or yellow cardstock
- Scissors
- Glue
- Shamrock stickers or other embellishments (optional)
Instructions:
1
Paint the back of the paper plate black, and allow it to dry.
2
Cut the paper plate in half. Glue the halves together along the edges, black side out, leaving the top edge open. Add shamrock stickers or embellishments if you like.
3
Cut small round circles from the gold or yellow card stock to create “gold coins” and add them to your paper plate pot, either gluing them into place or keeping them loose inside.
Tip: Write letters or numbers on the “coins” to turn this into a learning craft! You can also practice math by counting the coins.
Handprint Shamrocks and Clovers
Supplies:
- Paper
- Green fingerpaint or craft paint
- Paint brush
- Paper plate
Instructions:
1
Squirt some paint onto the plate and spread it out.
2
Press your child’s hand into the paint onto the paper to form one leaf. To make a shamrock, create three leaves. For a lucky clover, create four leaves.
3
Finish by adding a stem to your shamrock or clover with the brush and remaining paint.
Fingerprint Rainbow

Supplies:
- Finger paints or craft paints in red, orange, yellow, green, blue, indigo, and violet
- Paper plate
- Scissors
Instructions:
1
Cut the paper plate in half and place one half on your word surface with the rounded side at the top.
2
On the other half, squeeze a small amount of red paint. Show your child how to dip their finger into the paint and make a fingerprint on the top edge of the plate. Add more red fingerprints to complete the first row of the rainbow.
3
Repeat with orange paint to create the second row just underneath. Continue with the remaining colors to fill in the rest of the half-plate and make the whole rainbow!
Yarn Wrapped Paper Plate Horseshoe
Supplies:
- Paper plate
- Scissors
- Yarn in your choice of colors
- Scotch tape
Instructions:
1
To make the horseshoe shape, cut out the middle of the paper plate, as well as about three inches from the top edge of the rim.
2
Tape a piece of yarn to the back of the plate, and begin wrapping the yarn around to cover the plate completely. You can wrap it in rainbow colors; green and yellow; orange, white, and green (the colors of the Irish flag); or any other combination you like.
3
When the horseshoe is completely covered, tuck the end of the yarn in at the back of the plate. Add a loop of yarn at the top to hang your St. Patrick’s Day craft!
Smiling Shamrock Friend
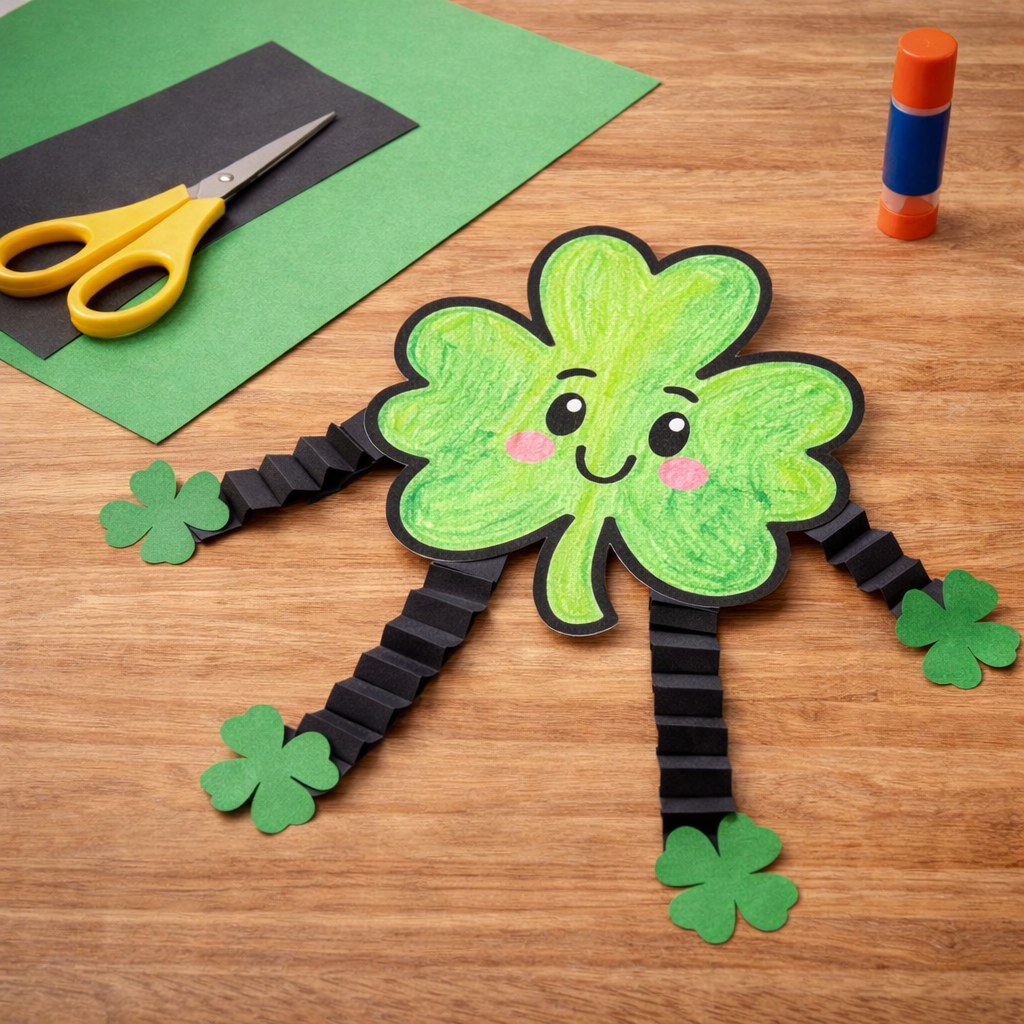
Supplies:
- Smiling Shamrock coloring page from ABCmouse
- Crayons or markers
- Green and black construction paper
- Scissors
- Glue stick
Instructions:
1
Color in the smiling shamrock and cut it out.
2
Cut four strips of black construction paper. Accordion-fold each strip to form a “spring.” Glue one end of each strip to the back of the shamrock to create arms and legs.
3
Cut four small shamrocks from green construction paper. Glue them to the ends of the paper strips to be hands and feet.
Irish Flag Magnet
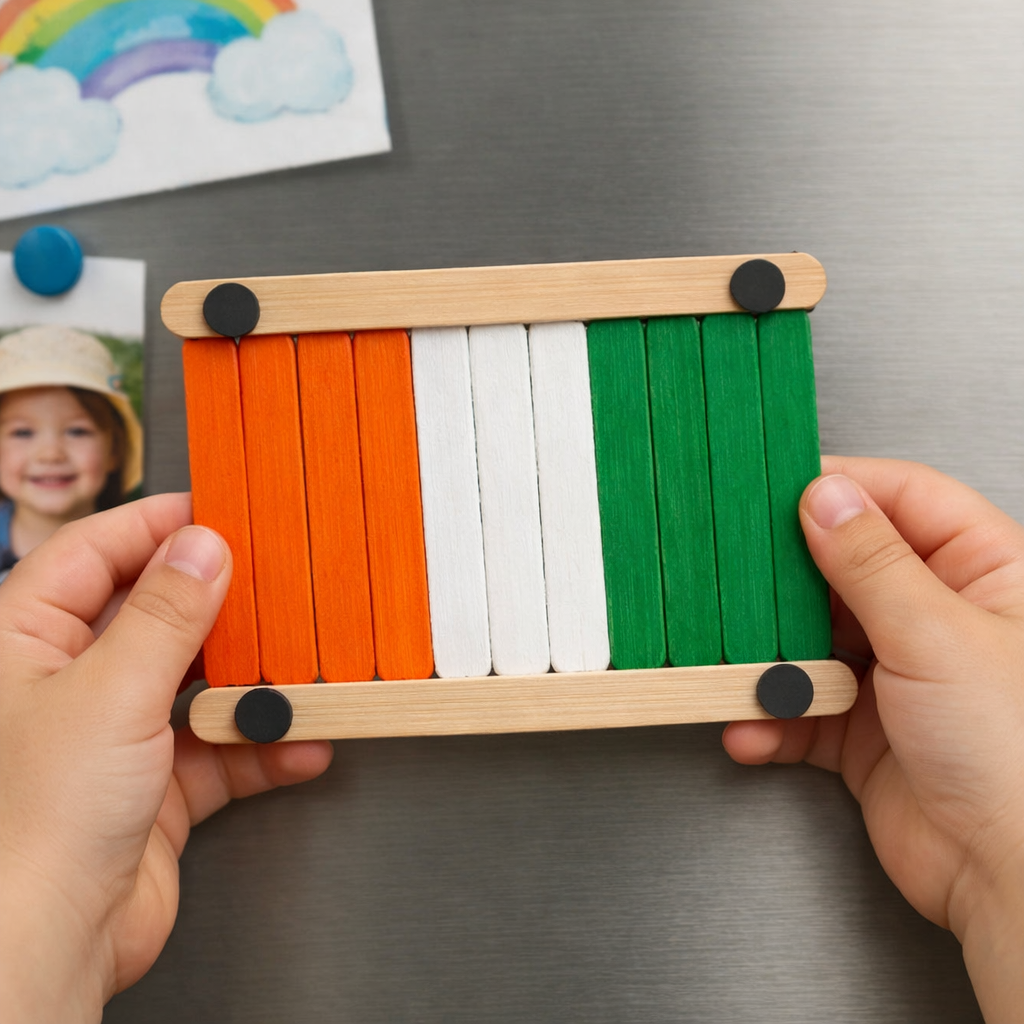
Supplies:
- 9 to 14 wood craft sticks
- Orange, white, and green craft paint and brushes
- Glue
- Small magnets
Instructions:
1
Decide how many craft sticks you’ll use for each section of the flag (3 or 4). Paint your craft sticks so you have 3 or 4 that are orange, green, and white. Let them dry.
2
Lay the craft sticks vertically, face down and side-by side. Place them to form three vertical stripes: orange, white, and green.
3
Add some glue to one of the remaining craft sticks and press it horizontally along the top of the craft sticks to hold them together. Repeat with the remaining craft stick at the bottom.
4
Glue magnets to the top and bottom craft sticks and let them dry. Hang your magnet with pride!
Pipe Cleaner Rainbow Sculpture
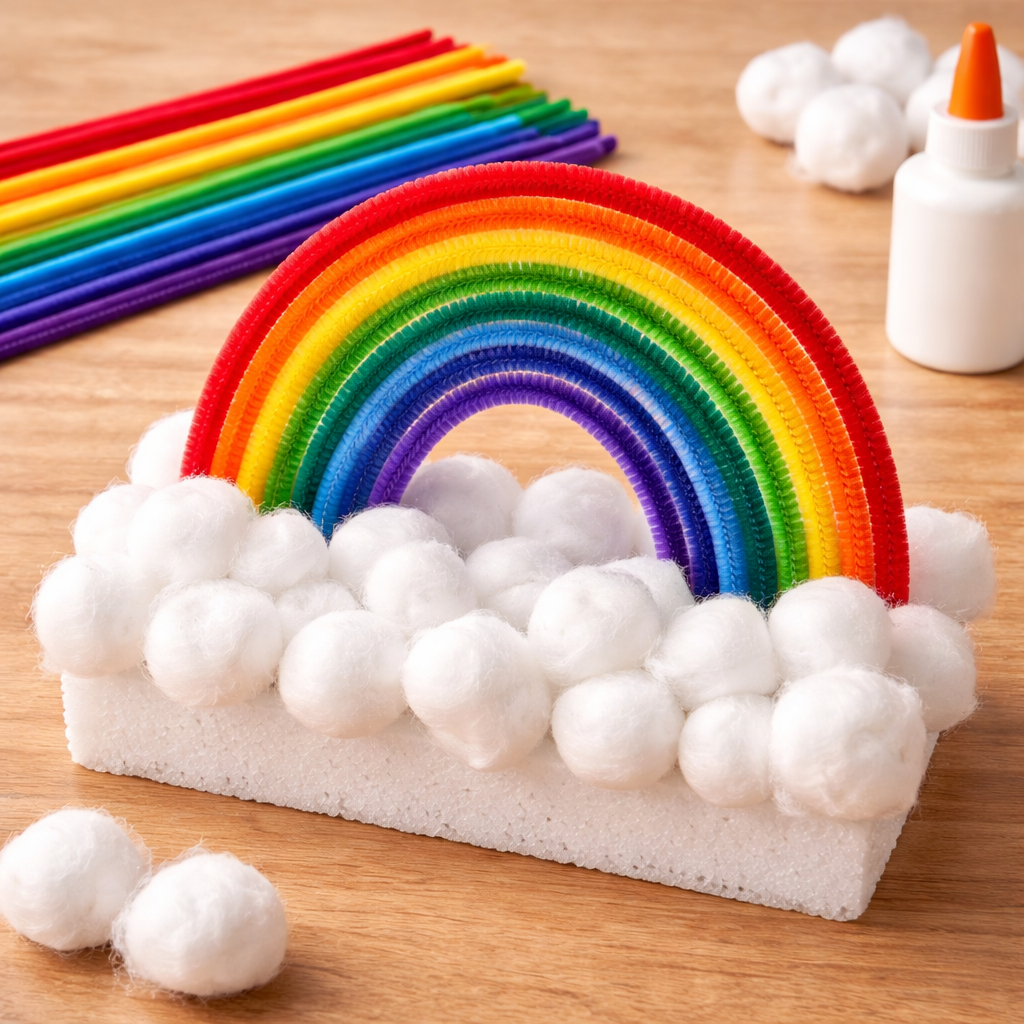
Supplies:
- Pipe cleaners in red, orange, yellow, green, blue, indigo, and violet
- Block of styrofoam or floral foam
- Cotton balls
- Glue
Instructions:
1
Bend the pipe cleaners to form a rainbow arch, pushing the ends of each pipe cleaner into the foam block.
2
Glue the cotton balls in place to cover up the block entirely, then show off your colorful sculpture!

Pot of Gold and Rainbow Crafts for St. Patrick’s Day
Sponge Painted Rainbow
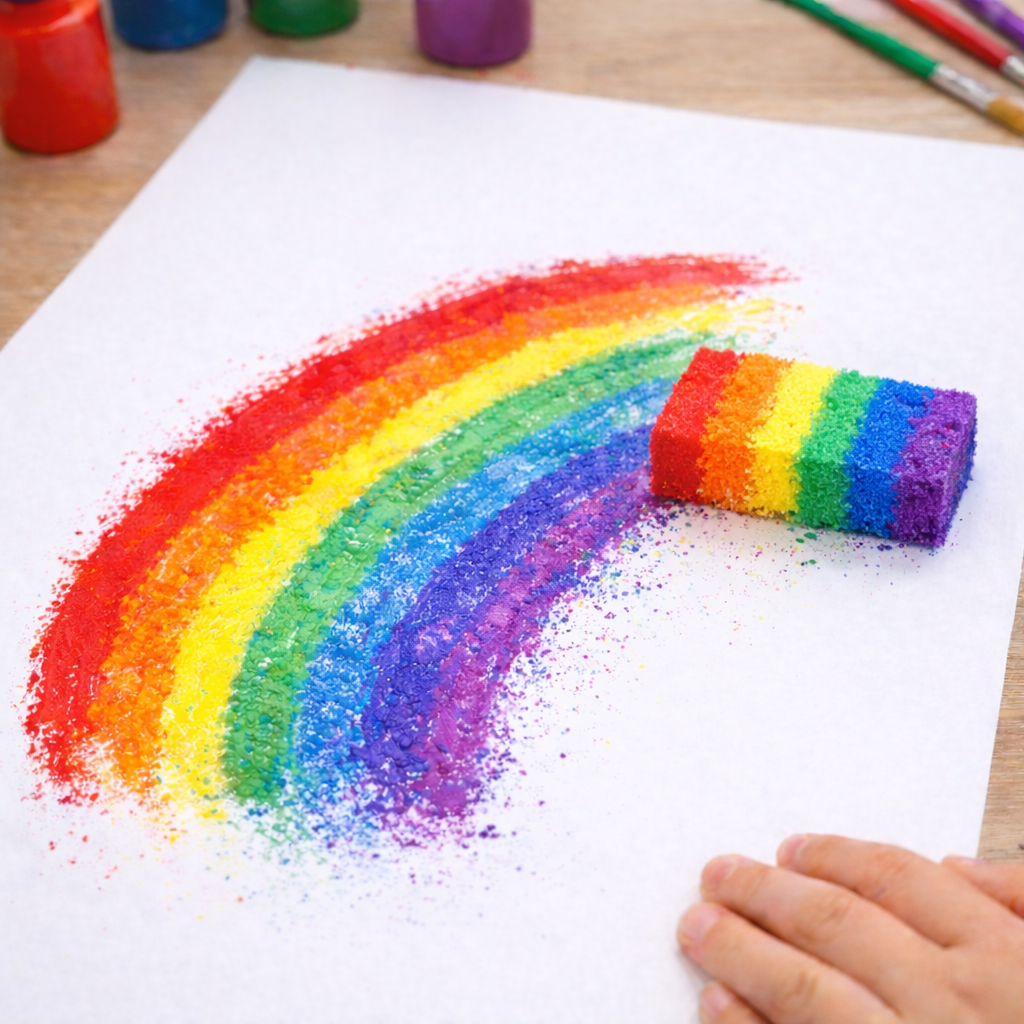
Supplies:
- Sponge
- Craft paint: red, orange, yellow, green, blue, indigo, and violet
- Paint brushes
- Paper
Instructions:
1
Use the paint brushes to make stripes of paint across the sponge in rainbow order (red, orange, yellow, green, blue, indigo, violet). Add the paint generously.
2
Carefully swipe the sponge, paint-side down, across the page to create a rainbow. Have fun creating different shapes and patterns with your sponge!
Tip: If your sponge isn’t large enough to hold all of the colors, just apply one at a time, rinsing your sponge off in between colors. Children can also experiment with blotting the sponge onto the paper to create a rainbow that matches the shape of their sponge.
Salt Painted Rainbow
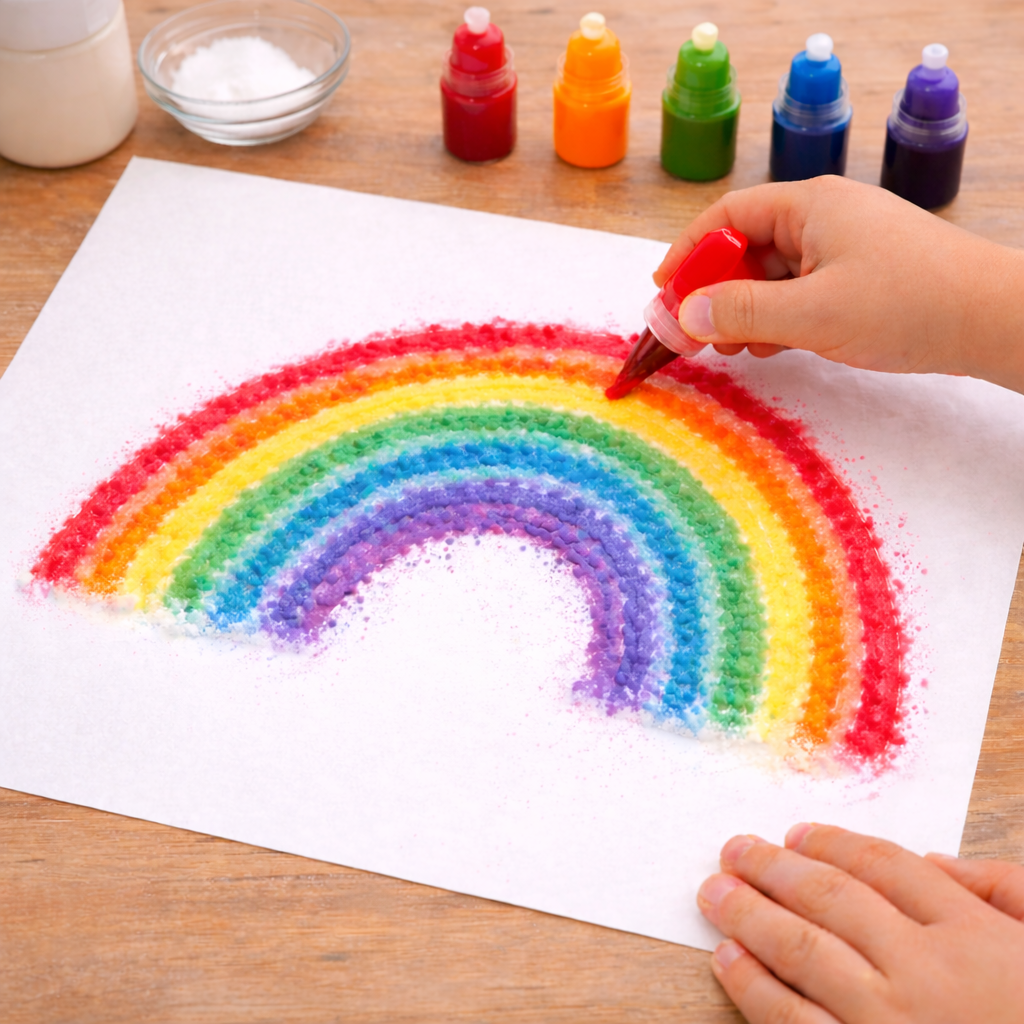
Supplies:
- Paper
- Glue
- Table salt
- Food coloring
Instructions:
1
Use the glue to make a half-circle arc across the page. Make more arcs just beneath for a total of 7. (It should look like an all-white rainbow.)
2
Sprinkle salt generously across the wet glue to ensure it’s fully covered, and shake off the excess. Let the glue dry completely.
3
Starting with the outermost band, drop red food coloring along it and watch as it spreads along the salt (due to capillary action!).
4
Continue filling in the bands with the rest of the rainbow colors (orange, yellow, green, blue, indigo, violet). If you don’t have all the colors, mix the food coloring together in a small dish to create the hues you need. Let your artwork dry, then hang it for all to see!
Rainbow in a Cup
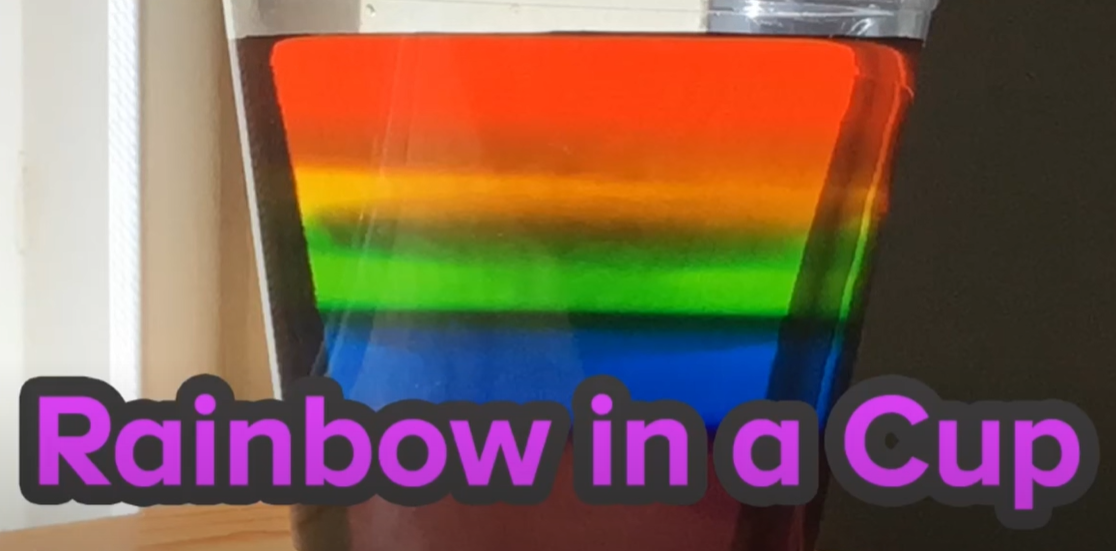
Supplies:
- Warm water
- Food coloring
- Sugar
- Five clear cups
- Spoon
- Large clear cup or jar (big enough to hold at least 1.5 cups of water)
Instructions:
1
Add two tablespoons of sugar to the first cup, and then increase by one tablespoon for each of the following five cups. The last cup should have six tablespoons of sugar. Then, add ¼ cup warm water to each cup.
2
Add a few drops of food coloring to each cup. Use red in the first cup, orange in the second (or a mix of red and yellow), yellow in the third, green (or yellow and blue) in the fourth, and blue in the fifth. Stir each cup thoroughly until the sugar is fully dissolved.
3
Pour the blue water into the large cup or jar. Pour the green water slowly and gently into the cup. Add the other layers in reverse order, finishing with red. The differing densities of the sugar water should keep the layers separate, displaying a rainbow!
Tip: Watch how this craft comes together in our Rainbow in a Cup video. You’ll also find each step broken down into even more detail.
Pot of Gold Treats
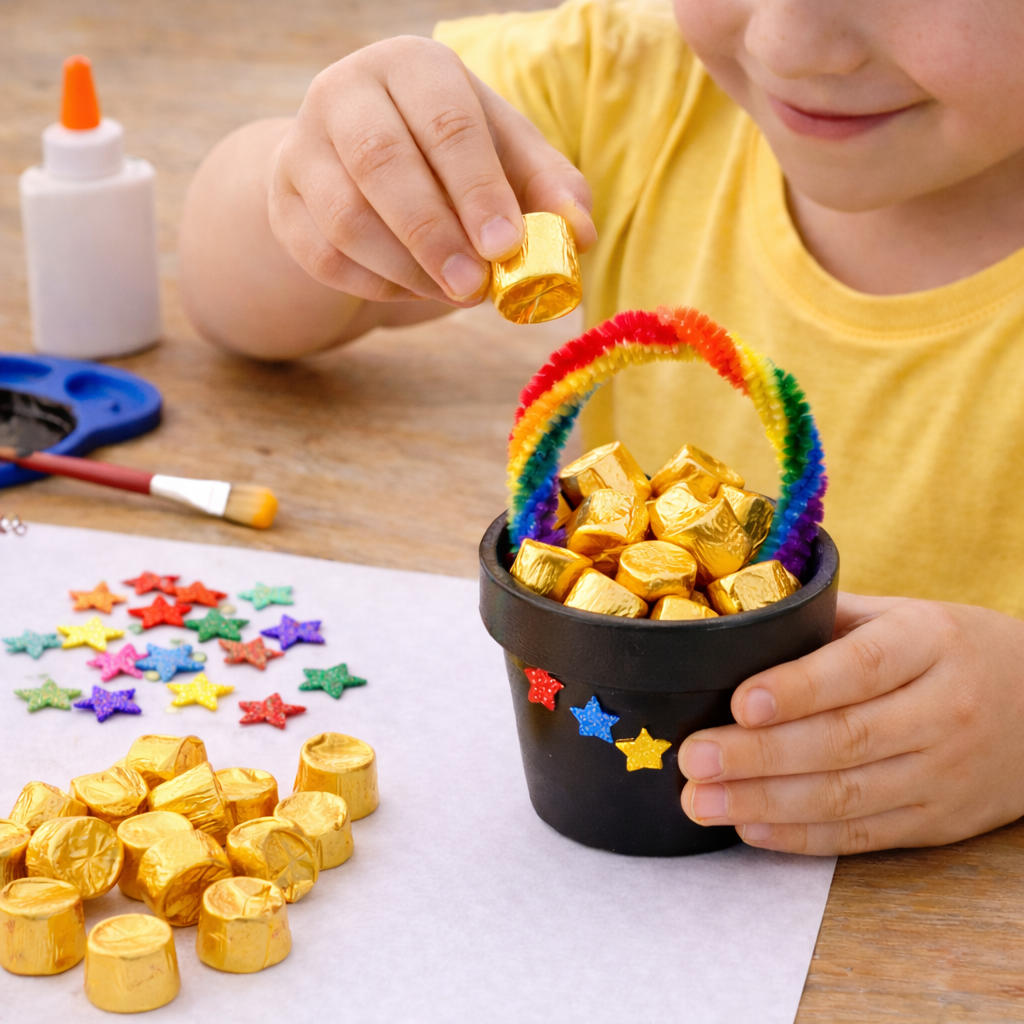
Supplies:
- Small terra cotta pot
- Black craft paint and brush
- Pipe cleaners in red, orange, yellow, green, blue, indigo, and violet
- Gold-wrapped candies (such as Rolos)
- Stickers, glitter, or other embellishments (optional)
- Glue
Instructions:
1
Paint the terra cotta pot black, inside and out. Let the paint dry completely. If desired, add stickers, glitter, or other embellishments to the outside of the pot.
2
Twist the pipe cleaners together in a spiral pattern. Bend them to form a semi-circle, and glue each end to the inside of the pot to form a handle. Let the glue dry.
3
Fill the pot with gold-wrapped candies, and enjoy your tasty decoration!
Clay Coil Pots of Gold
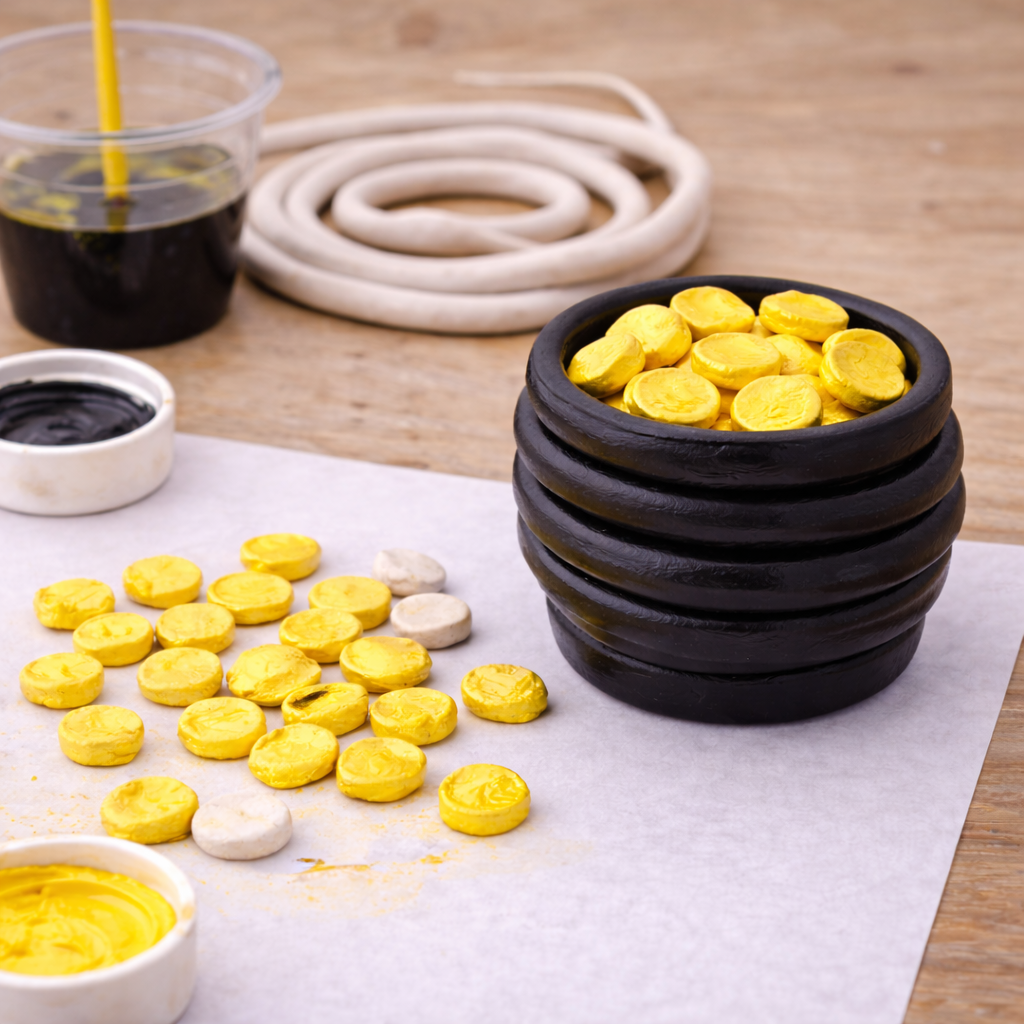
Supplies:
- Air dry clay
- Black and yellow craft paint and brushes
Instructions:
1
Roll out the clay into long “snakes.” Begin your pot by coiling one snake around itself to form the flat bottom.
2
Now, build up the sides of the pot by coiling the clay snake around the edge of the base. Add more claying and continue until you’re pleased with the size and shape of the pot.
3
Roll some small balls of clay and press them flat with your finger or thumb to create “coins.” Allow all the clay to dry following the directions on the package.
4
Paint the pot black and the coins yellow, and let the paint dry. Fill your pot with “gold” coins!
Leprechaun Crafts for St. Patrick’s Day
Craft Stick Leprechaun Hat
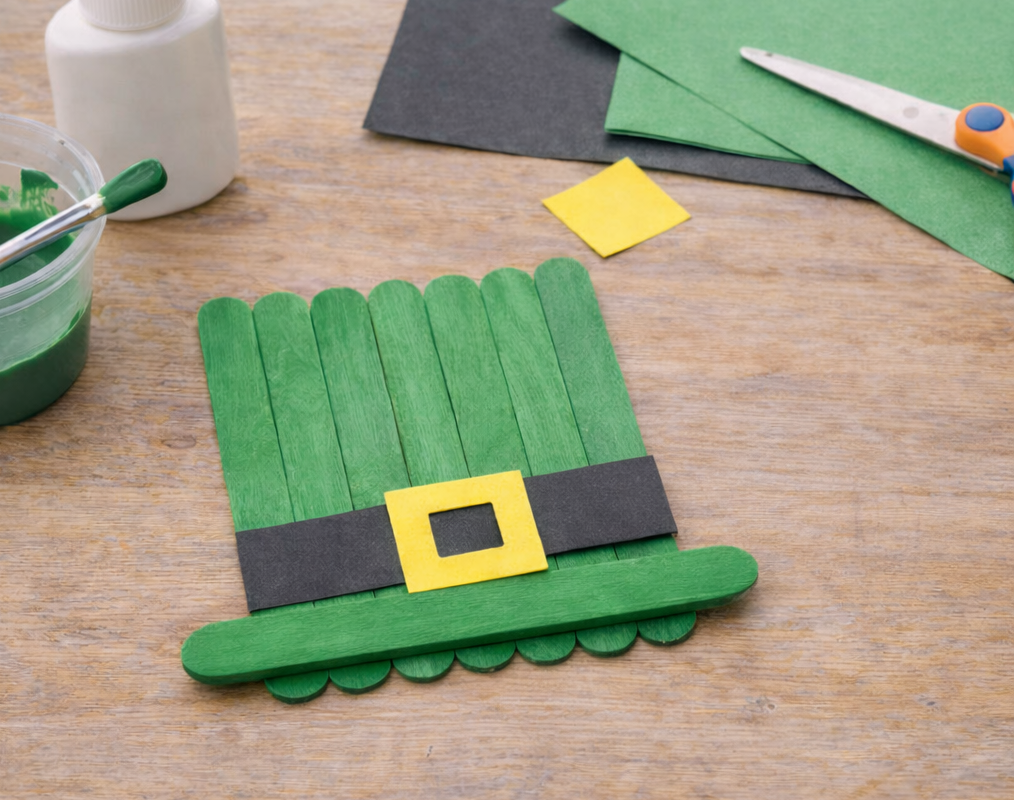
Supplies:
- 8 jumbo wood craft sticks
- Green paint and brush
- Black and yellow construction paper
- Scissors
- Glue
Instructions:
1
Paint the craft sticks green and let them dry.
2
Lay six craft sticks side by side vertically. Lay the seventh horizontally across the bottom to form the brim, and glue into place.
3
Cut a strip of black construction paper to form the hat band, and a yellow square for the buckle. Glue them into place above the hat brim.
Leprechaun Handprint Craft
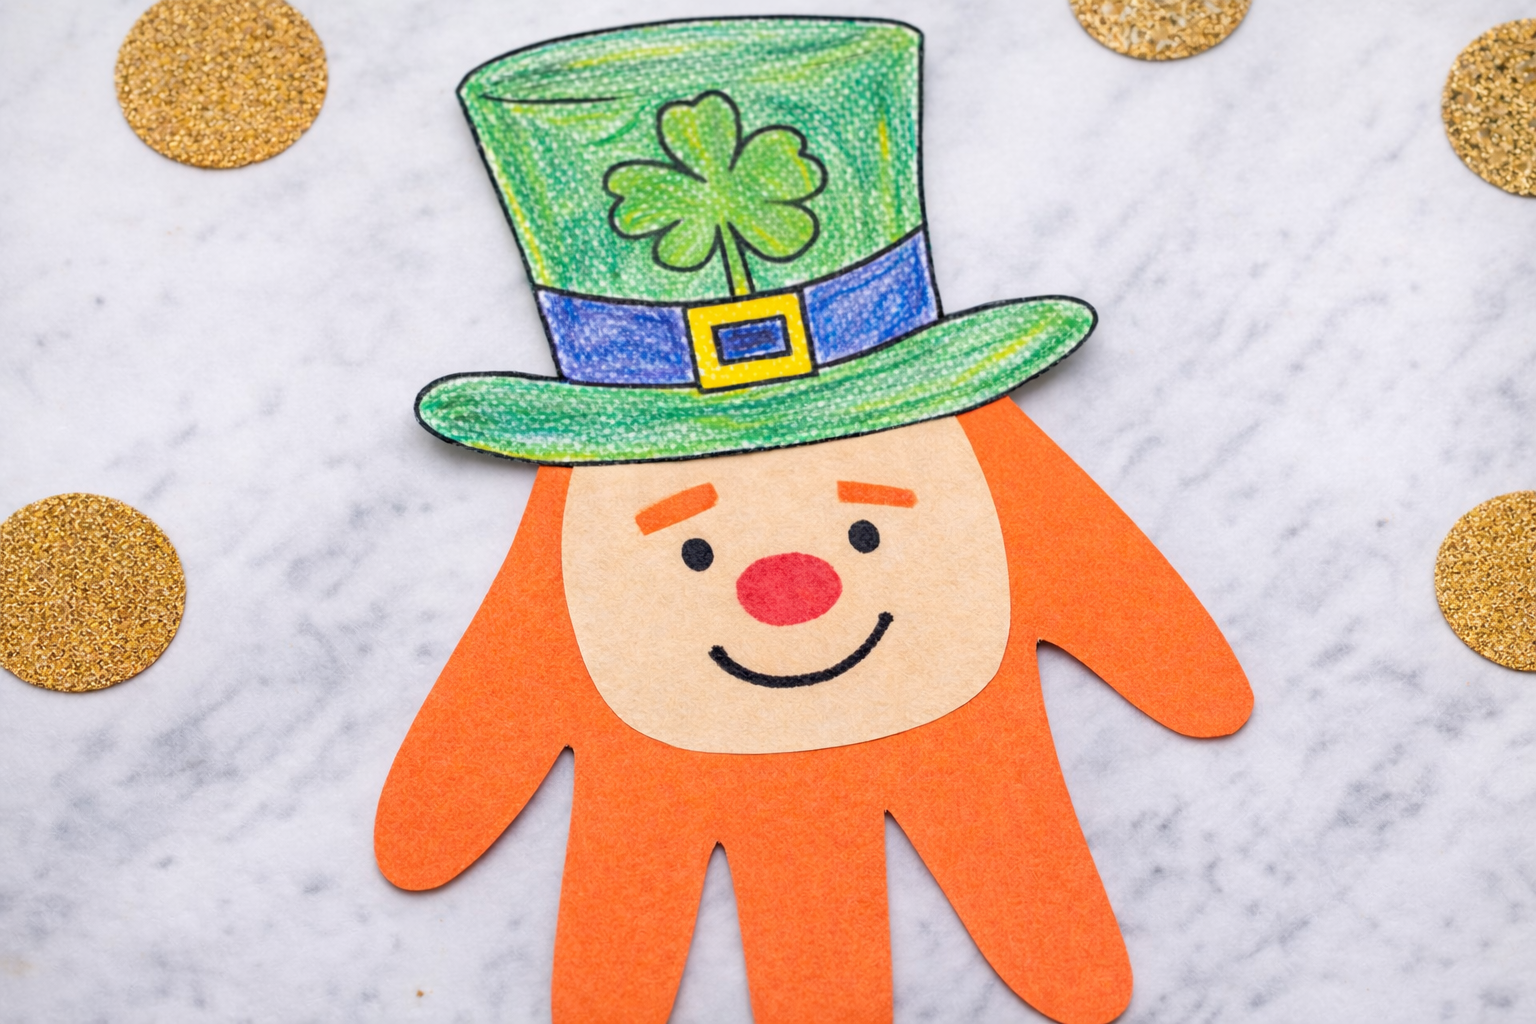
Supplies:
- Leprechaun’s Lucky Hat coloring page from ABCmouse
- Colored paper
- Scissors
- Glue
- Marker
Instructions:
1
Print out and color in the Leprechaun’s Lucky Hat coloring page from ABCmouse.
2
On the orange paper, trace your child’s hand, leaving plenty of space around their hand and fingers to create a larger-looking hand.
3
Cut out a circular shape from another piece of construction paper and draw the leprechaun’s face on it. Glue the face onto the handprint.
4
Cut out out the leprechaun’s hat and place it onto the handprint, slightly covering the top of the leprechaun’s head. Glue it into place and let dry.
Leprechaun Pencil Holder
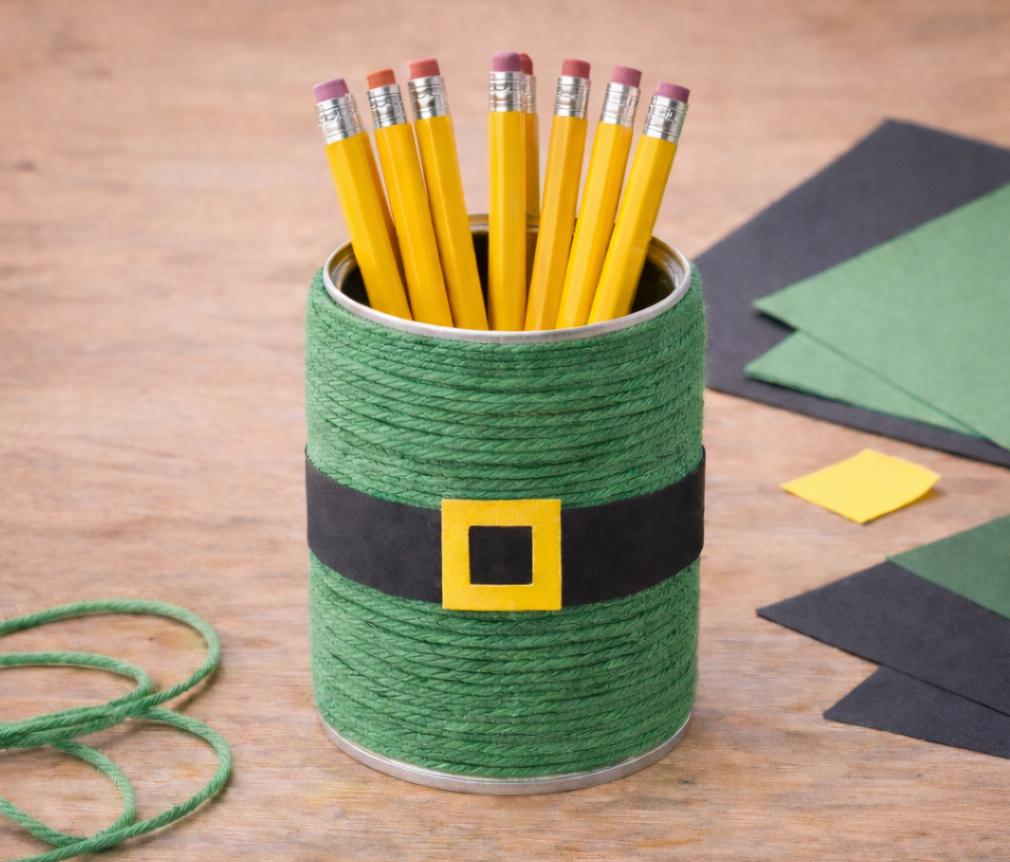
Supplies:
- Empty, clean tin can
- Green yarn
- Black and yellow construction paper
- Glue
- Scissors
Instructions:
1
Spread a thin layer of glue around the outside of the can. Wrap the green yarn around the can, starting at the top edge, pressing it into the glue. Continue until you’ve covered the can completely, then let the glue dry.
2
Cut a strip of black construction paper and glue it around the middle of the can for a belt. Cut a buckle from yellow paper and glue it in place. Fill your can with pens and pencils for a handy holiday decoration!
Leprechaun Face Frame
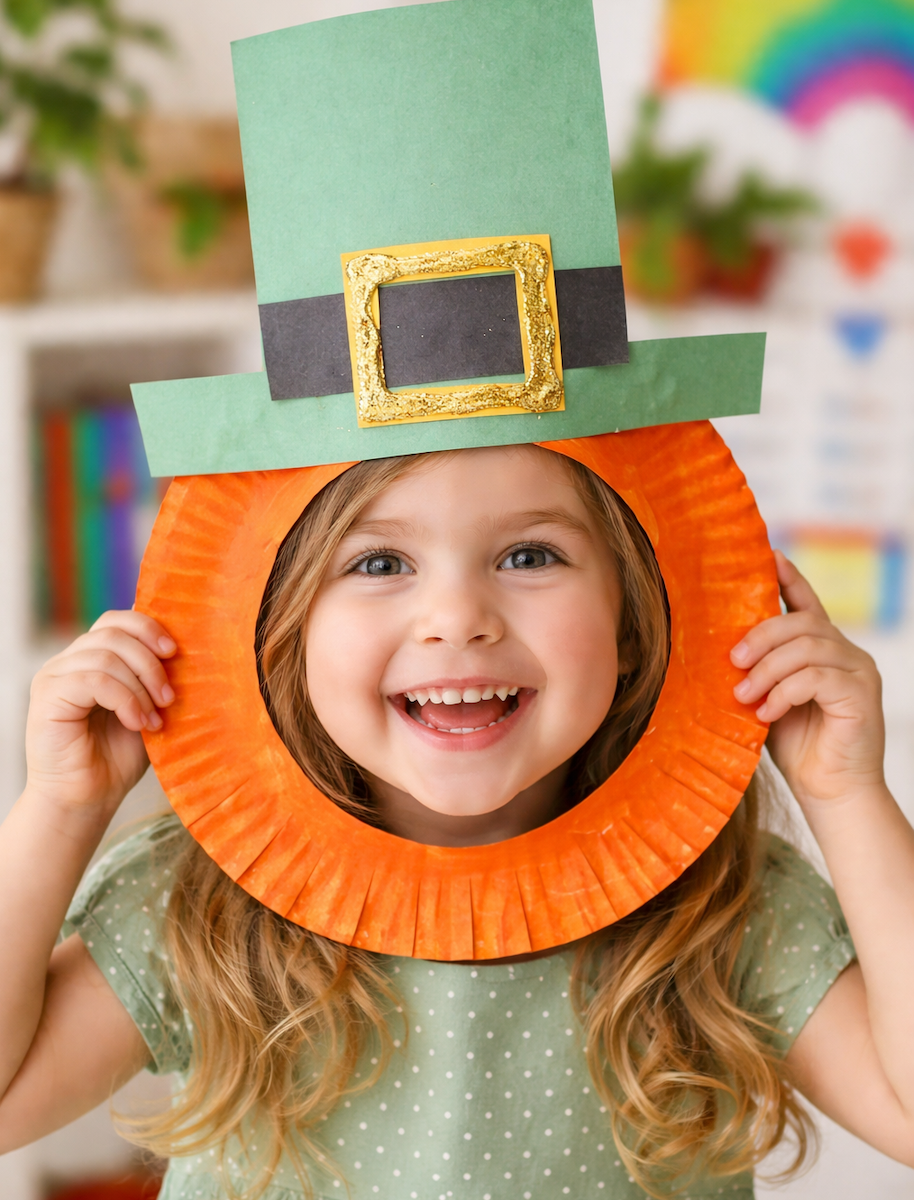
Supplies:
- Paper plate
- Green, black, and yellow paper
- Orange paint
- Paintbrush
- Gold glitter or glitter glue
- Glue
- Scissors
Instructions:
1
Have your child paint a paper plate with orange paint so it’s completely covered. While it dries, work on constructing the leprechaun hat with green and black construction paper. To create the gold buckle, use yellow paper and then glue down gold glitter or apply a squiggle of gold glitter glue over the buckle.
2
Once the paper plate and leprechaun hat have dried, cut out the center of the paper plate.
3
To create a leprechaun beard, cut small strips into the lower half of the paper plate, being careful not to cut all the way through the plate.
4
Glue the hat to the top of plate, so the beard is positioned at the bottom. Let dry, then take some cute pictures of your child with their new leprechaun mask around their face!
Leprechaun Hat Wind Chime
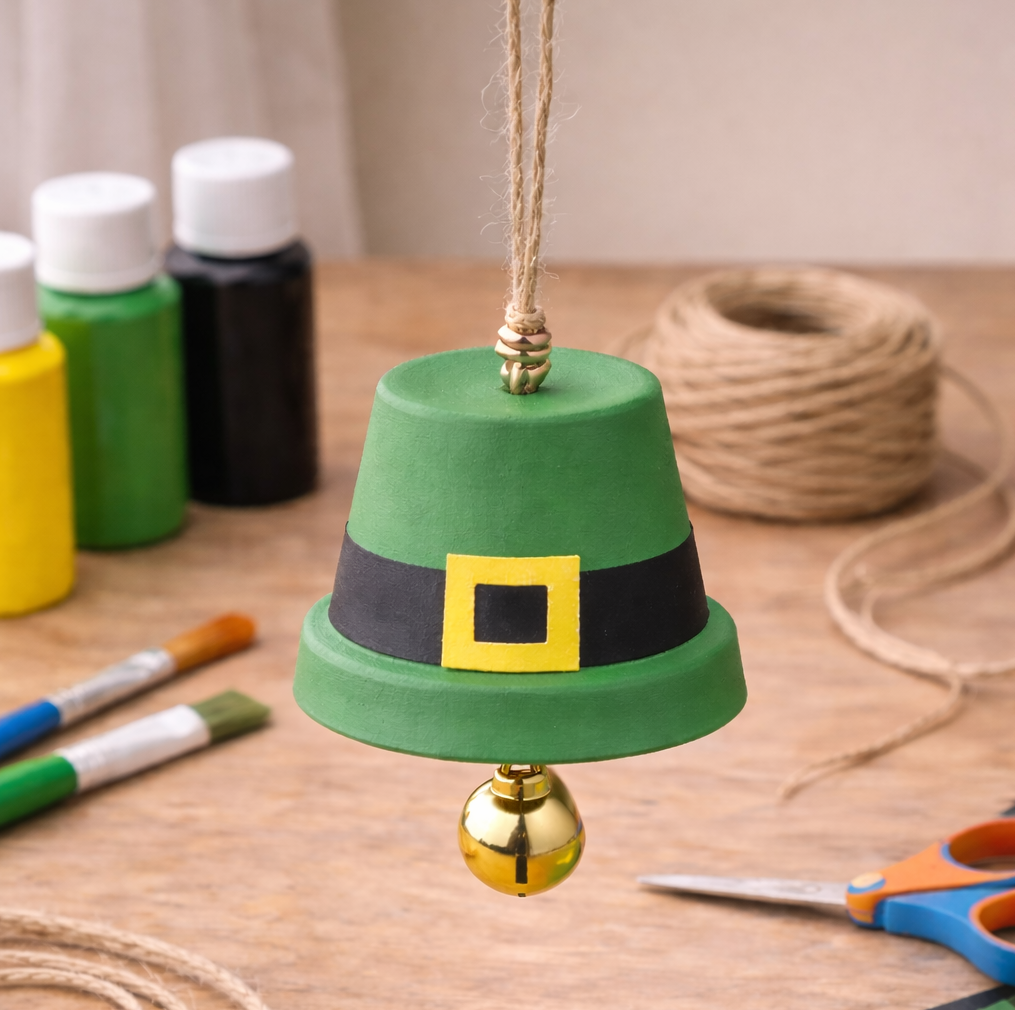
Supplies:
- Small terra cotta pot
- Green, black, and yellow craft paint and brushes
- Small jingle bell
- Twine
- Scissors
Instructions:
1
Paint the pot green, and let it dry. Then, paint on the black belt, adding it directly to the rim of the pot or right above the rim. Let the paint dry, then add a yellow buckle to the belt and let it dry.
2
Cut a length of twine about 12 inches long. Feed it through the loop on the bell so the bell hangs in the middle.
3
Tie a knot in the twine an inch or so above the bell, large enough to keep it from slipping through the hole in the bottom of the pot. Feed both ends through the hole in the pot from the inside, and tie another knot outside the pot to hold it in place.
4
Tie one more knot to make a hanger, then trim any excess twine before you hang your bell.
Paper Plate Leprechaun Face
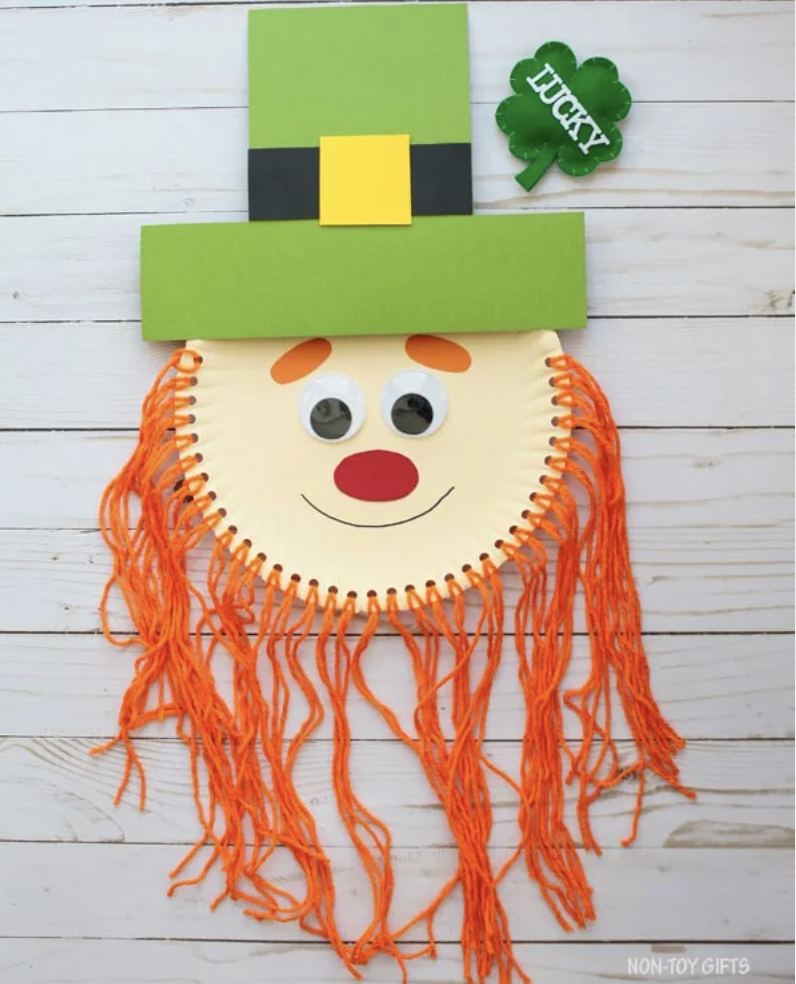
Supplies:
- Paper plate
- Green, yellow, and black construction paper
- Orange yarn
- Crayons or markers
- Hole punch
- Glue stick
- Scissors
Instructions:
1
Use the hole punch to make holes all around the rim of the plate, spaced closely together. Then, draw eyes, nose, and mouth in the middle of the plate. You can also use googly eyes or scraps of paper or fabric.
2
Cut orange yarn into long pieces so you have enough for each of the holes you punched.
3
Feed a piece of yarn through a hole and tie the ends together close to the edge of the plate. Repeat for each of the holes, creating the leprechaun’s hair and beard.
4
Color and cut out the leprechaun hat from construction paper, and glue it into place on the top of the plate.
Leprechaun Wind Sock
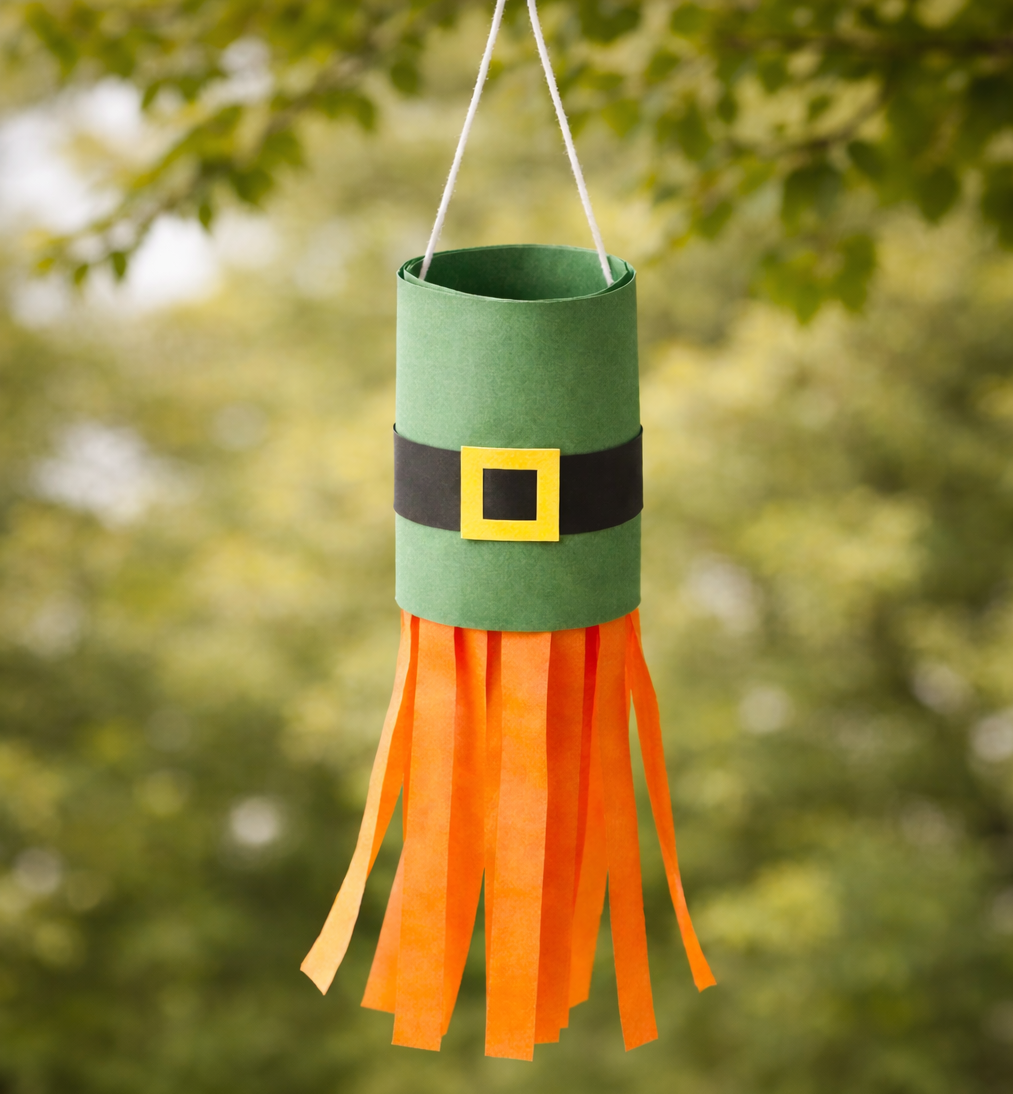
Supplies:
- Green, black, and yellow construction paper
- Orange tissue paper
- Yarn
- Hole punch
- Scissors
- Glue stick
Instructions:
1
Roll a piece of green construction paper into a tube, starting at the shorter end. Glue the ends together.
2
Cut a strip of black construction paper and wrap it around the middle of the green tube as a “belt.” Cut out and add a belt buckle from yellow paper, gluing both in place.
3
Cut strips of orange tissue paper. Glue them to one end of the tube on the inside so the strips hang down freely.
4
Make two holes at the other end of the tube, and add a piece of yarn to make a hanger.
Clover and Shamrock Crafts for St. Patrick’s Day
Paper Heart Shamrocks and Clovers
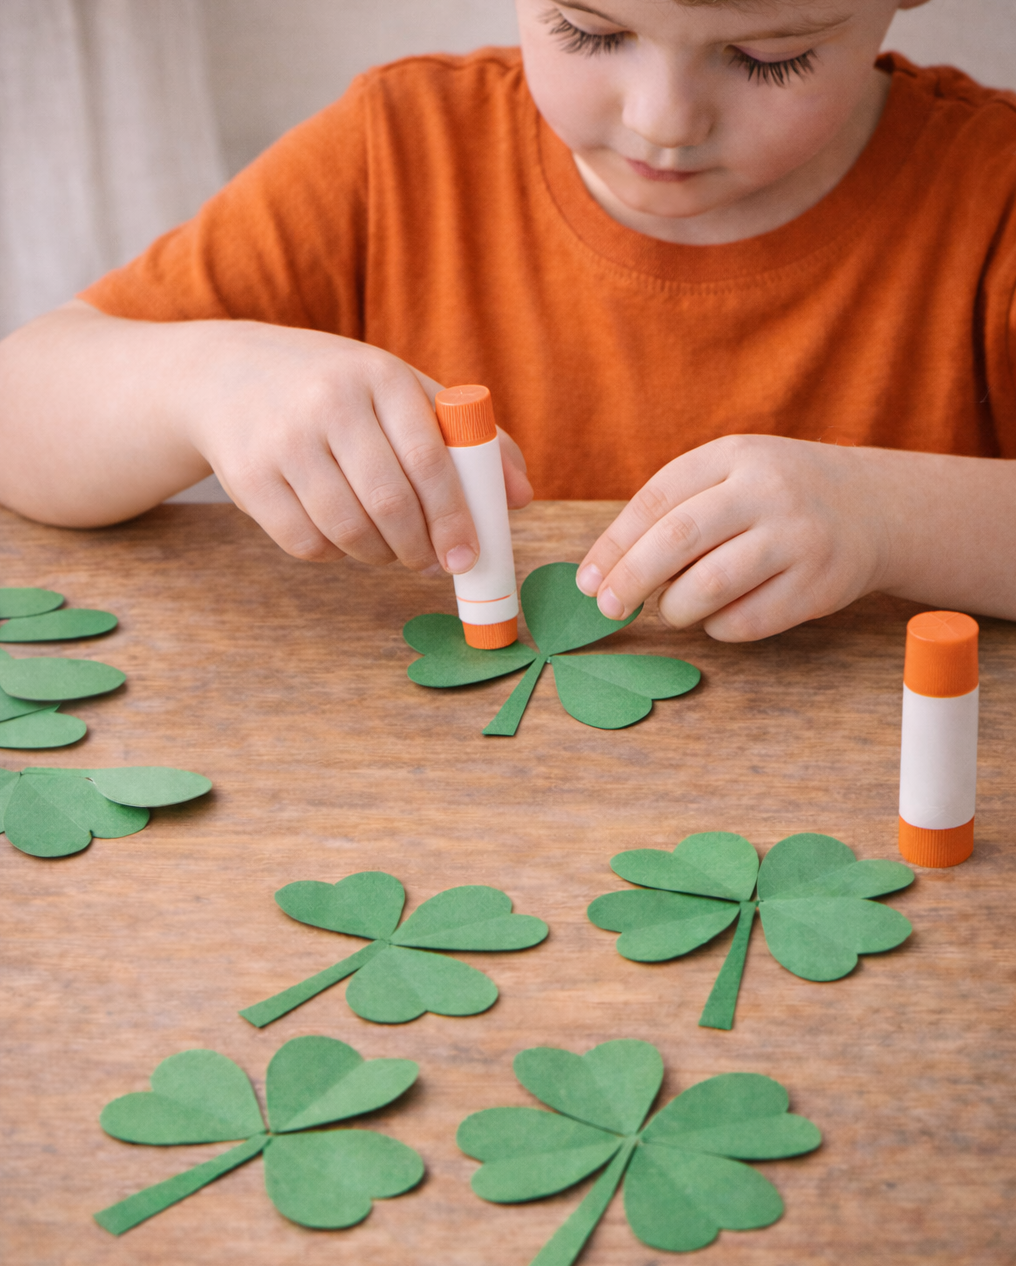
Supplies:
- Green construction paper
- Pencil
- Cardboard
- Scissors
- Glue stick
Instructions:
1
Trace half a heart along the edge of the cardboard and cut it out to use as a template. This will ensure your paper hearts are all the same size.
2
Fold the construction paper in half. Place the flat half of the template along the edge and trace it with the pencil. Then cut out the heart and unfold.
3
Repeat to make as many hearts as you’ll need for your shamrocks (3) or clovers (4).
4
Cut a stem from the green construction paper. Arrange your leaves in sets of three for shamrocks, or four for clovers. Use the glue stick to attach them to the stem.
Rainbow Shamrocks
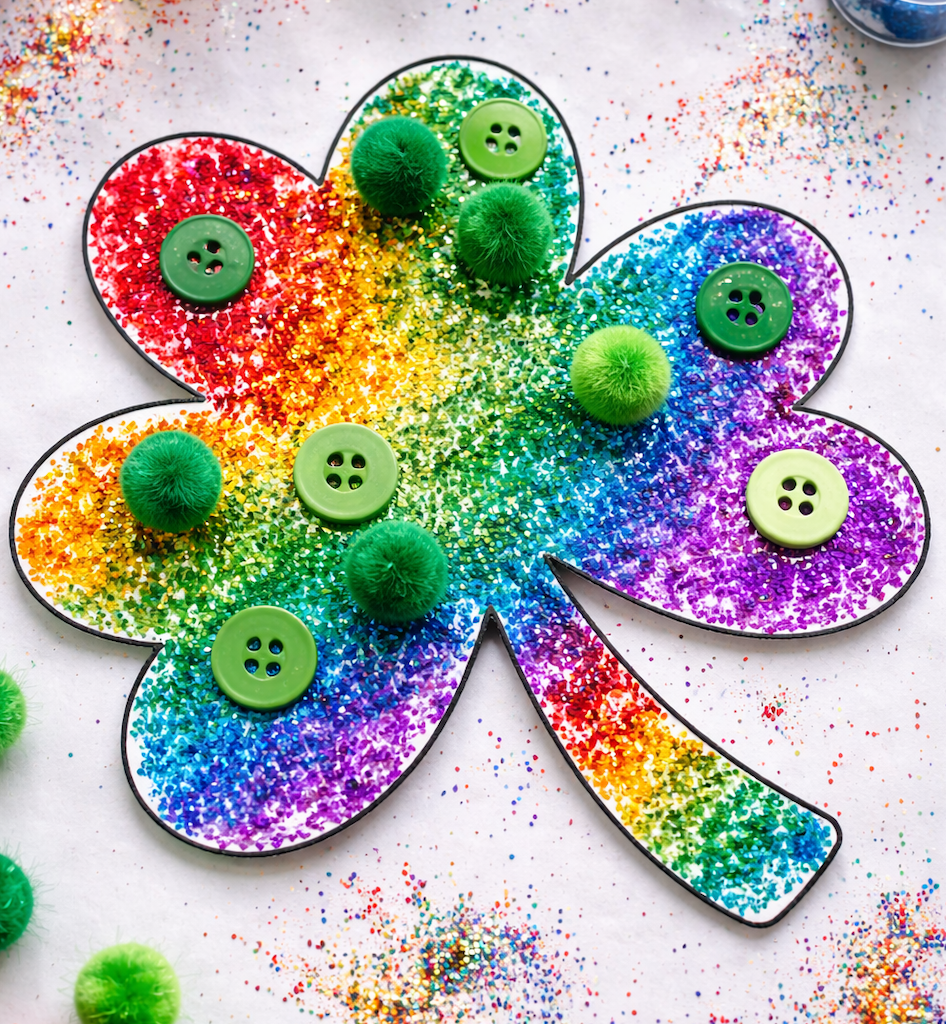
Supplies:
- Glitter, buttons, pompoms, yarn, feathers
- Pencil
- White or green card stock
- Scissors
- Glue stick
Instructions:
1
Trace the shape of a shamrock or clover (or print our 4 leaf clover template) onto a piece of white or green card stock and cut it out.
2
Gather up items your child can use to decorate their shamrock, including glitter, old buttons, pompoms, pipe cleaners, feather, etc. Have your child glue the items down and let them dry completely.
DIY Shamrock Window Clings
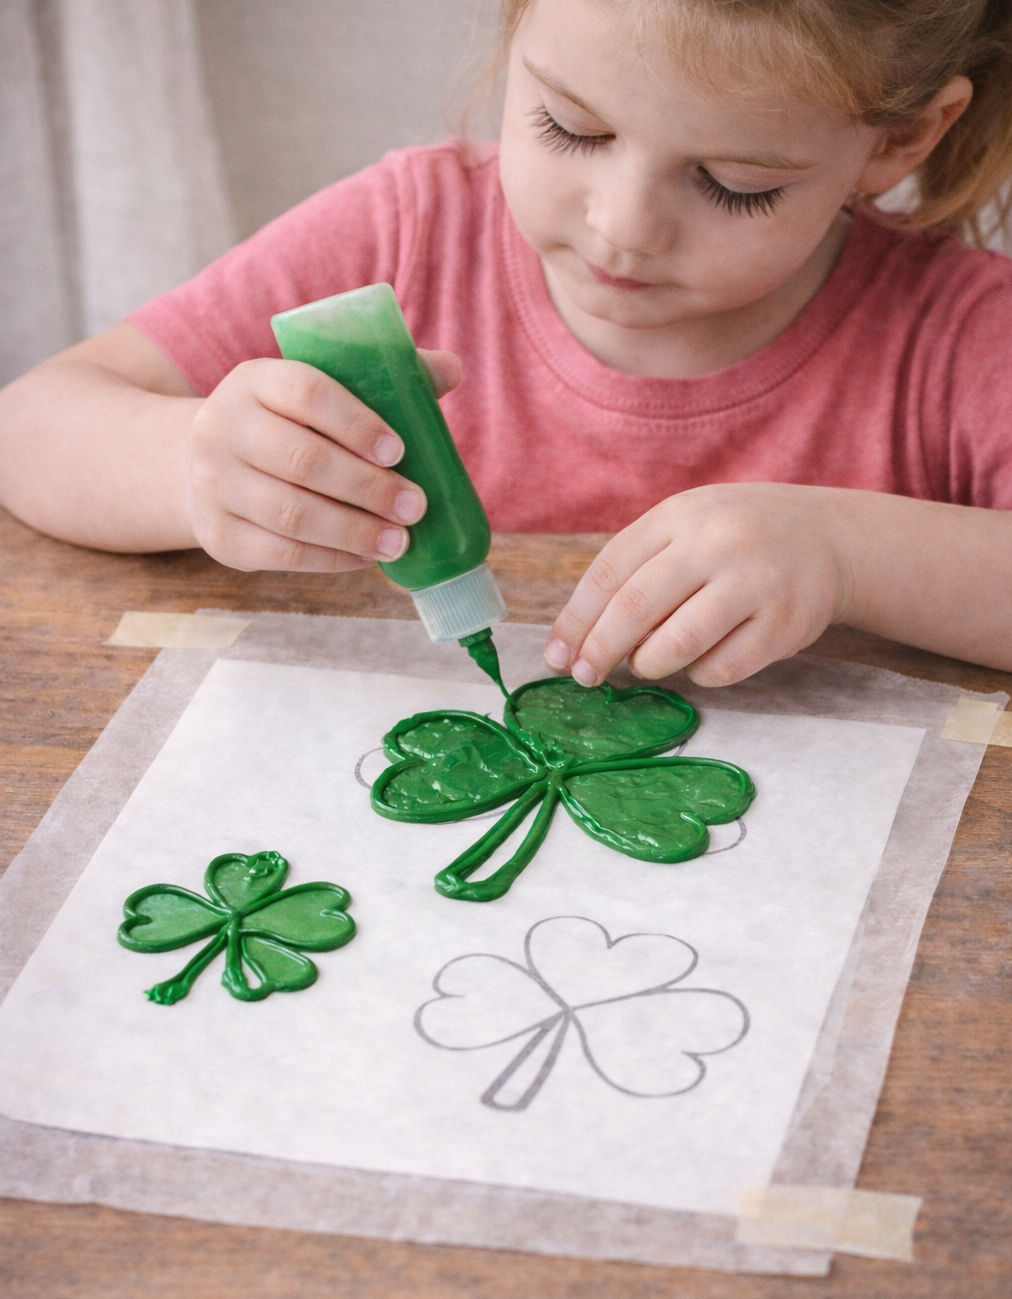
Supplies:
- Three Leaf Shamrock or Four Leaf Clover coloring page from ABCmouse
- Green puffy fabric paint
- Wax paper
- Masking tape
Instructions:
1
Lay the coloring page on the table and hold it in place with tape. Lay a sheet of wax paper over top and tape it in place.
2
Fold the construction paper in half. Place the flat half of the template along the edge and trace it with the pencil. Then cut out the heart and unfold.
3
Repeat to make as many hearts as you’ll need for your shamrocks (3) or clovers (4).
4
Cut a stem from the green construction paper. Arrange your leaves in sets of three for shamrocks, or four for clovers. Use the glue stick to attach them to the stem.
Clay Shamrocks and Lucky Clovers
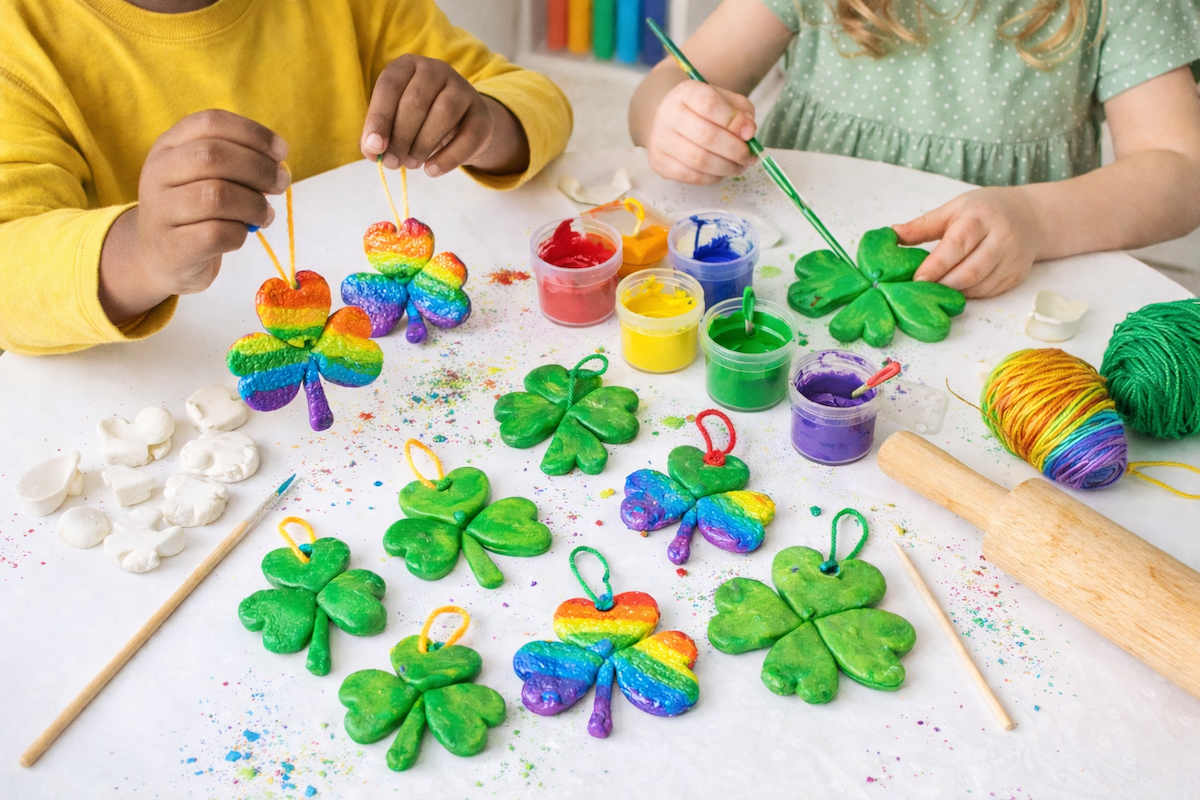
Supplies:
- Air dry clay
- Small heart-shaped cookie cutter
- Rolling pin
- Wood skewer or chopstick
- Craft paint and brush
- Yarn or ribbon
Instructions:
1
Roll the clay out to a thickness of about ½ inch. Use the heart-shaped cookie cutter to cut out “leaves.” Cut three leaves for each shamrock, and four for each lucky clover.
2
Arrange the leaves to form shamrocks or clovers, and press them together where they meet. Cut small pieces for stems and press them into place.
3
Use the skewer or chopstick to poke a small hole at the top of each clover or shamrock. Let your clay creations dry completely according to the directions on the package.
4
Paint your shamrocks and clovers green or rainbow colors and let them dry, then add a yarn or ribbon hanger and hang them anywhere you like!
Shamrock Name Garland
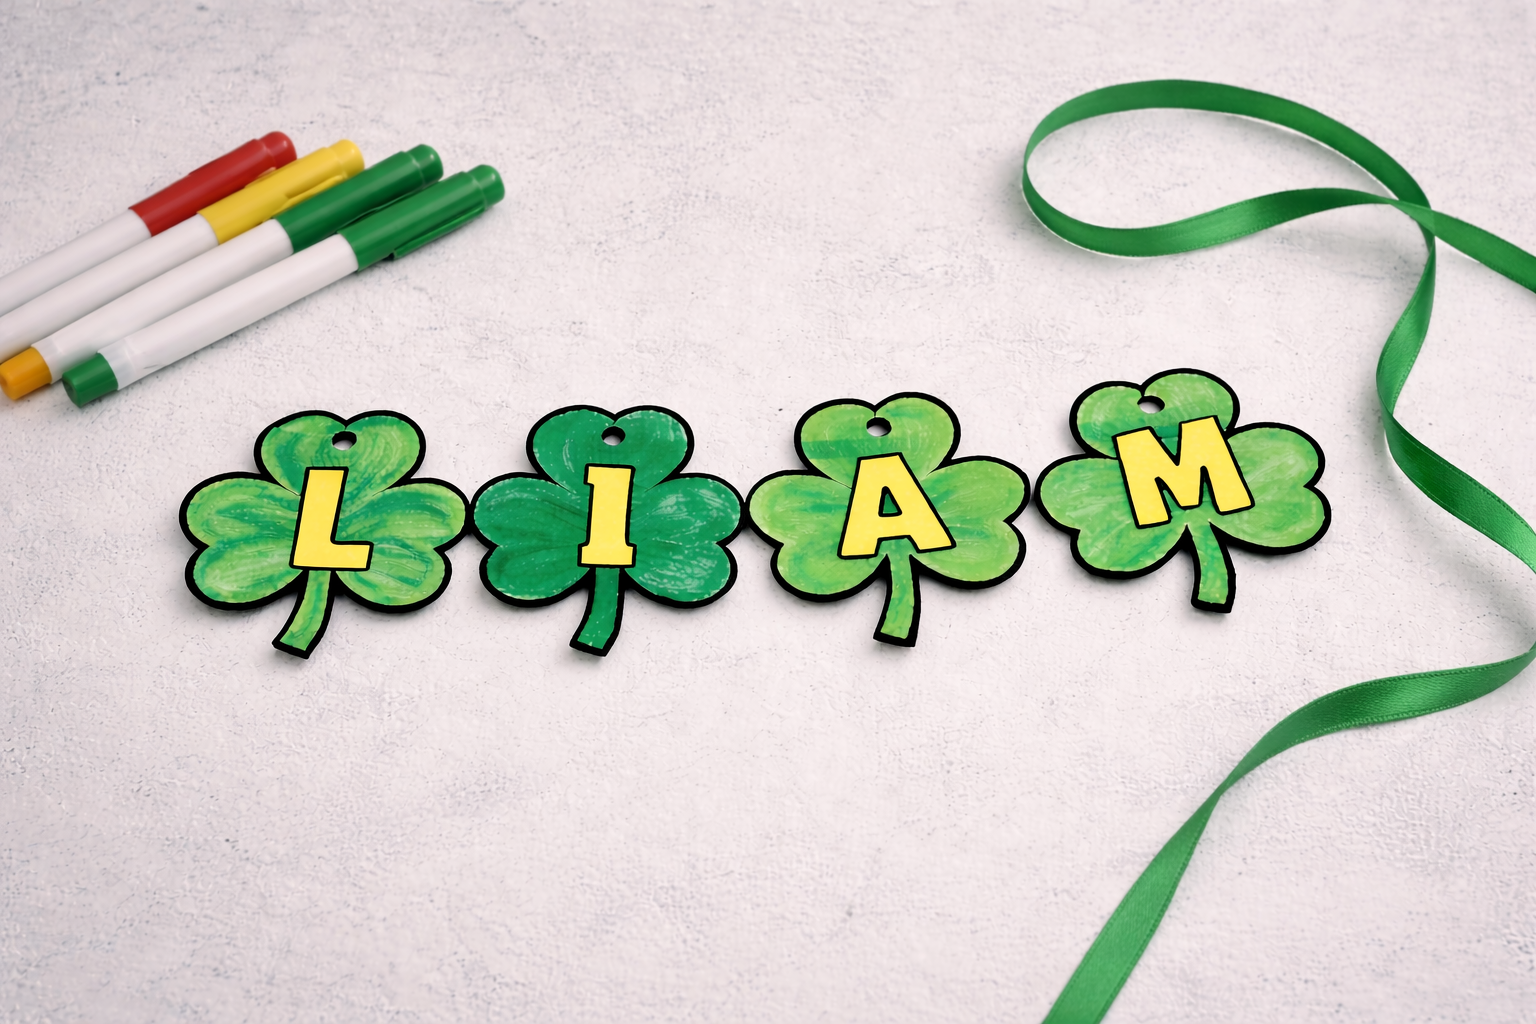
Supplies:
- Three Leaf Shamrock or Four Leaf Clover coloring page from ABCmouse
- Markers
- Letter stickers
- Ribbon
- Hole punch
- Scissors
Instructions:
1
Print enough copies of the coloring pages so you have one shamrock or clover for each letter of your child’s name.
2
Color and cut out the shamrocks or clovers. Add a letter sticker to each one, and punch a hole in the top. String the shamrocks or clovers along the ribbon to make a garland, and hang your festive display!
3D Tissue Paper Shamrocks
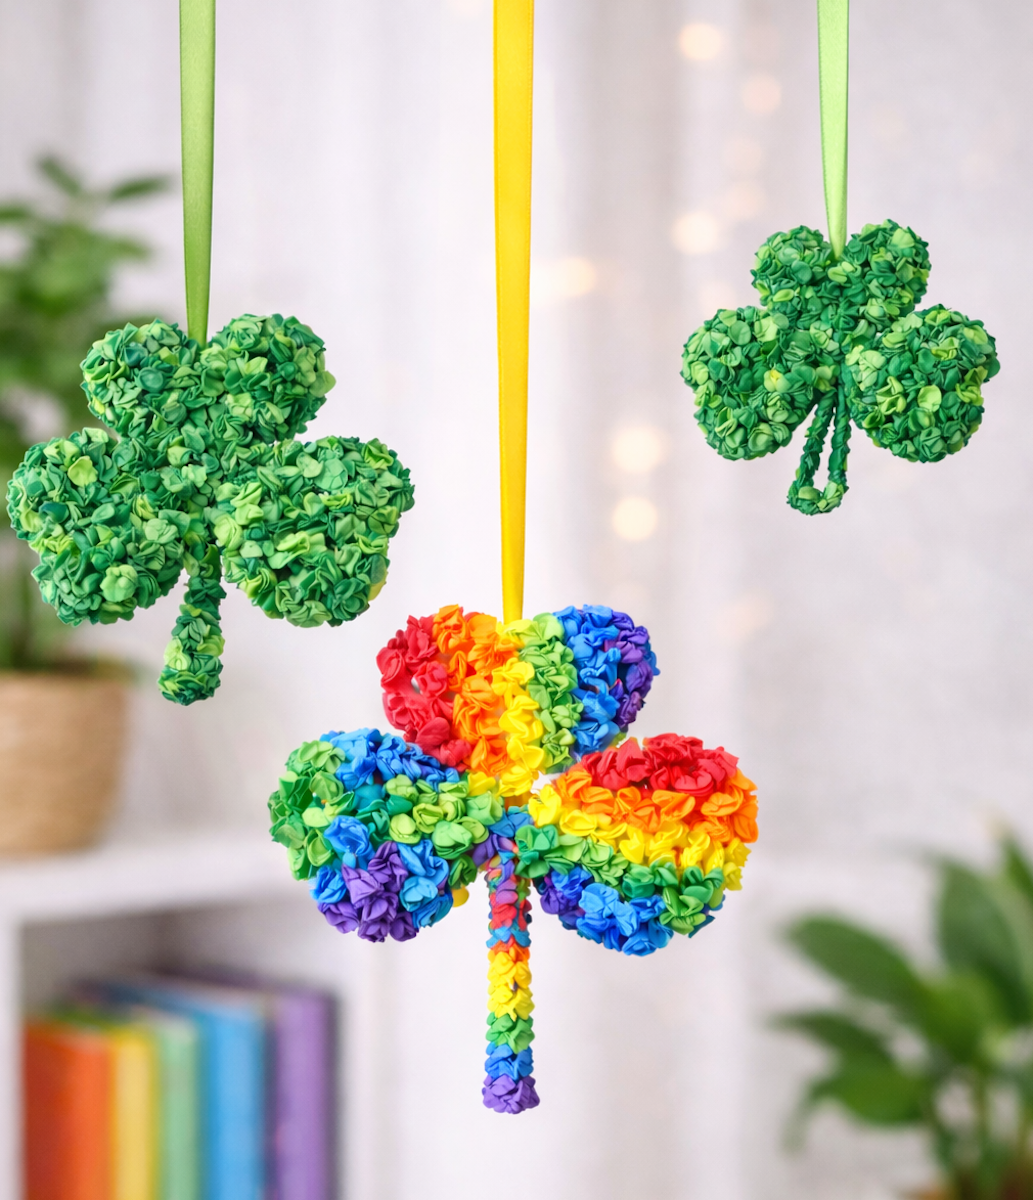
Supplies:
- Three Leaf Shamrock or Four Leaf Clover coloring page from ABCmouse
- Tissue paper
- Scissors
- Glue
- Pencil or chopstick
Instructions:
1
Decide if you’ll be making green clovers or rainbow shamrocks. Cut the tissue paper you’ll need into squares about 1 inch by 1 inch. Cut out the shamrocks or four-leaf clovers from the coloring pages.
2
Pour a little glue onto a piece of scrap paper. Wrap a piece of tissue paper around the eraser end of the pencil to form a tiny rosette, and dip the bottom into glue. Press it into place on a shamrock or clover.
3
Repeat until the entire shamrock or clover is covered with tissue rosettes.
Tip: Punch a hole in the card stock before applying the tissue paper. The use a ribbon or string to hang the shamrock up.
Legal disclaimer: Any links to third-party resources are provided for informational purposes only. We are not affiliated with and do not sponsor/endorse these third parties and bear no responsibility for the accuracy of content on any external site
More St. Patrick’s Day Activities
The Great Shamrock Hunt on ABCmouse YouTube
Help ABCmouse and his friends find a real shamrock, and see who they meet along the way!
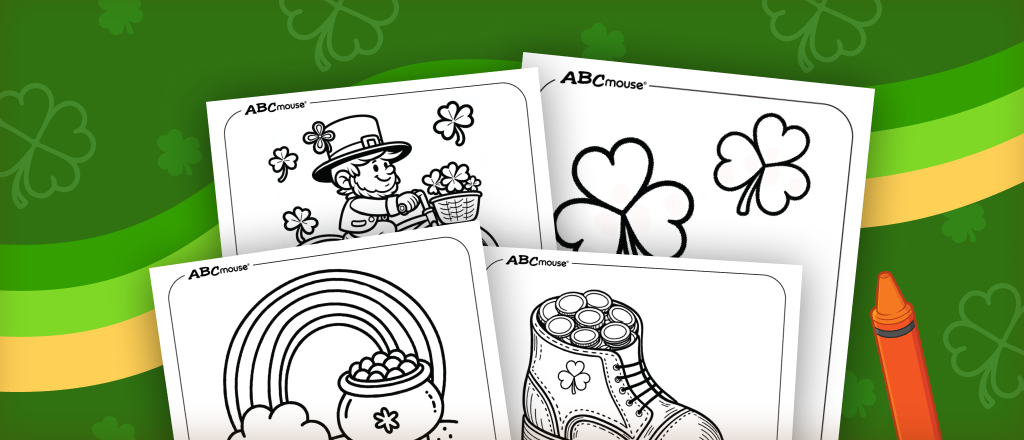
St. Patrick’s Day Coloring Pages
St. Patrick’s Day Jokes for Kids
St. Patrick’s Day Crafts on ABCmouse TikTok
Get step-by-step instructions for creating these Magical Leprechaun Rocks here.
Related Activities
-

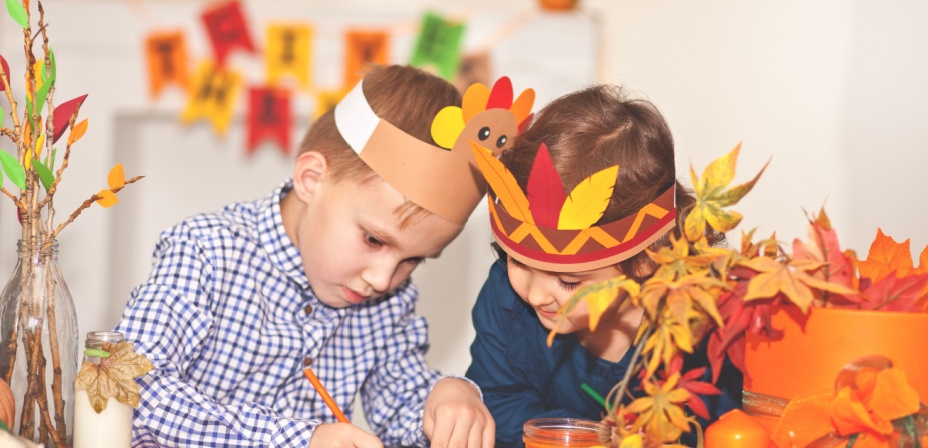
Thanksgiving Crafts and Activities
Keep kids entertained with 35+ Thanksgiving games, crafts, and printables—perfect for classrooms, family gatherings, or holiday fun.
-

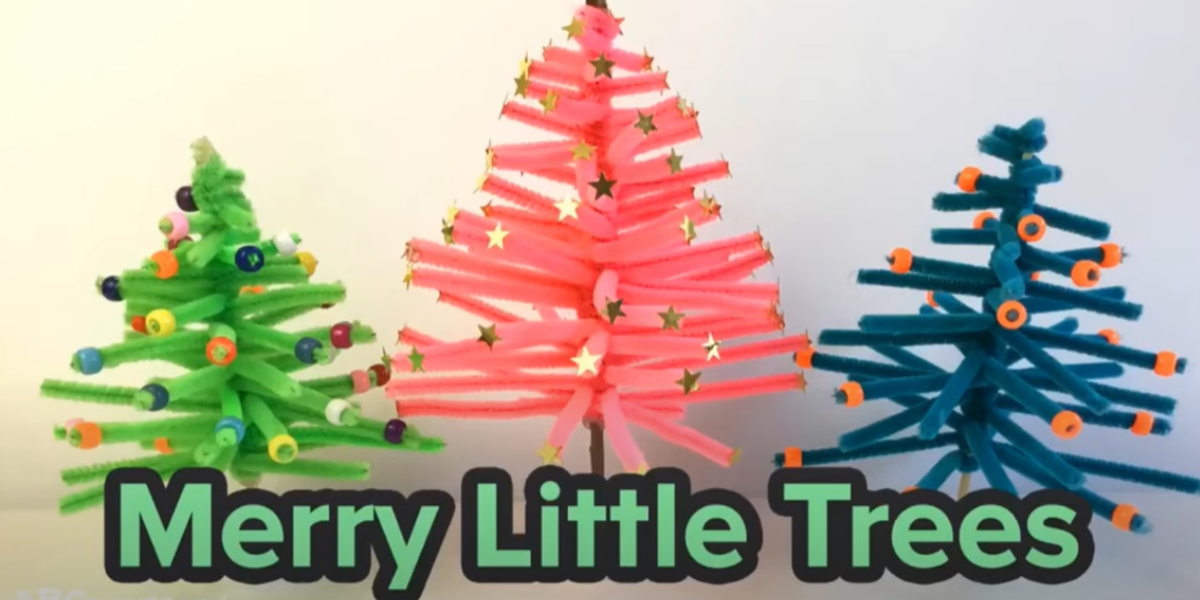
Pipe Cleaner Christmas Tree Craft
Create festive holiday fun with this easy Pipe Cleaner Christmas Tree craft for kids! Using simple materials like pipe cleaners, a wooden skewer, and beads, children…
-

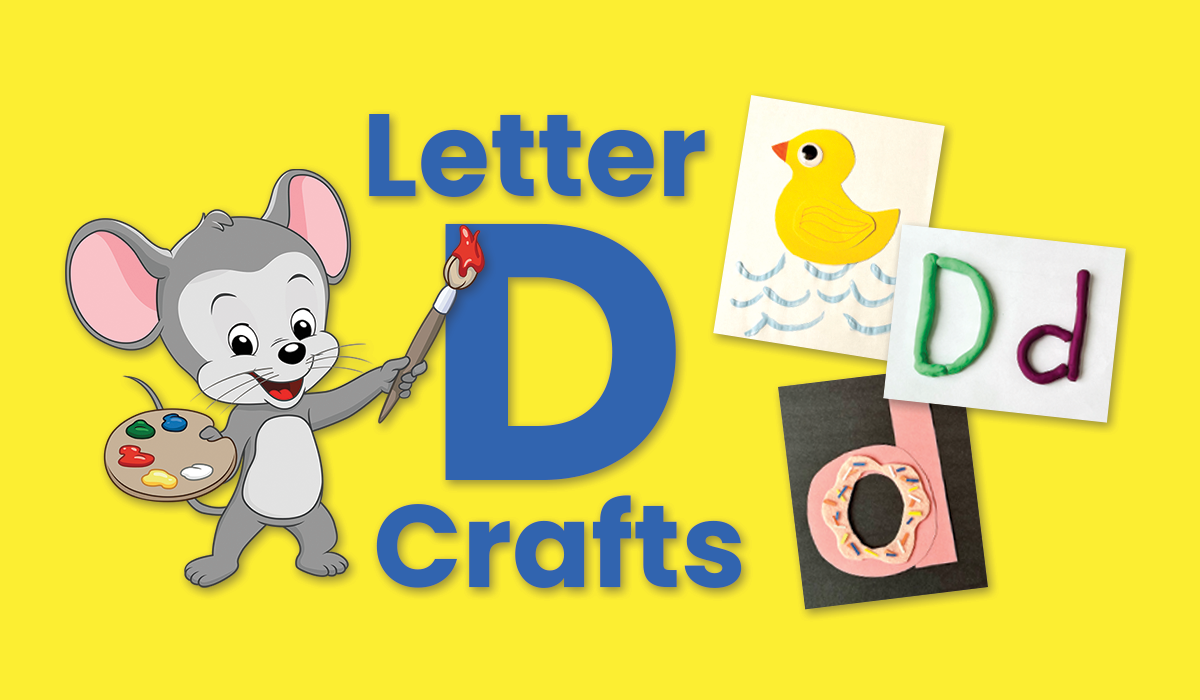
Letter D Crafts and Activities
Discover fun and easy Letter D crafts for preschoolers using common household items! From making doors that reveal hidden Ds to crafting a playful DIY dog,…
-
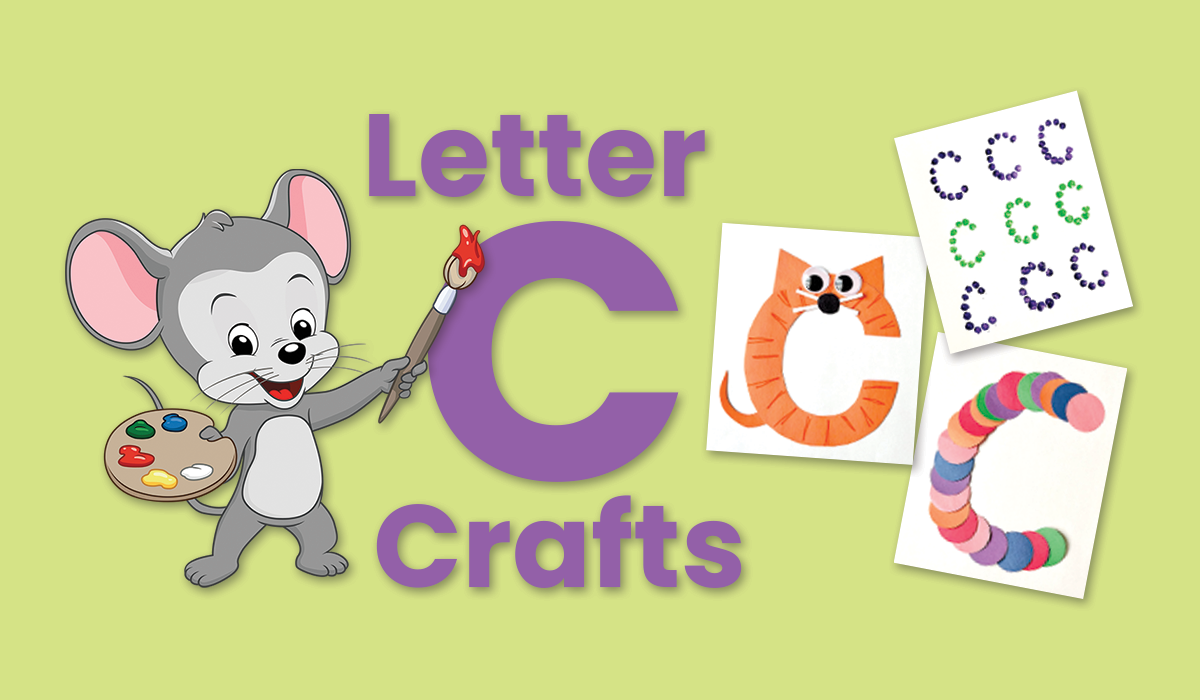
Letter C Crafts and Activities
Explore creative ways to teach preschoolers the letter C with fun, simple crafts like making a caterpillar, cotton ball clouds, or carrot stamps. These engaging activities…
-

Vowel Activities for Kids
Engage kids in learning vowel sounds with 18 fun activities and games! From sorting vowel sounds to treasure hunts, these hands-on activities will help children practice…
-
Leaf Prints Craft for Kids
Celebrate fall with this easy Leaf Prints craft for kids! Using natural leaves, paint, and paper, children can create colorful and textured prints that capture the…