45 Cute Back to School Crafts for Preschool and Early Elementary
Share
Get little ones excited about their first day of school with a huge selection of craft ideas that are perfect for the classroom or at home.
Back to school season has a special feeling all its own. Celebrate it with these fun and easy back to school crafts designed for young students! They’ll build a sense of anticipation and excitement, plus help you commemorate first days and growth year after year. Try these ideas leading up to the first day or incorporate them into the first few weeks of school. Each craft should be completed with adult supervision.
Easy Back-to-School Crafts for Toddlers
At this age, little ones may or may not be attending formal classes themselves, but by doing some simple back to school craft projects, they can get excited for the school years to come! Many of these ideas work well for preschoolers, too.
1. Yarn-Wrapped Cardboard Pencil
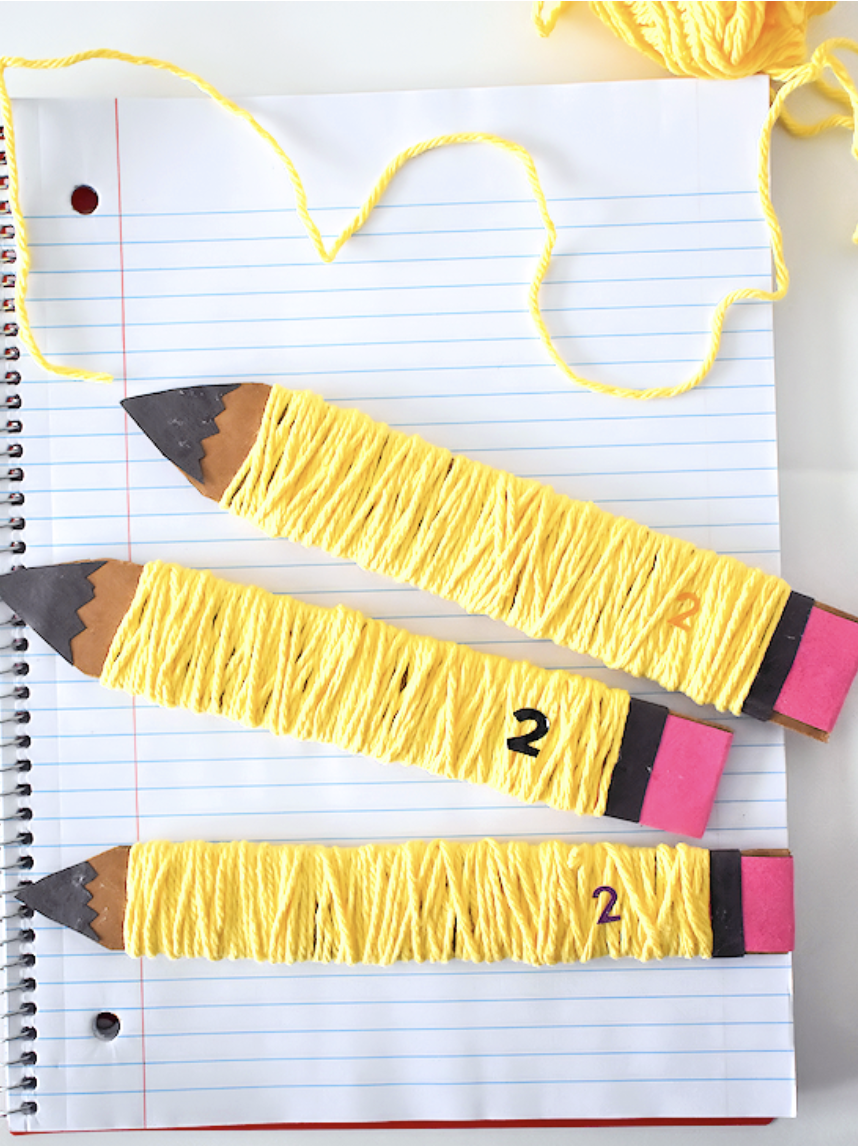
Supplies:
- cardboard
- scissors
- glue
- tape
- yellow yarn
- pink and black construction paper or paint
Instructions:
1. Cut the cardboard into strips with pointed ends. (You can make these any size you want.)
2. Paint the pointed end black, and add pink and black stripes to the other end to make the eraser.
3. Tape one end of the yarn down at one end of the pencil. Have your toddler wrap the yarn around and around to fill in the yellow section, then tuck in the end of the yarn to finish.

2. Paper Plate Apple Lacing

Supplies:
- red paper or plastic disposable plate
- hole punch
- brown and green construction paper
- yarn
Instructions:
1. Use the hole punch to make evenly-spaced holes around the edges of the plate.
2. Cut a stem from the brown paper and a leaf from the green paper, and glue them to the top of the plate.
3. Tie one end of the yarn to one of the holes, then show your toddler how to lace the yarn in and out of the holes.
3. Fruit Pouch Bag (from ABCmouse on Instagram)
Supplies:
- empty squeezable fruit pouch
- scissors
- paint and markers
- hole punch
- shoelace, ribbon, or yarn
Instructions:
1. Cut the top off the pouch and clean the pouch thoroughly.
2. Paint the outside of the pouch a solid color.
3. Let your toddler use paint, markers, or other materials to decorate the outside.
4. Punch two holes at the top and tie one end of the shoelace to each, forming the handle strap.
4. I Will Grow Keepsake
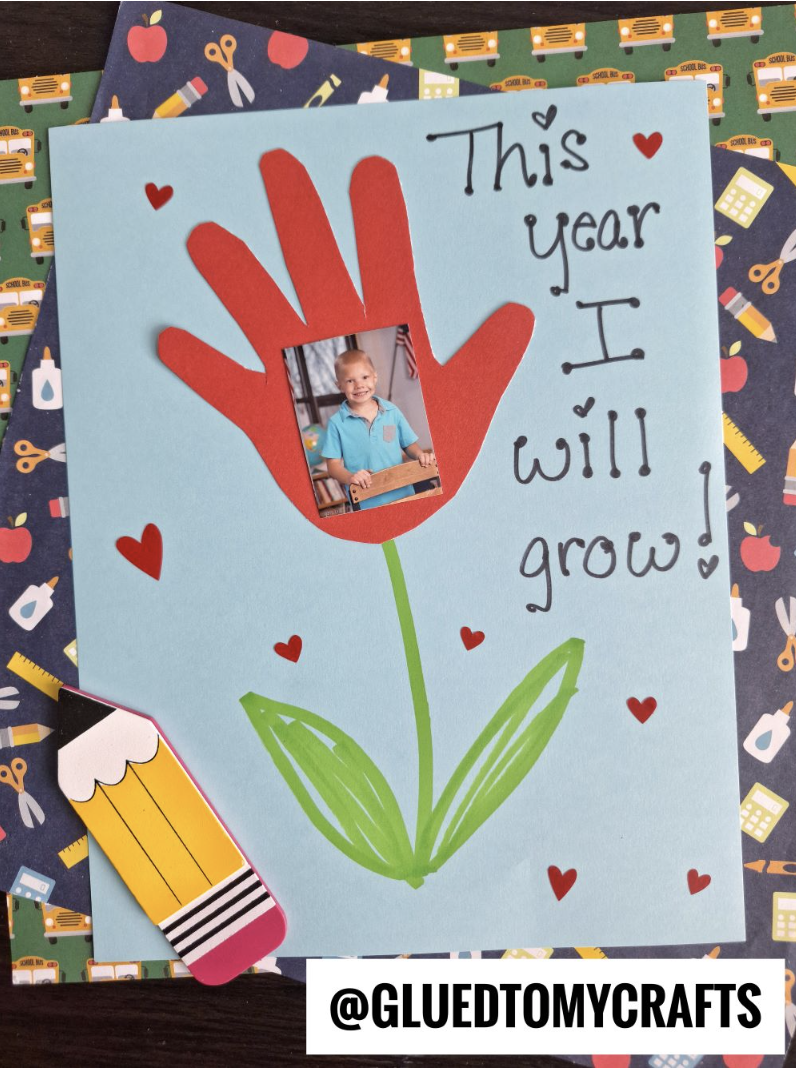
Supplies:
- construction paper
- markers
- glue
- child’s photo
Instructions:
1. Trace around your child’s hand, and cut out the shape.
2. Have your child paste the handprint to the middle of the page, then use markers to draw a flower stem and leaves.
3. Glue the child’s photograph to the middle of the flower, and add the text, “This year I will grow!”
5. Button Apple Craft
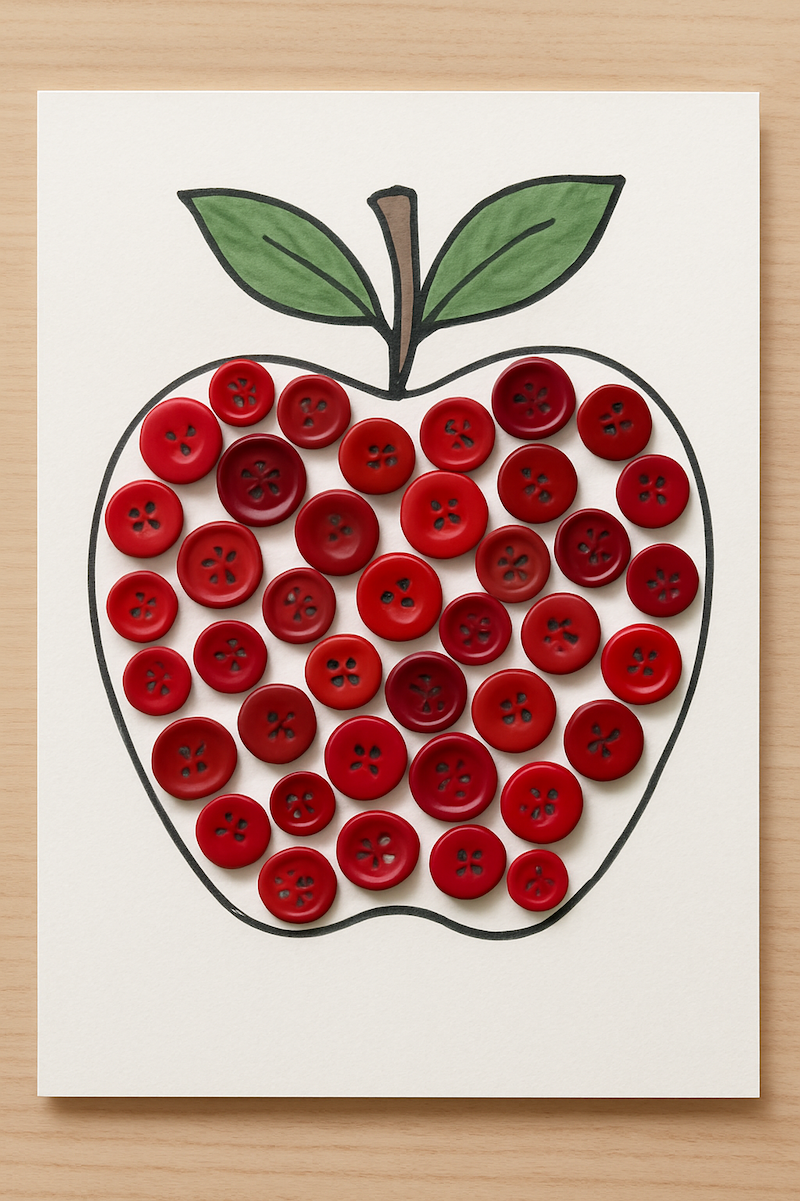
Supplies:
- red or green buttons of various sizes
- glue
- card stock
- markers
Instructions:
1. Trace the outline of a large apple onto a piece of card stock, and add a stem and leaves.
2. Help your child fill the outline with buttons, covering as much space as possible. (Supervise small children for safety.)
3. Carefully glue each button in place, then display your art!
6. Paper Bag Colored Pencil Craft
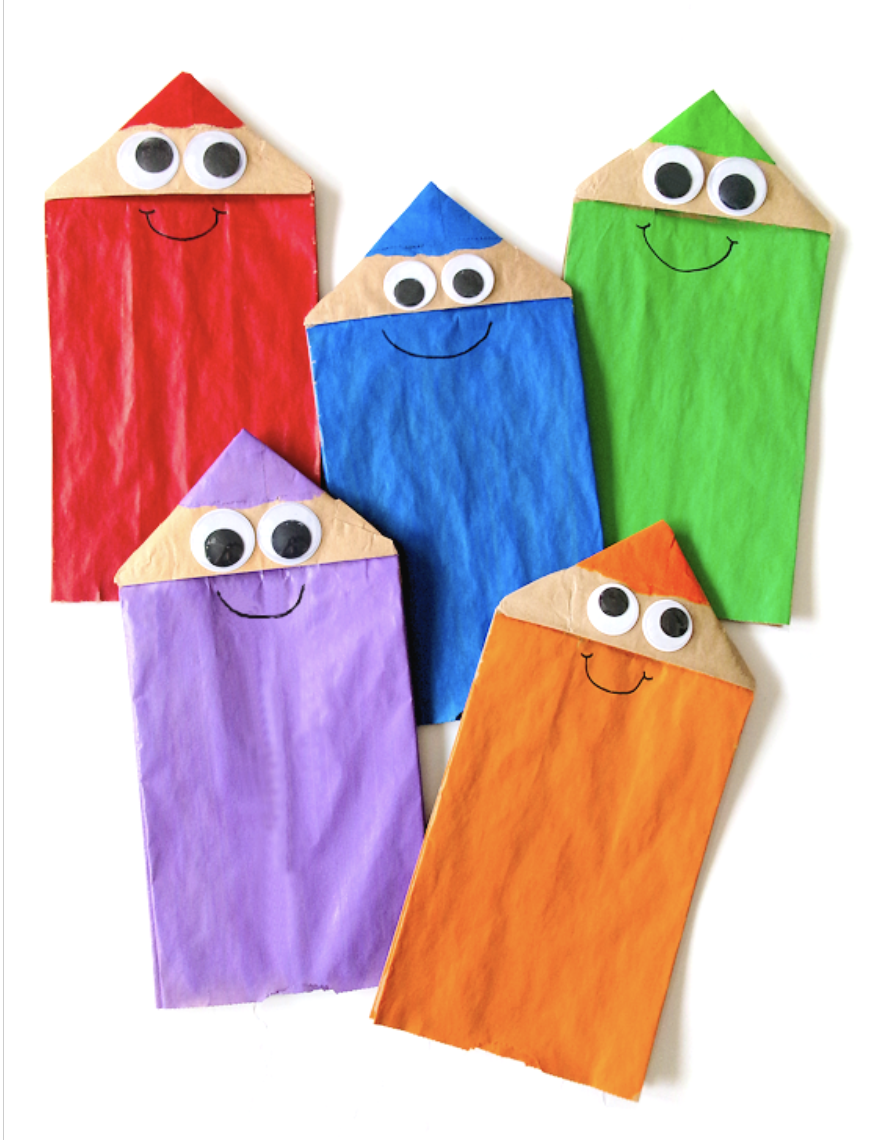
Supplies:
- brown paper lunch bags
- paint and paintbrushes
- googly eyes
- black marker
- glue stick
Instructions:
1. Flip the bag over so the flap is facing down. Then, fold the corners in to make a point, and glue them in place.
2. Now, flip the bag over and paint the bottom section (below the flap) any color you want. Paint just the tip with the same color, leaving a strip unpainted.
3. When the paint is dry, add the googly eyes to the unpainted section, and draw in a happy smile. Add your child’s name if you like.
7. Personalized Sticker Pencil Box
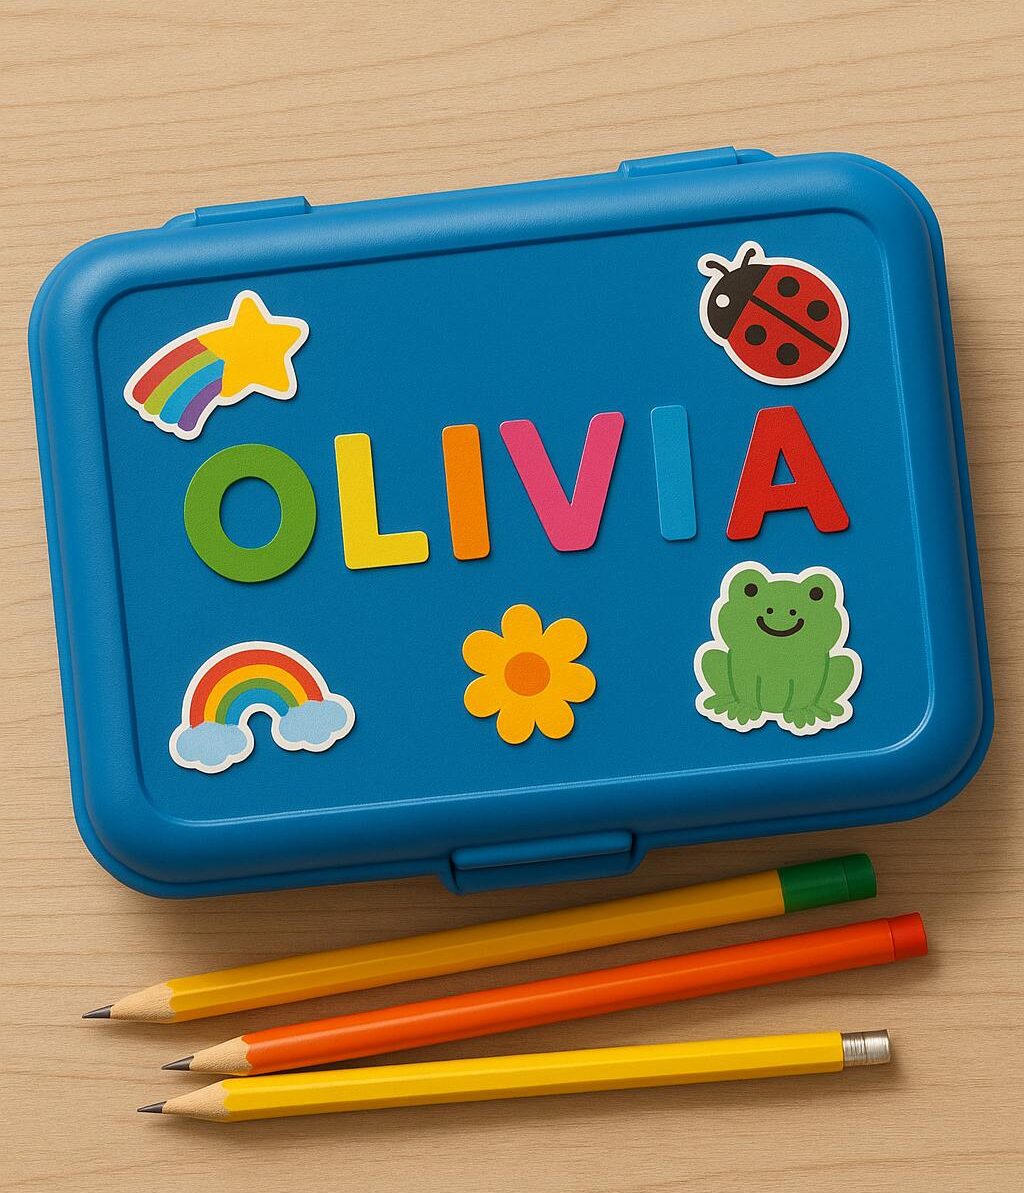
Supplies:
- plain pencil box (or upcycled wipes container)
- adhesive letters, plus other stickers of your choice
Instructions:
1. Help your child find the letters of their name from the adhesive letters and apply them to the lid of the box.
2. Let your child use the other stickers to decorate the box however they like.
3. Stow their favorite pencils, markers, and other supplies in the box!
8. Butterfly Pencil Holder
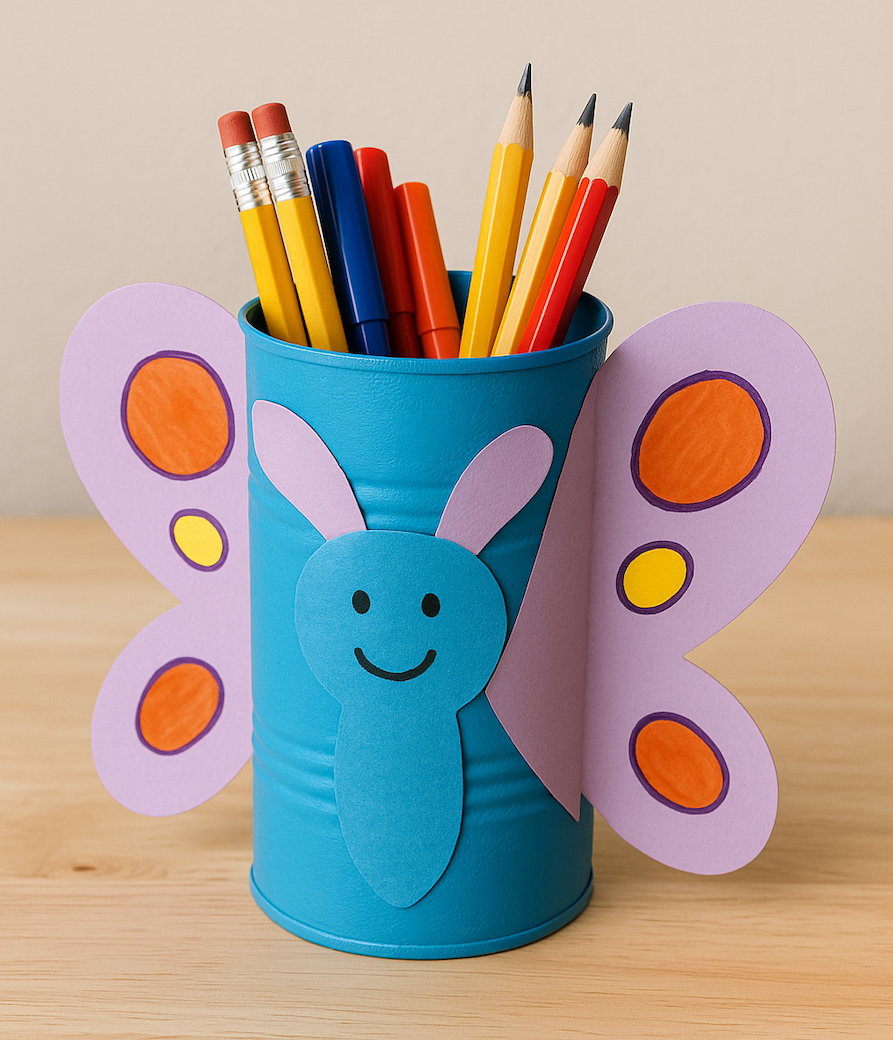
Supplies:
- empty tin can, washed with sharp edges removed
- paint
- construction paper
- markers
- glue
- scissors
Instructions:
1. Have your child paint the outside of the can any color they like.
2. Cut butterfly wings from construction paper. Your child can decorate these with paint or markers.
3. Glue the wings to the back of the can to make a simple butterfly!
Tip: Continue getting creative with these beautiful winged insects with our free printable Butterfly Coloring Pages.
9. Handprint Box of Crayons
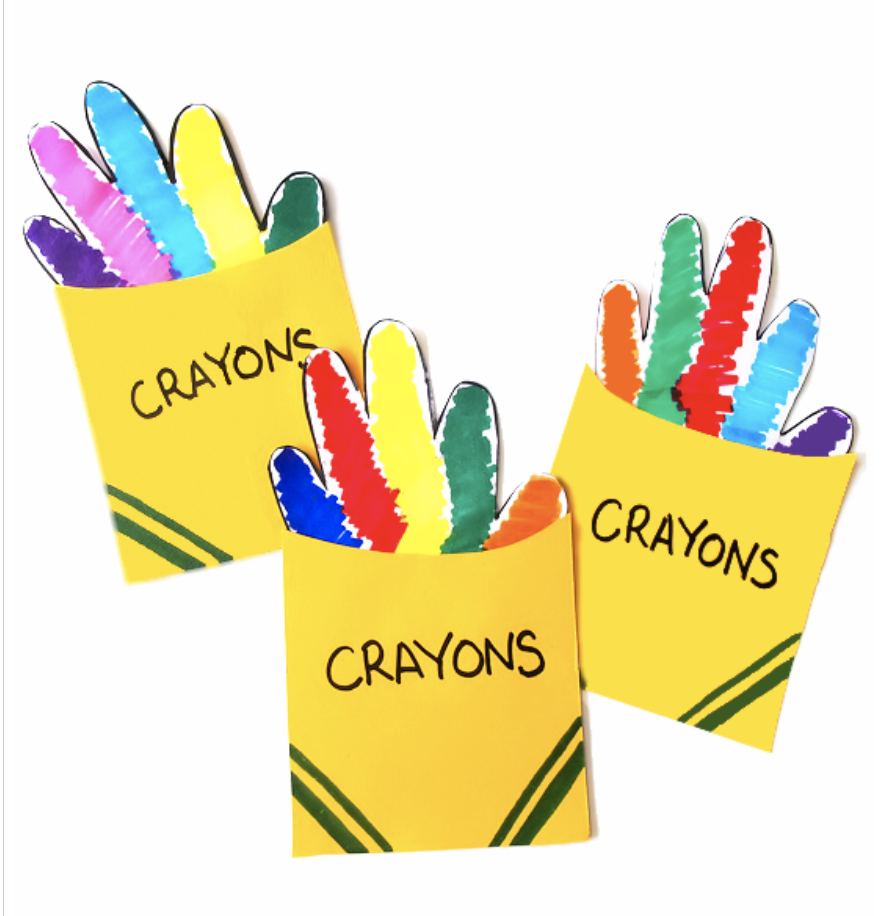
Supplies:
- white and yellow cardstock
- 5 colors of markers, plus black
- scissors
- glue stick
Instructions:
1. Trace around your child’s hand on the white card stock, and cut it out.
2. Have your child use a different color of marker to color in each finger.
3. Cut a rectangle of gold card stock the right size to cover the bottom of the handprint. Glue it in place so the fingers appear to be crayons sticking out of the box.
4. Label the front of the box “Crayons.” You can even add your child’s name if you like!
10. Popsicle Stick Glue Bottle
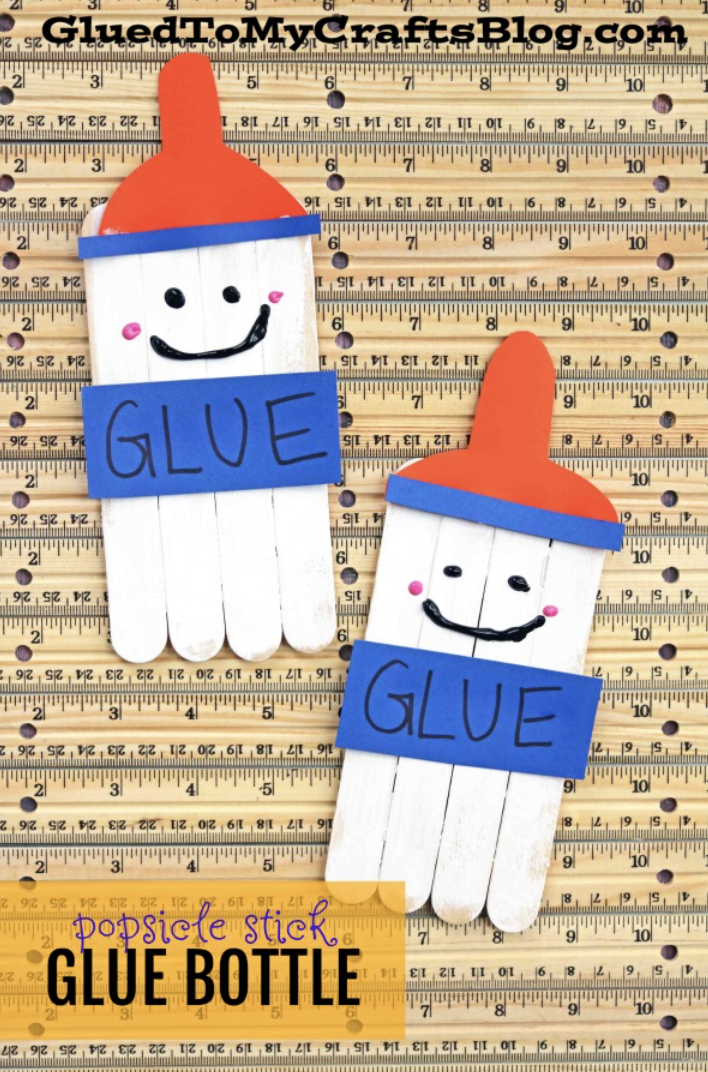
Supplies:
- wood craft sticks
- white, black, and pink craft paint
- paintbrushes
- blue and orange card stock
- scissors
- black marker
Instructions:
1. Lay four craft sticks side by side, then glue one craft stick horizontally across the top to hold them in place.
2. Once they’re dry, have your toddler paint the whole thing white, and allow it to dry.
3. Cut a nozzle shape from orange card stock and a thin blue strip to go below it. Cut another wider blue stripe for the label, and glue them all into place.
4. Write the word “Glue” across the label with the marker, and use the paint to add a smiley face.
Back-to-School Crafts for Preschoolers
School begins to become more formal around this age, with many kids having their first official “back to school” day when preschool begins. These fun crafts help celebrate the day, and many also help preschoolers learn their letters!
11. First Day of School Crown
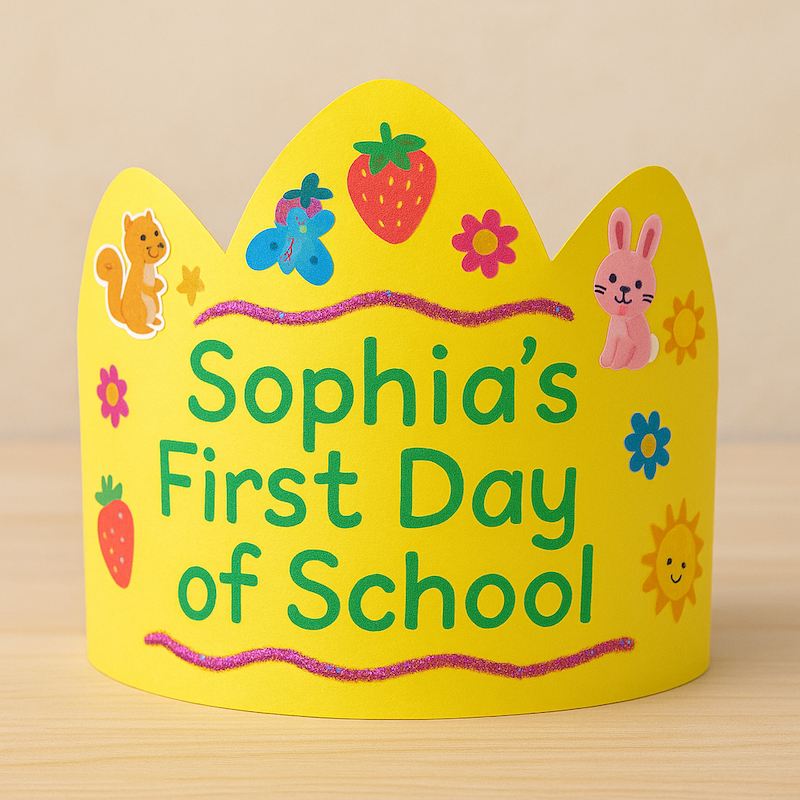
Supplies:
- construction paper
- stapler
- scissors
- decorating supplies like glitter glue, stickers, markers, paint, etc.
Instructions:
1. Cut a paper crown from the paper in any shape you like to fit your child’s head, but don’t staple it together yet.
2. Write “[Name]’s First Day of School” on the front of the crown. Then, let your child decorate the crown any way they like.
3. When they’re done, staple the crown together. Wear it proudly for the first day of preschool pictures!
12. Craft Stick Picture Puzzle
Supplies:
- jumbo wood craft sticks (same amount as number of letters in your child’s name)
- photo of your child
- glue
- precision knife
- marker
Instructions:
1. Set craft sticks side by side, with the edges touching. Lay the picture on top and glue it in place, leaving room at the bottom.
2. Write your child’s name across the bottom, one letter per stick.
3. Use the knife to slice the photo apart between the sticks.
4. Mix up the pieces, and let your child put them back together.
Teachers: Have each student make one of these puzzles, then trade them with their classmates to get to know them and their names too!
13. Back to School Coloring Book

Supplies:
- ABCmouse back to school coloring pages
- crayons, markers, or colored pencils
- construction paper
- back-to-school related stickers
- stapler
Instructions:
1. Print the coloring pages and stack them. Add a construction paper front and back cover, and staple together into a booklet.
2. Label the front “[Name]’s Back to School Coloring Book.” You can add the year if you like.
3. Let your child decorate the front and back covers with stickers or drawings. Then, they can color the pictures inside.
Tip: Make a new version of this coloring book each year, and you can record your child’s skills as they advance!
14. Silly Student Plant Hair
Supplies:
- disposable cup
- potting soil
- grass seeds
- photo of student’s head
- glue stick
- scissors
Instructions:
1. Cut out and glue the photo of each child to the outside of a paper cup. Try to position the photo so their hair is right below the edge of the cup.
2. Add soil to the cup, and sprinkle grass seeds on top.
3. Place the cup in a sunny spot and water it lightly each day. Watch the grass “hair” grow!
Teachers: Try this with a class of students, all lined up across a windowsill.
15. A is for Apple
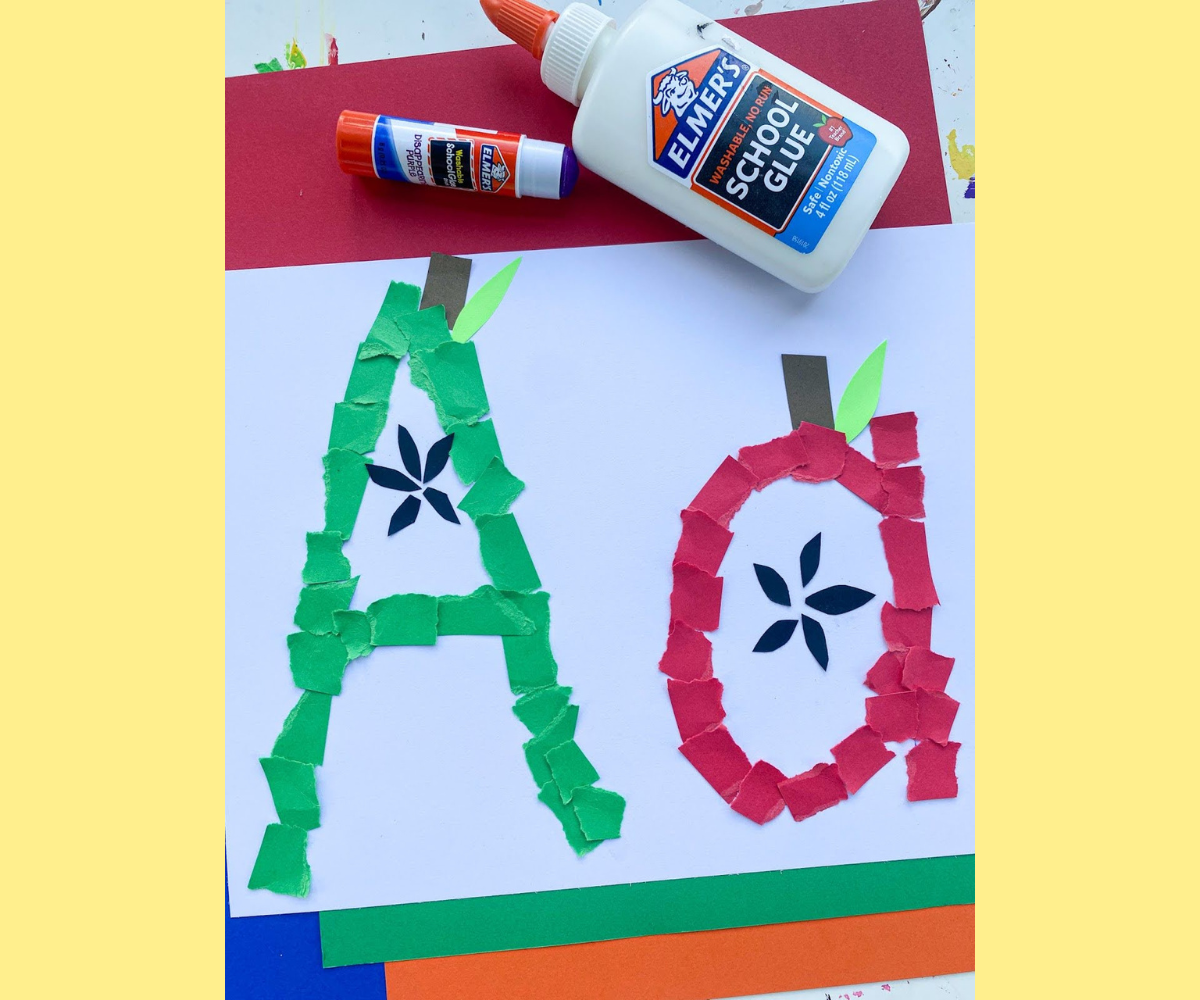
Supplies:
- white card stock paper
- red, green, and brown construction paper
- marker
- glue stick
- scissors (optional)
Instructions:
1. Trace an uppercase and lowercase A onto the card stock.
2. Have your child cut or tear the construction paper into small pieces, then glue them over the letter shapes you traced. Use red for one letter and green for the other.
3. When they’re done, add brown stems and use a marker to draw little seeds inside as shown.
16. B is for Brown (Lunch) Bag
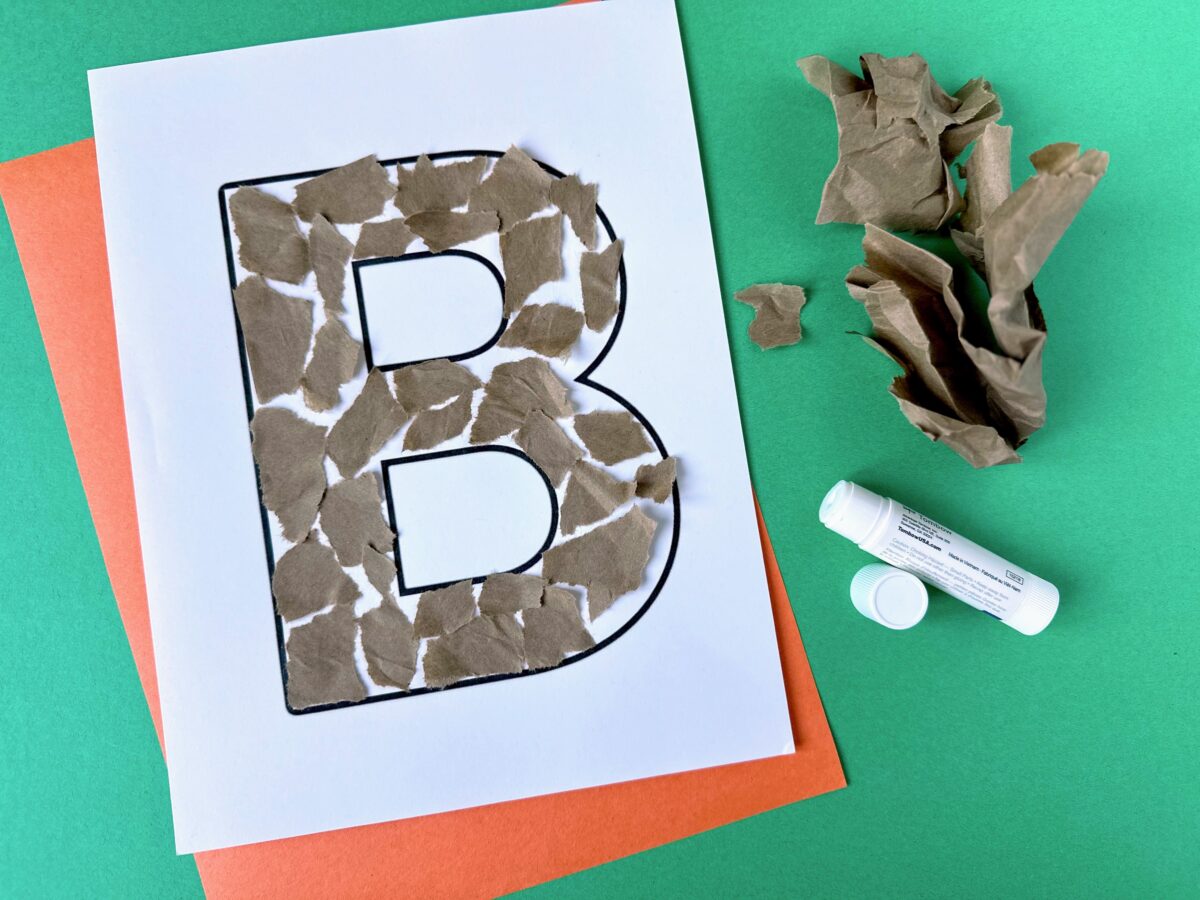
Supplies:
- letter B template
- brown paper lunch bag
- glue stick
Instructions:
1. Have your child cut or tear a brown paper lunch bag into small pieces.
2. Print out or draw the outline of a letter B.
3. Then, have your child fill the outline with their pieces of torn brown paper lunch bag, gluing the pieces down when they’re finished.
4. When they’re done, they can use crayons to draw pictures around their letter B of the lunch that was inside the bag!
Tip: This is a fun way to recycle a gently-used paper bag!
17. Crayon Bookmarks

Supplies:
- colored cardstock
- marker
- scissors
- glue stick
- yarn for tassels (optional)
- hole punch (optional)
Instructions:
1. Trace and cut crayon shapes from card stock.
2. Cut rectangle labels from card stock that’s slightly lighter in color. Paste the labels onto the crayons.
3. Use the black marker to write your child’s name and decorate the label.
4. Optional: Make tassels by cutting three or four short pieces of yarn, then tying a longer piece of yarn around the middle. Punch a hole in the top of the crayon and feed one end of the longer piece of yarn through, tying it off to make a loop. Fluff the tassel.
18. Yarn-Wrapped Can Pencil Holder
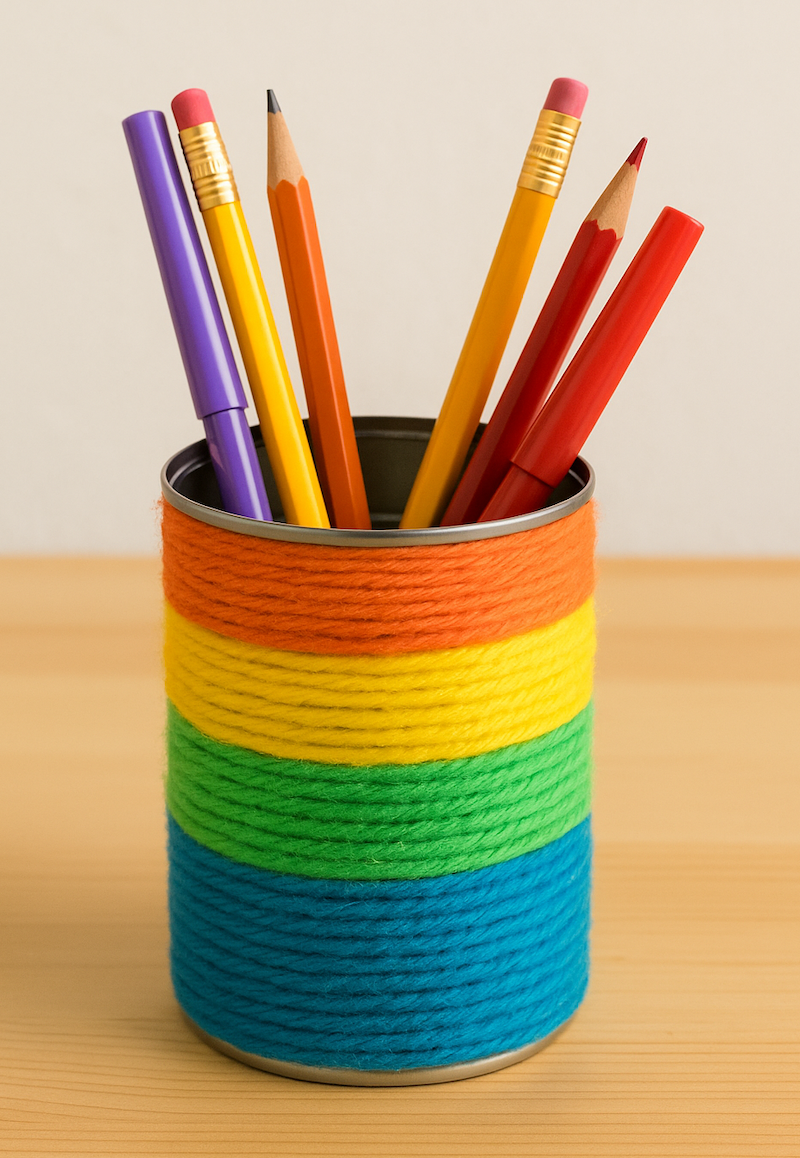
Supplies:
- empty tin can
- yarn in several colors
- glue
- small paintbrush
Instructions:
1. Clean the can and file any sharp edges down until they’re smooth.
2. Use the paintbrush to spread glue around the bottom inch or so of the can.
3. Have your child begin wrapping one color of yarn around the can. When they reach the end of the glued area, cut off the yarn.
4. Spread glue around the next section, and let your child wrap it with a new color of yarn. Repeat until you’ve completely covered the can.
5. Let dry, then use the can to hold pencils, pens, and markers.
19. F is for Family
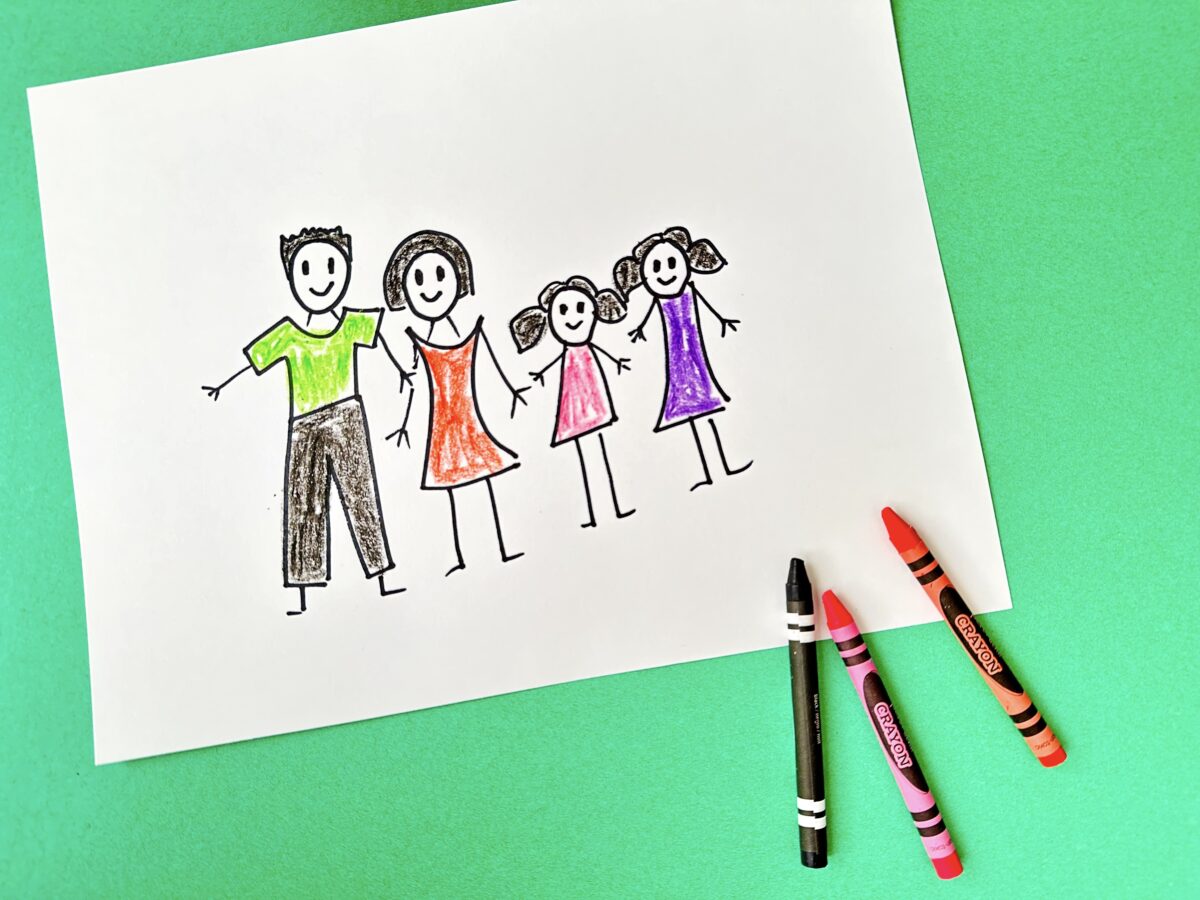
Supplies:
- paper
- crayons, markers, or colored pencils
Instructions:
1. Have your child or students use their art tool of choice to create a picture of their family.
2. Invite students to share their drawing with the class or hang the drawings up around the room.
3. For children with school lockers, this a creative way to have a friendly reminder of home with them at school.
Teachers: This is a great way for students to learn about each other’s families on the first day of school.
20. Craft Stick Pencil Bookmark
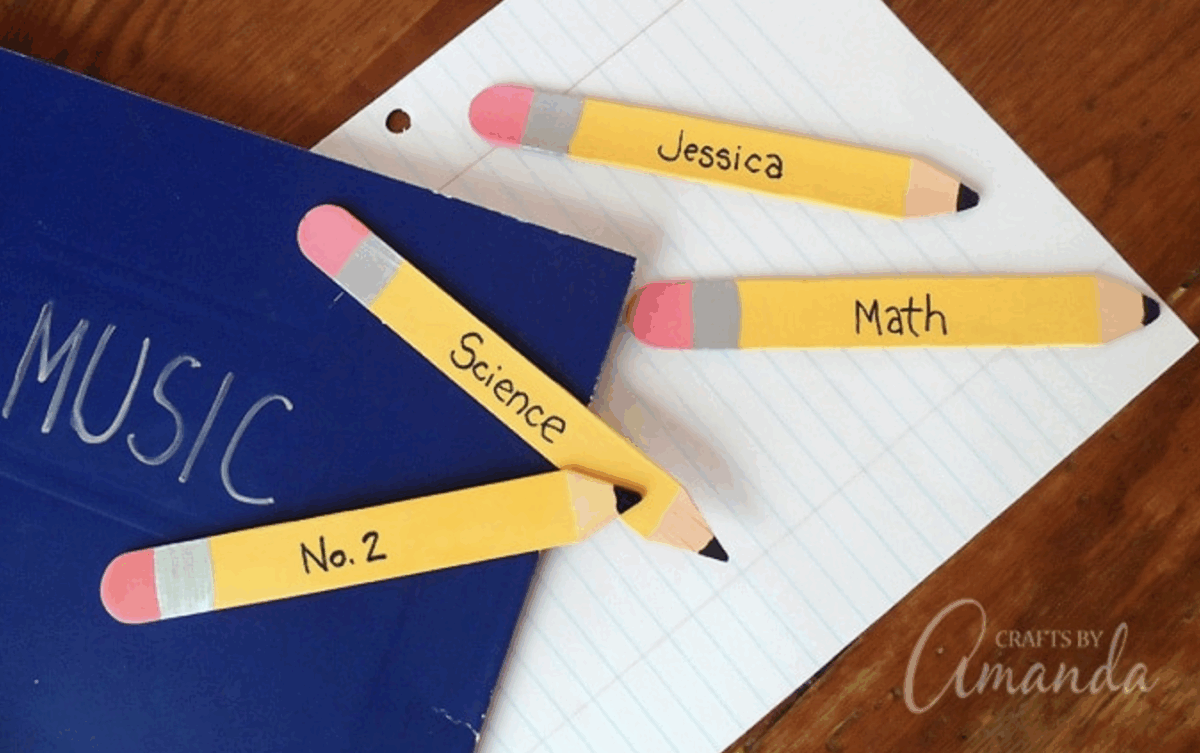
Supplies:
- wood craft stick
- scissors and sandpaper
- pencil
- yellow, pink, silver, and black paint
- black marker
Instructions:
1. Cut one end of the craft stick into a point, and use sandpaper to remove rough edges.
2. Draw light lines with a pencil to indicate where each color of paint should go.
3. Have your child paint the stick with the appropriate colors.
4. When it’s dry, label the pencil bookmark with their name or the school subject it will be used for.
21. H is for Handprint
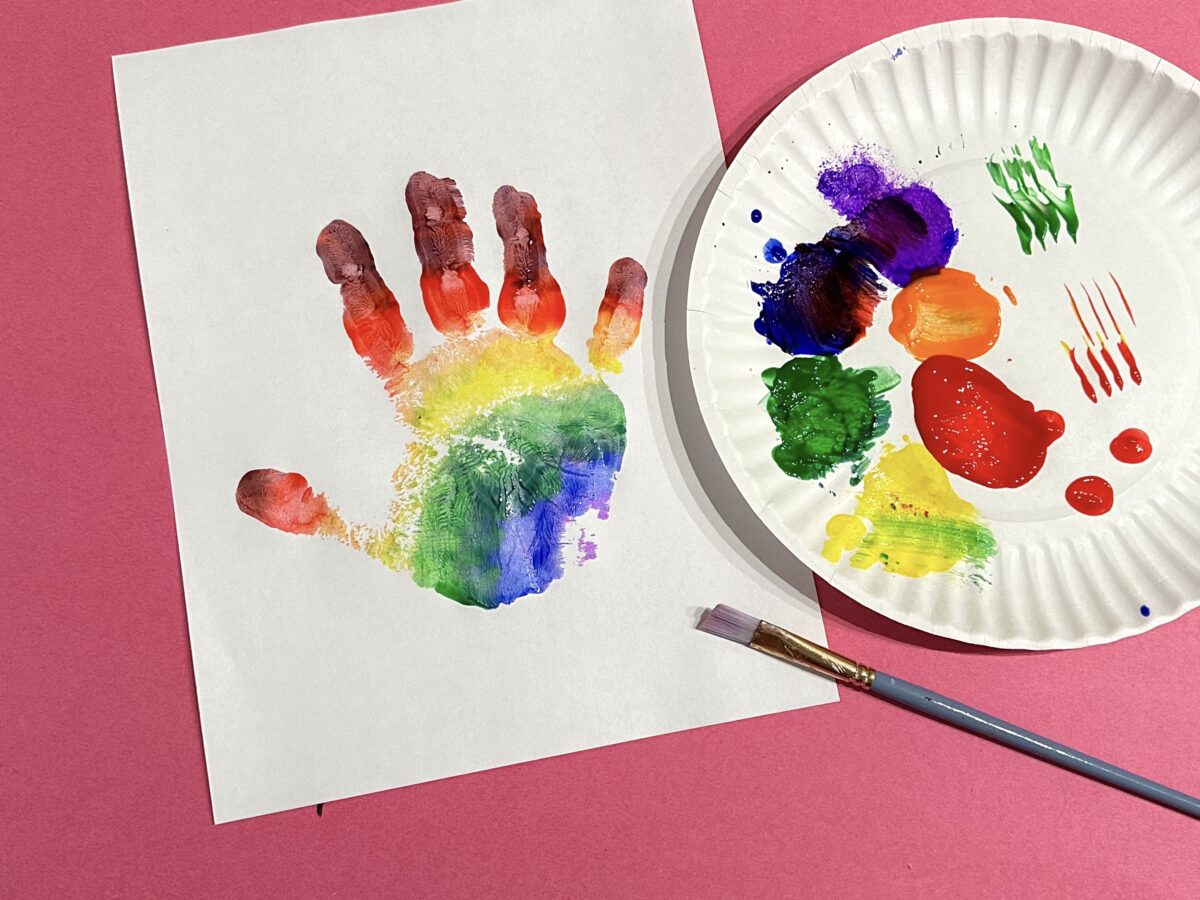
Supplies:
- white paper
- washable paint
- paintbrushes
Instructions:
1. Write your child’s name across the top of the page.
2. Apply paint to your child’s palm in any colors you like, then press it gently onto the page and lift straight up.
3. At the end of the school year, repeat this craft and compare how much your child’s hand has grown!
Teachers: Make a whole collection of these for every member of your class, then use them to decorate walls or doors!
22. Back to School Collage
Supplies:
- large piece of paper
- old magazines, catalogs, or books with lots of pictures
- scissors
- glue stick
Instructions:
1. Look through the magazines, catalogs, craft paper, stickers, or books with your child for pictures that fit the theme “Back to School.” (Think pencils, crayons, scissors, students, new clothes, teachers, books, etc.)
2. Cut or tear out the pictures, then experiment with different arrangements on your paper.
3. Finally, glue everything in place and display your collage.
23. P is for Pencil
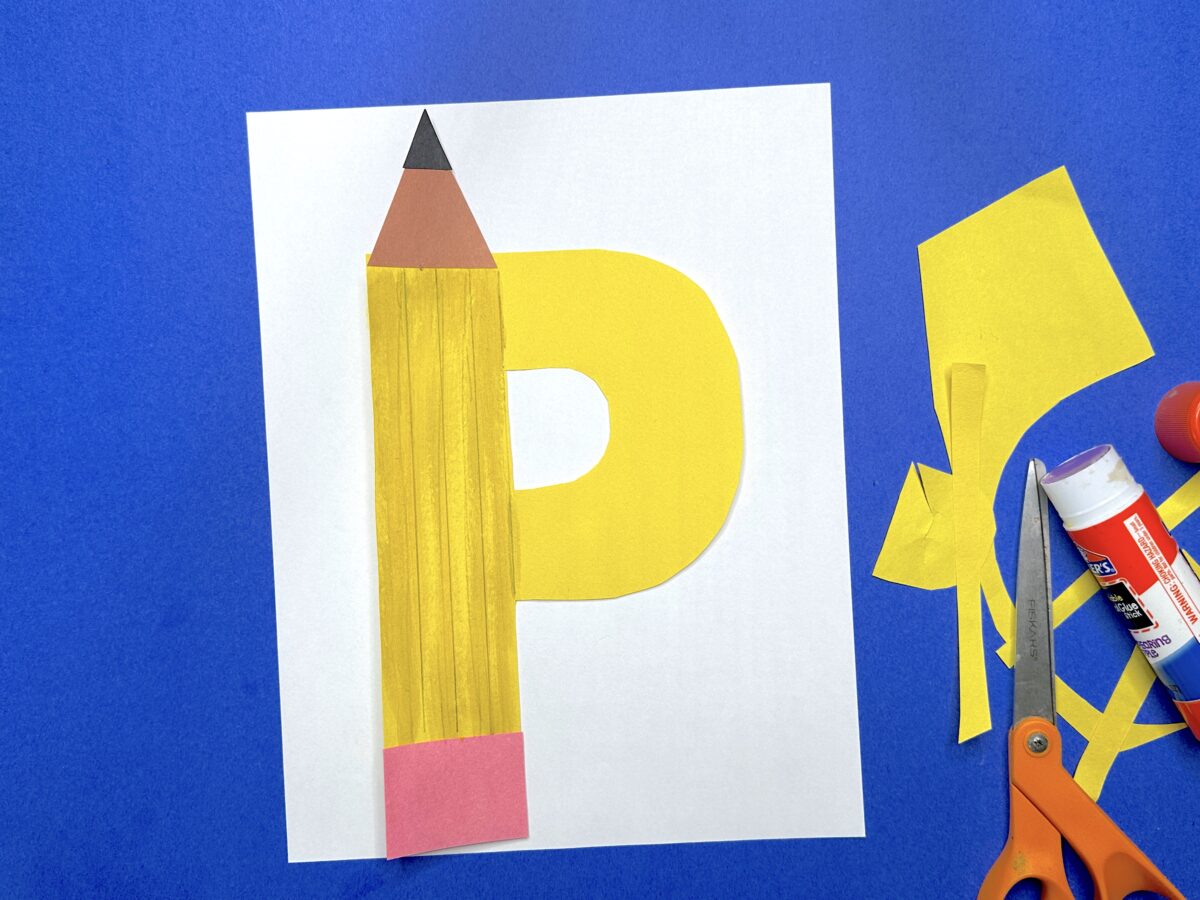
Supplies:
- yellow, pink, brown, and black construction paper
- sheet of white paper
- scissors
- glue
Instructions:
1. Print out or draw an uppercase or lowercase letter P onto a sheet of yellow construction paper, then cut it out. Use our letter P outlines from this set of worksheets if needed.
2. Next, have your child draw straight lines on the part of the letter P that’s a straight line, going from the top to the bottom. If they’d like, they can use their finger to blend them slightly. This helps your yellow rectangle look more like a pencil.
3. Then, cut out a pink square to act as the pencil eraser and glue it to the bottom of the P.
4. Finally, cut out a larger brown triangle and smaller black triangle, forming the top of the pencil and its sharp point.
24. Q is for Quiet
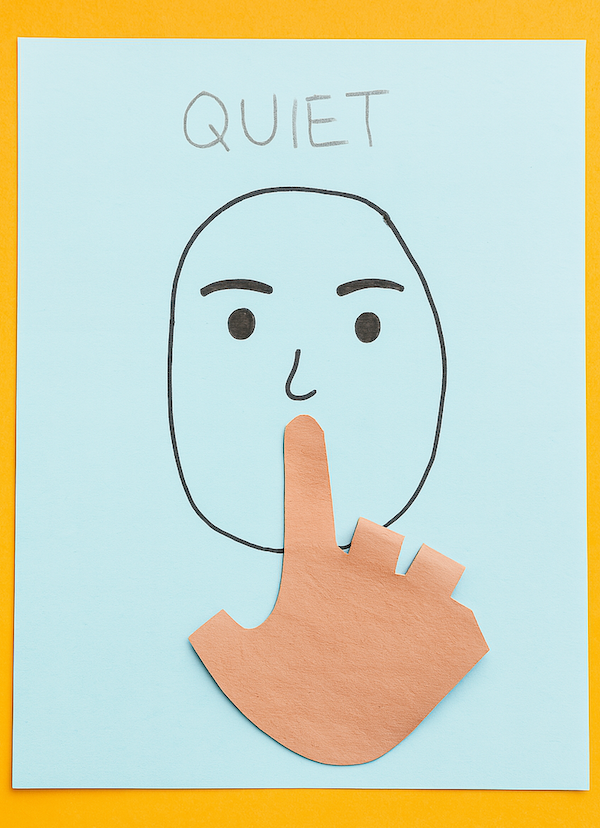
Supplies:
- construction paper
- pencil, crayon, or marker
- scissors
- glue
Instructions:
1. Remind preschoolers that school sometimes means being quiet for awhile with this cute back to school craft! First, ask your child to draw a circle on a piece of paper and turn it into a face by adding eyes, eyebrows, and a nose.
2. Then, trace the outline of your child’s hand onto a piece of construction paper and cut it out.
3. Finally, fold down all of the fingers except the index (pointer) finger and place the hand where the mouth would be on the face, creating a person saying “shhhh!” or asking for some quiet!
25. Beaded Name Zipper Pull

Supplies:
- letter beads
- pipe cleaners
- decorative beads (optional)
Instructions:
1. Have your child find the letters to spell their name, and string them onto a pipe cleaner.
2. Add decorative beads to either side, if using.
3. Feed the top of the pipe cleaner through a zipper on your child’s backpack, and twist it around to hold it firmly in place.
4. Loop the bottom of the pipe cleaner around your finger once and twist it closed, then slide it off. (This loop will keep the beads from slipping off.)
26. Bumblebee School Snack Bag
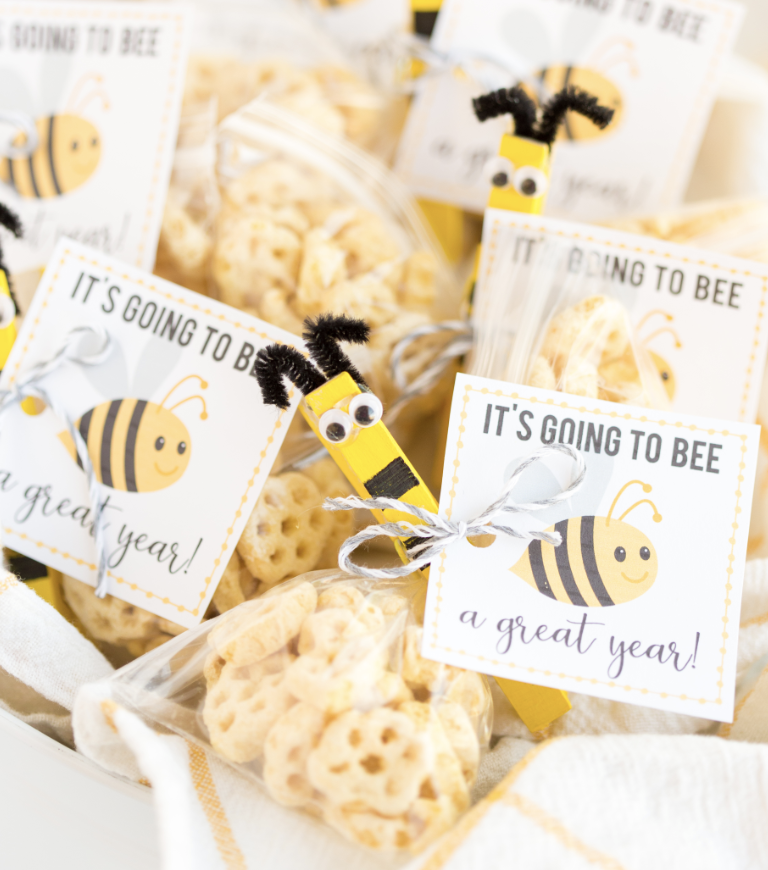
Supplies:
- clothespin
- yellow and black paint
- googly eyes
- black pipe cleaner
- zipper snack bag
- honeycomb cereal (or other treat)
Instructions:
1. Have your child paint the clothespins yellow with black stripes, like a bee.
2. Glue the googly eyes to the top front of the clothespin.
3. Cut two short pieces of pipe cleaner to form the antennae, and glue them into place.
4. Fill the zipper bag with your chosen snack, but not too full. Squeeze out the air and zip the bag.
5. Move the snacks to either side of the bag, then pinch it together in the middle and twist once to make “wings.” Add the clothespin to hold everything in place.
27. Apple Popsicle Stick Frame
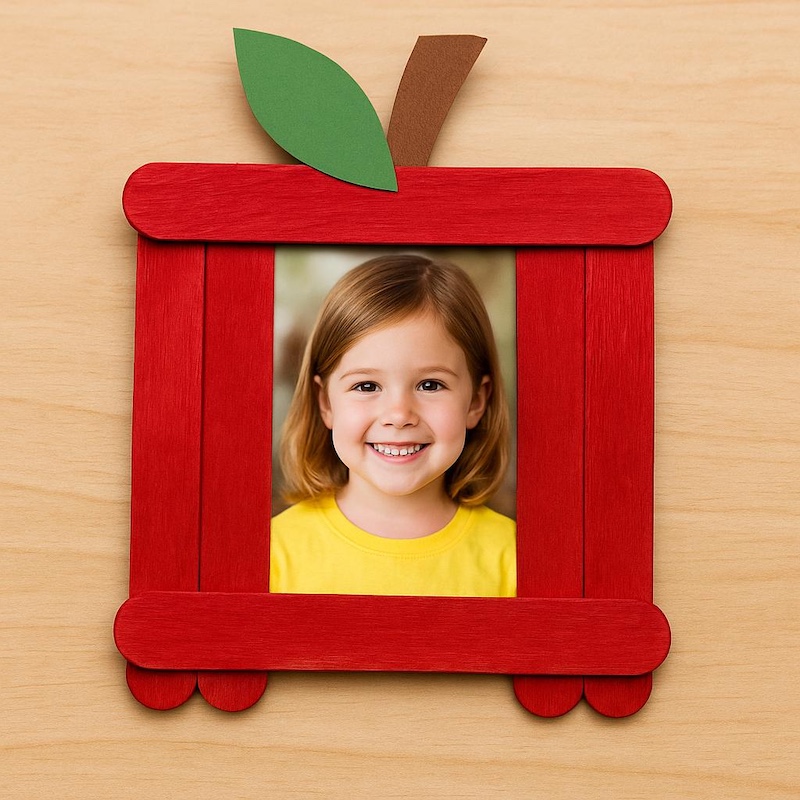
Supplies:
- 8 jumbo craft sticks
- glue
- red or green paint
- brown and green construction paper
- scissors
- photo of your child
Instructions:
1. Lay six craft sticks side by side with their edges touching. Lay the remaining two horizontally across the top and bottom, gluing them into place.
2. When the glue is dry, turn the sticks over. Have your child paint the “apple” red or green and let it dry.
3. Cut out a stem and leaves from construction paper, and glue them into place.
4. Glue your child’s photo into the middle of the apple.
5. Optional: Glue magnets to the back so you can hang this easy back-to-school craft on the fridge.

Back-to-School Crafts for Kindergarteners
This is it – “real” school has begun! This often includes first bus rides and other important school milestones. Celebrate and commemorate them all with these back-to-school arts and crafts ideas.
28. Year-by-Year Handprints
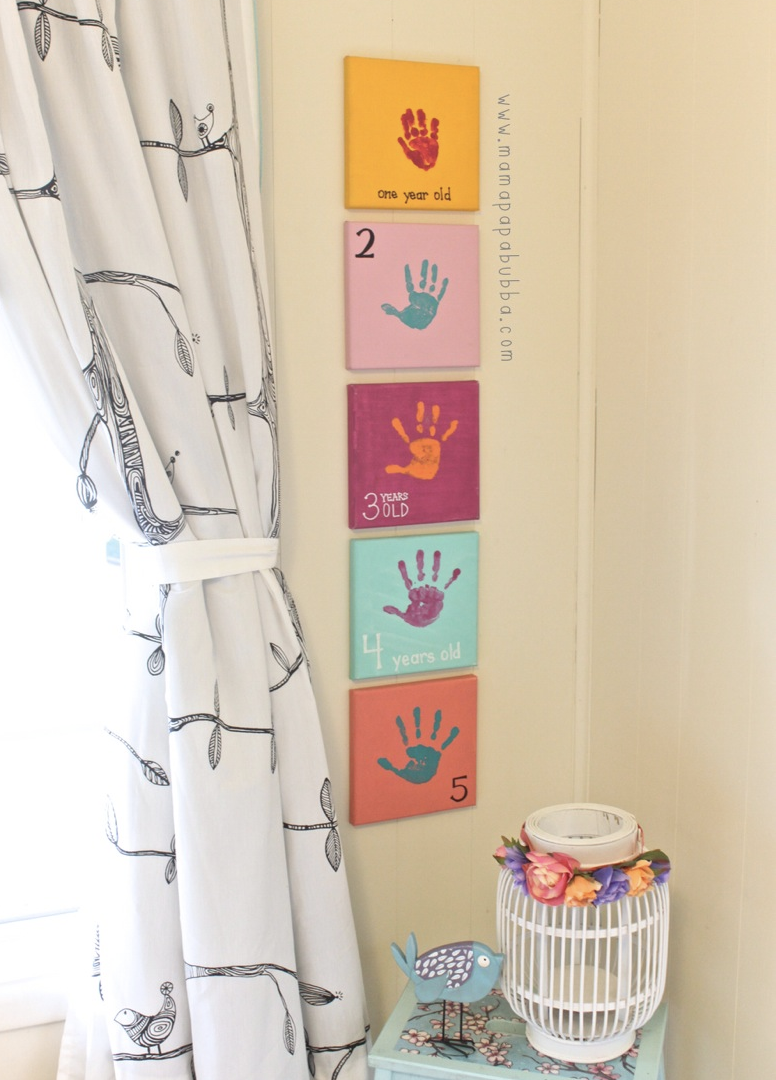
Supplies:
- poster board
- washable paint
- marker
- poster frame (optional) or square blank art canvases
Instructions for Poster Board Version (not pictured):
1. Across the top of the poster board, write your child’s name in large letters.
2. Divide the board into sections, one for each grade K to 12. Label each section with the grade and date.
3. Starting in kindergarten, use washable paint to capture your child’s handprint in the appropriate section. Repeat each year until they graduate, and watch them grow!
4. You can frame the poster board for display if you like. It makes a great bedroom wall hanging!
Tip: You can also use a small canvas for each year’s handprint, as shown in the image above.
29. Back to School Time Capsule
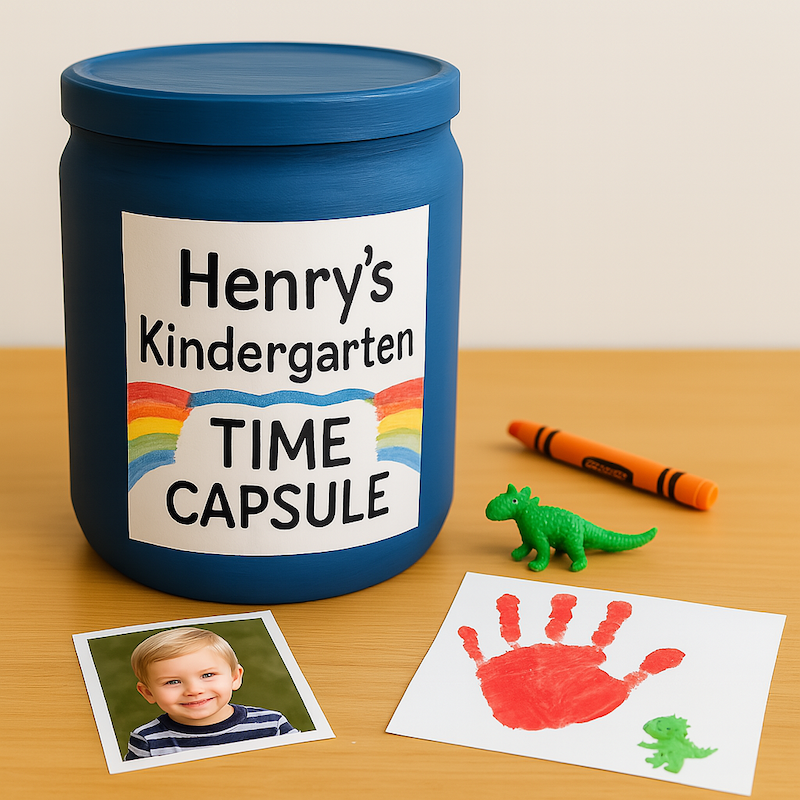
Supplies:
- large container with a lid
- construction paper
- markers
- paint (optional)
- items to place inside capsule
Instructions:
1. If using a glass jar or other see-through container, paint it with a few coats of paint so you can’t see what’s inside.
2. Make a label from construction paper that says “[Name]’s Kindergarten Time Capsule.” Add the current year, and the year you plan to open it. (This could be at the end of kindergarten, when they complete elementary school, or even not until they graduate high school!) Glue the label onto the container.
3. Now, work with your child to fill the container with things that represent them at this age. They might add photos, drawings of favorite toys, hair ribbons, or anything else they love. (Remind them that anything that they put in there will be hidden away for a long time!)
4. Tuck the time capsule away somewhere, and save it to open when your chosen day comes!
30. School Bus Frame
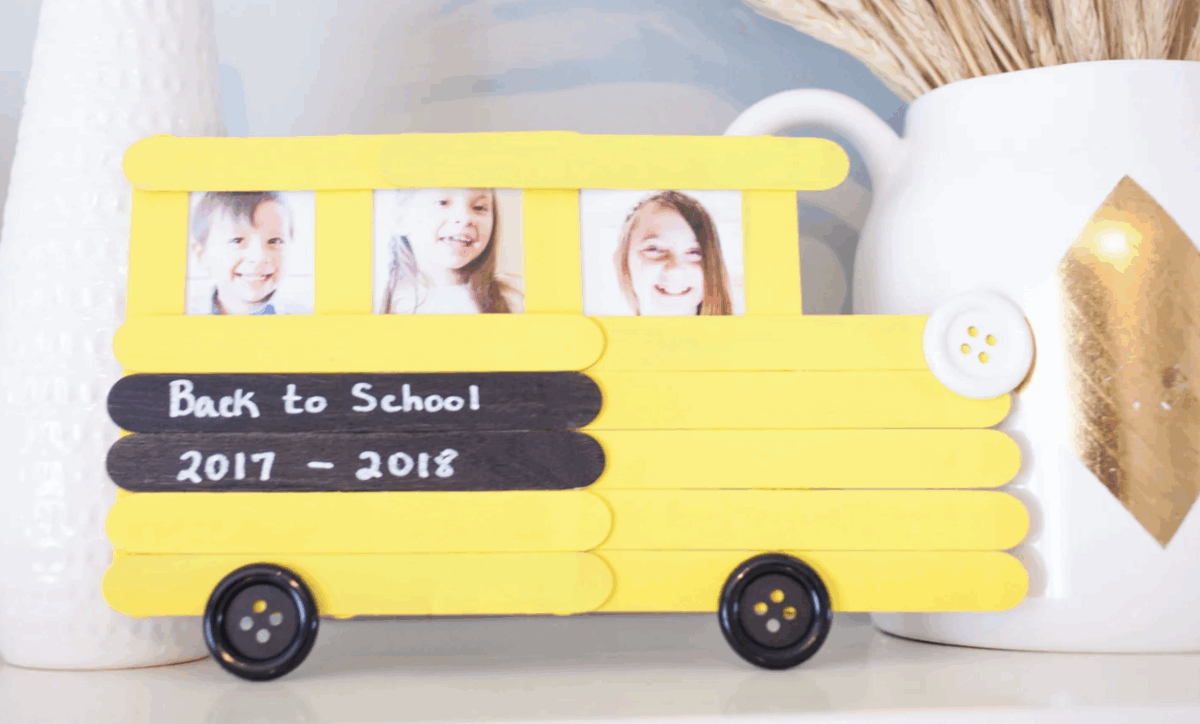

Supplies:
- 16 wood craft sticks
- black and yellow craft paint
- paint brushes
- glue
- two black buttons and one white button
- white chalk marker (optional)
- photos of your child
- small flat round magnets
Instructions:
1. Paint 2 sticks using black paint and the rest yellow.
2. Lay out the craft sticks as shown in the picture to form a school bus with three “windows.” Glue them in place and allow to dry.
3. Glue several magnets onto the back of the frame.
4. Glue or tape your child’s pictures in place, and display proudly on your fridge.
Tip: Use the white markers to write the school year, your child’s name, and/or the school name.
31. First Day of School Signs
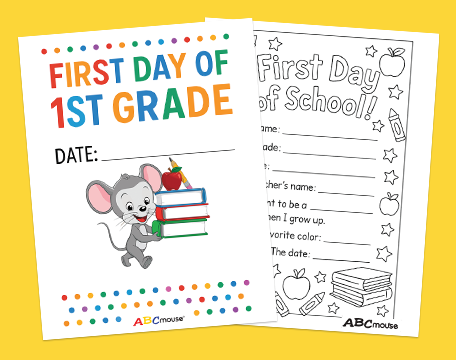
Supplies:
- ABCmouse First Day of School Printable Signs
- crayons, markers, glitter glue, stickers and other art supplies
Instructions:
1. Print the sign(s) you want to use with your child for their first day of preschool, kindergarten, first, second, third, fourth, or fifth grade. There are several options to choose from for each grade.
2. Let your child color in and decorate the signs, then use them to take pictures when you commemorate their first day.
32. School Year Keepsake Box
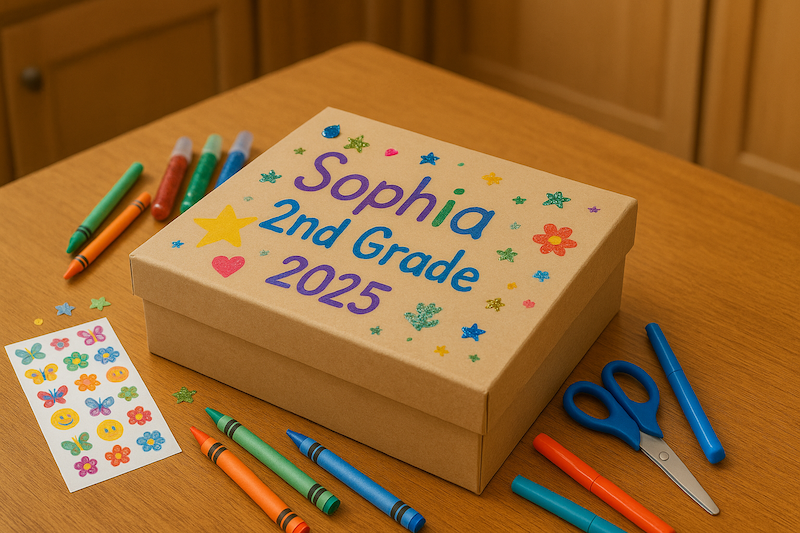
Supplies:
- box with lid
- crayons, markers, glitter glue, stickers, and other art supplies
Instructions:
1. Write your child’s name, grade, and the year on the top of the box.
2. Work with your child to decorate the outside of the box in any way you like.
3. Throughout the year, add special keepsakes from their experiences to the box. Eventually, you can build an entire collection of these to celebrate all of their school years!
33. First Day Photo Frame Prop

Supplies:
- foam poster board or large piece of cardboard
- precision knife
- paint, markers, glitter glue, stickers, and other art supplies
- clear packing tape (optional)
- dry erase markers (optional)
Instructions:
1. Cut a large square section out of the board so it resembles a photo frame. Leave the border large enough to write in and decorate.
2. Across the top, write, “First Day of School.”
3. Decorate the rest of the frame however you like, then have your child hold it up and look through it to take a fun first day of school pic!
4. Optional: Place a long piece of clear packing top across the bottom of the frame. Use the dry erase markers to write in your child’s name, grade, and the year. Reuse this frame year after year by wiping it clean and adding the updated info.
34. School Bus Countdown
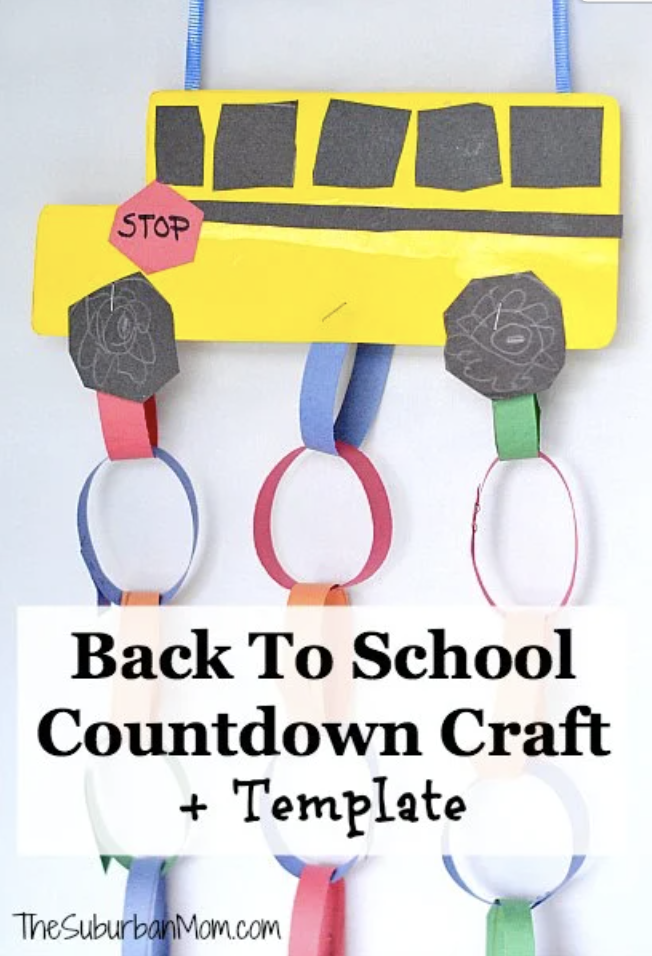
Supplies:
- construction paper
- pencil
- scissors
- glue stick
- stapler (optional)
- template
Instructions:
1. Print and cut out the template shapes that form the school bus.
2. Trace the template shapes onto red, black, and yellow construction paper.
3. Assemble the bus and glue the pieces together.
4. Cut strips of paper, about one inch by six inches, so you have one for each day that remains until school starts.
5. Form the first strip into a loop and glue or staple. Feed the next strip through and glue or staple, starting the chain. Continue until your paper chain is complete.
6. Attach the chain to the bottom of the school bus. Each night, tear one loop off the chain as you count down the days until school starts!
35. First Day Height Jar
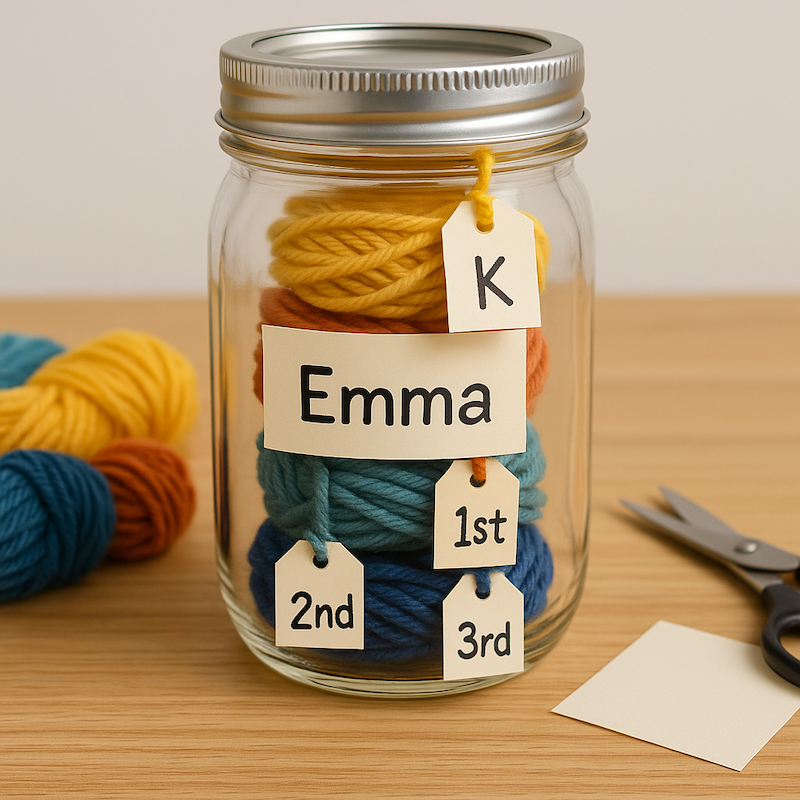
Supplies:
- clear glass jar with lid
- various colors of yarn or string
- scissors
- card stock
Instructions:
1. Make a label for the jar with your child’s name.
2. On the first day of school each year, measure your child and cut a piece of yarn that represents their height. Tie a tag to it with the grade and year, then coil it up and add it to the jar. This makes a fun keepsake for kids, year after year, as they see how much they grew!
36. DIY Marbled Pencils
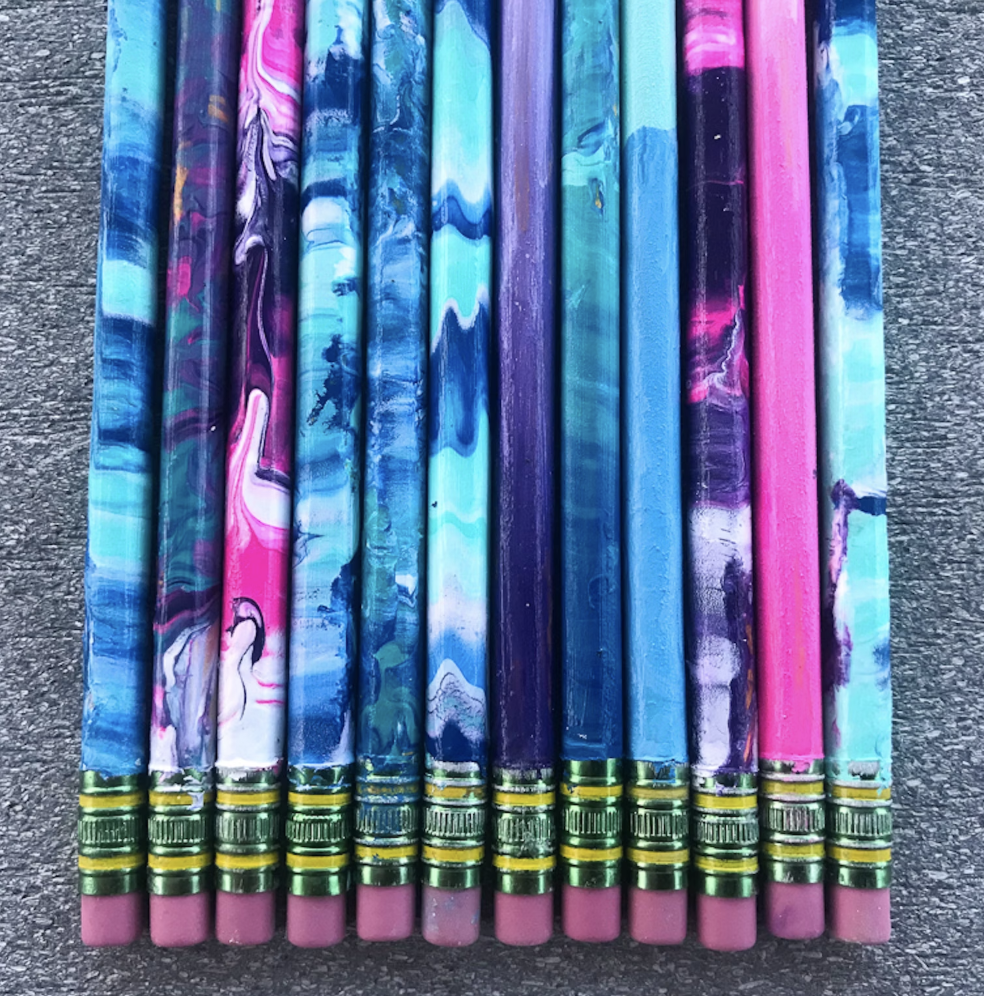
Supplies:
- unsharpened pencils
- painter’s tape or masking tape
- acrylic craft paint in your choice of colors
- aluminum foil
- toothpicks
- clothespins
- Mod Podge
- foam brushes
Instructions:
1. Tape off the eraser end of each pencil.
2. Squirt a few colors of paint onto a piece of aluminum foil (3-4 max colors is best). Gently swirl the paint with a toothpick, but do not over mix. If the paint is very thick, thin it a bit with water first.
3. Lay the pencil flat in the paint and turn to cover. Lift it carefully by the taped eraser end and let the excess drip off.
4. Clip a clothespin to the eraser end of the pencil, and carefully stand the clothespin on its end to allow the pencil to dry.
5. Repeat with new pieces of foil and different colors until all of your pencils are painted.
6. When the pencils are completely dry, apply a thin coat of Mod Podge with the sponge brush and allow to dry.
37. Magic Lunchbox Note
Supplies:
- green and white card stock
- scissors
- double-sided tape
- clear plastic film
- permanent marker
- colorful drawing or note
Instructions:
1. Follow the instruction in the video to create to create a special magical note for your child, and tuck it into their lunchbox or backpack on the first day of school!
38. Fuzzy Monster Pencil Toppers
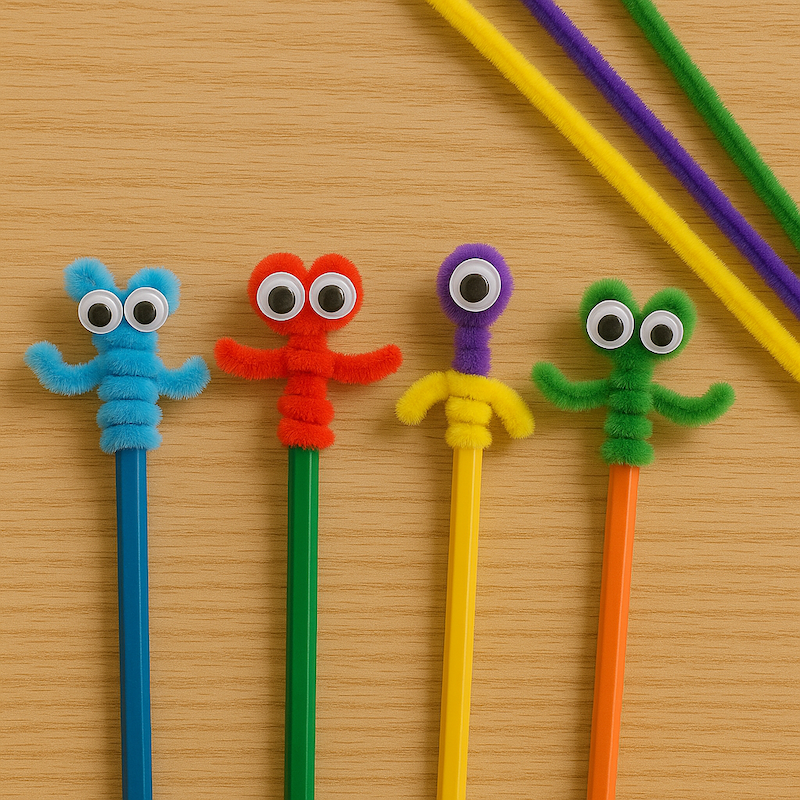
Supplies:
- pipe cleaners
- googly eyes
- hot glue
Instructions:
1. Help your child wrap a pipe cleaner around the eraser end of a pencil for about an inch or so.
2. Add arms by wrapping the middle of a pipe cleaner around, leaving the ends free. Trim them to be about an inch on either side, and bend into any shape you like.
3. Use hot glue to attach the eyes, and you’ve got a fuzzy pencil monster!
Tip: Kids can remove these to use the pencil eraser or to move them from one pencil to another.
39. School Bus Tissue Box Craft
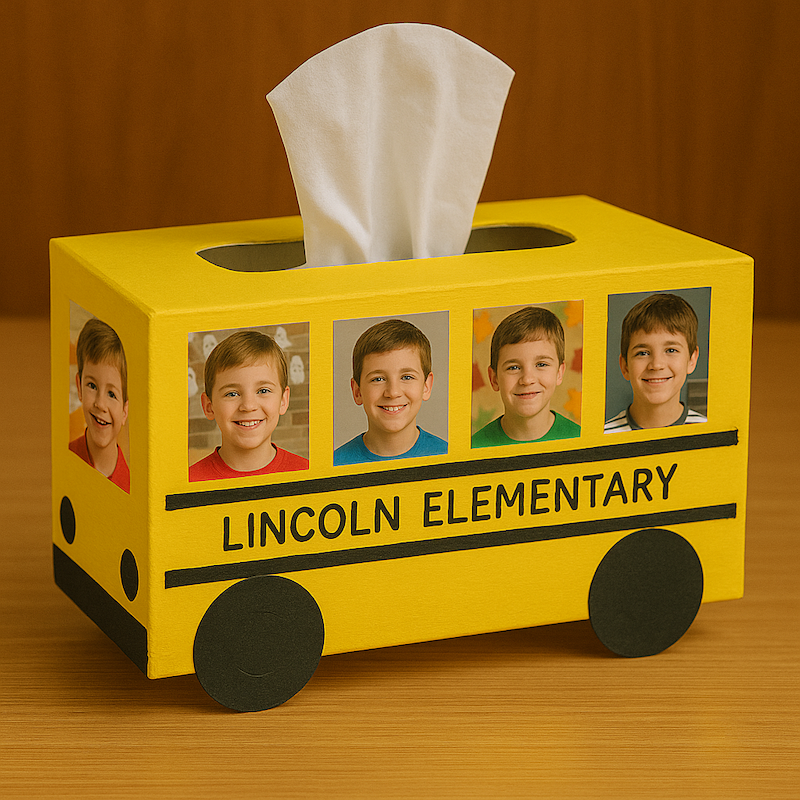
Supplies:
- rectangular box of tissues, unopened
- yellow and black craft paint
- black construction paper
- black marker
- paintbrushes
- photos of your child’s face
- glue
- scissors
Instructions:
1. Paint the tissue box yellow. Tip: Use several thin coats rather than thick ones that may soak through the box to the tissues inside.
2. Cut four circles of black construction paper, and glue them into place as tires.
3. Add black stripes and other school bus details. Write in your child’s school name and grade.
4. Trim the photos and glue them into place to represent windows with faces looking out.
Tip: This is a fun back-to-school gift for your child’s teacher! Just fill the bus windows with pictures of all the students instead of just your child.
40. Year-by-Year Back to School Rocks
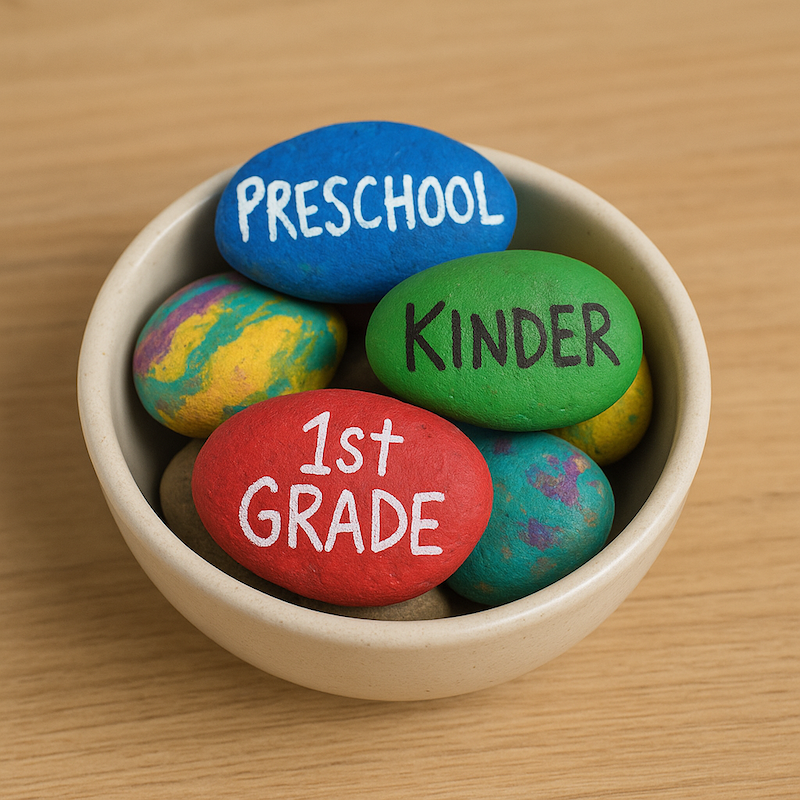
Supplies:
- large glass jar or bowl
- 13 river rocks
- paint markers or acrylic paint and brushes
Instructions:
1. Rinse the rocks and let dry.
2. Place the rocks in the bowl or jar. Each year on or around the first day of school, have your child paint a new rock and label it with their grade and the year. Add it to the bowl or jar, keeping the painted rocks on top.
Teacher Variation: Have your students create painted rocks on their first day. Keep each year’s rocks in its own jar, or add to one enormous bowl as the years go by!
41. First Day of School Flag
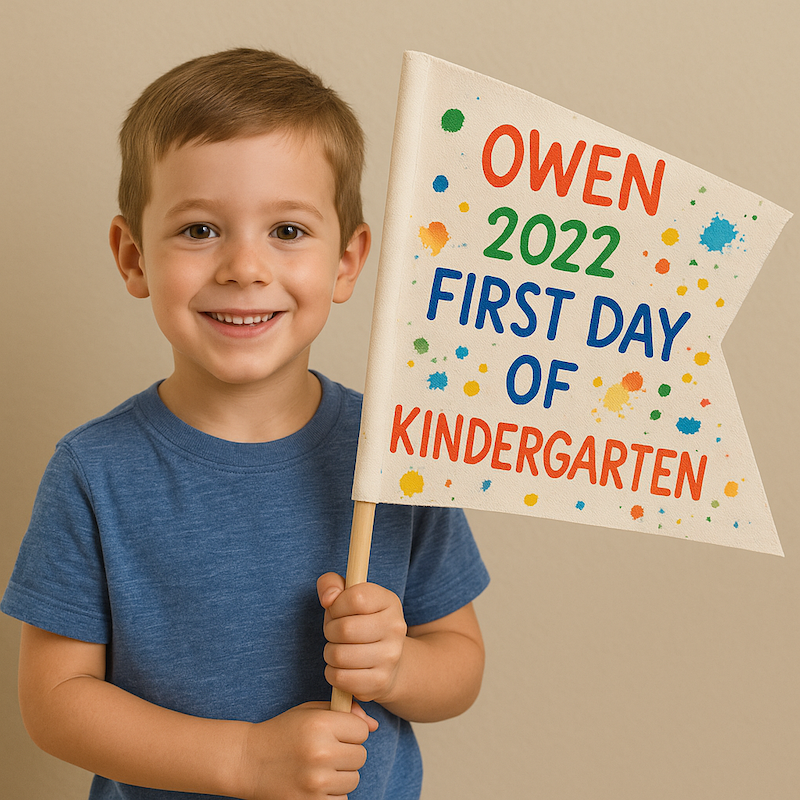
Supplies:
- sturdy material like cotton duck canvas, approx. 12 inches by 18 inches
- scissors
- dowel rod, about 24 inches
- hot glue
- fabric paint or paint markers
- brushes
Instructions:
1. Write your child’s name, the year, and “First Day of [Grade]” on the flag.
2. Let your child use the paint to decorate the rest of the flag however they like.
3. Wrap one end of the flag around the dowel rod and secure it with hot glue.
4. Have your child hold their flag for first day pictures!
42. Beaded Name and Grade Necklace
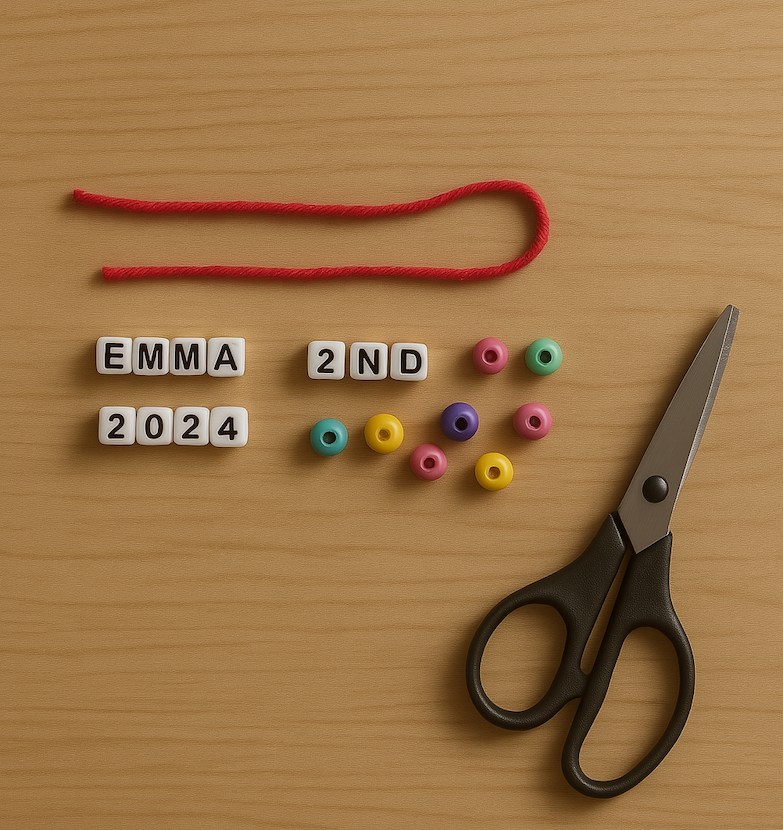
Supplies:
- letter/number beads and other decorative beads
- yarn
- scissors
Instructions:
1. Cut a piece of yarn about 14 inches long. Tie a knot two inches from one end.
2. Help your child spell out their name, grade, and the year with the letter and number beads. String them onto the yarn, adding other decorative beads in any design they prefer.
3. Tie the two ends of the yarn together when you’re finished, and your child can wear their necklace on the first day of class!
43. Personalized Collage Notebook Cover
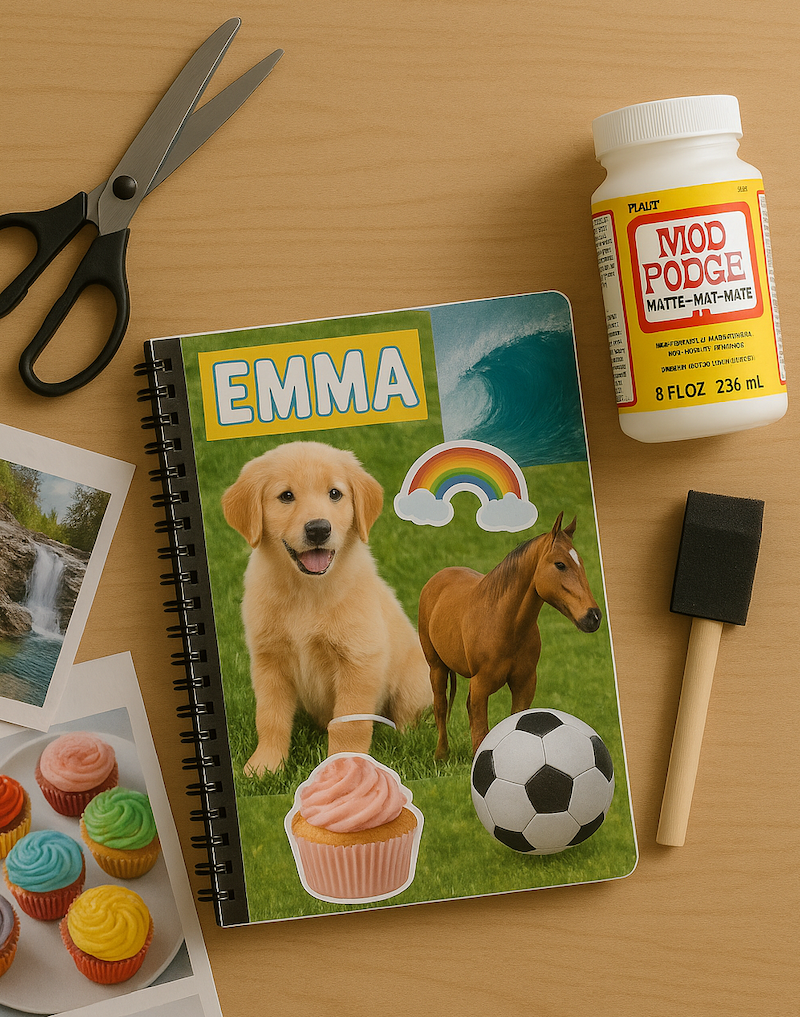
Supplies:
- notebook
- old magazines, catalogs, or books with lots of pictures
- stickers (optional)
- scissors
- Mod Podge
- foam brush
Instructions:
1. Look through the books, magazines, etc. and find pictures of things your child likes. Have them cut the various images from the pages. Optional: Choose stickers to add to the collage too.
2. Experiment until you have a layout your child likes.
3. Spread a thin layer of Mod Podge on the notebook cover, and glue the collage in place. Let it dry.
4. When completely dry, add another thin layer of Mod Podge to seal everything in place.
44. Craft Stick Pencil Holder
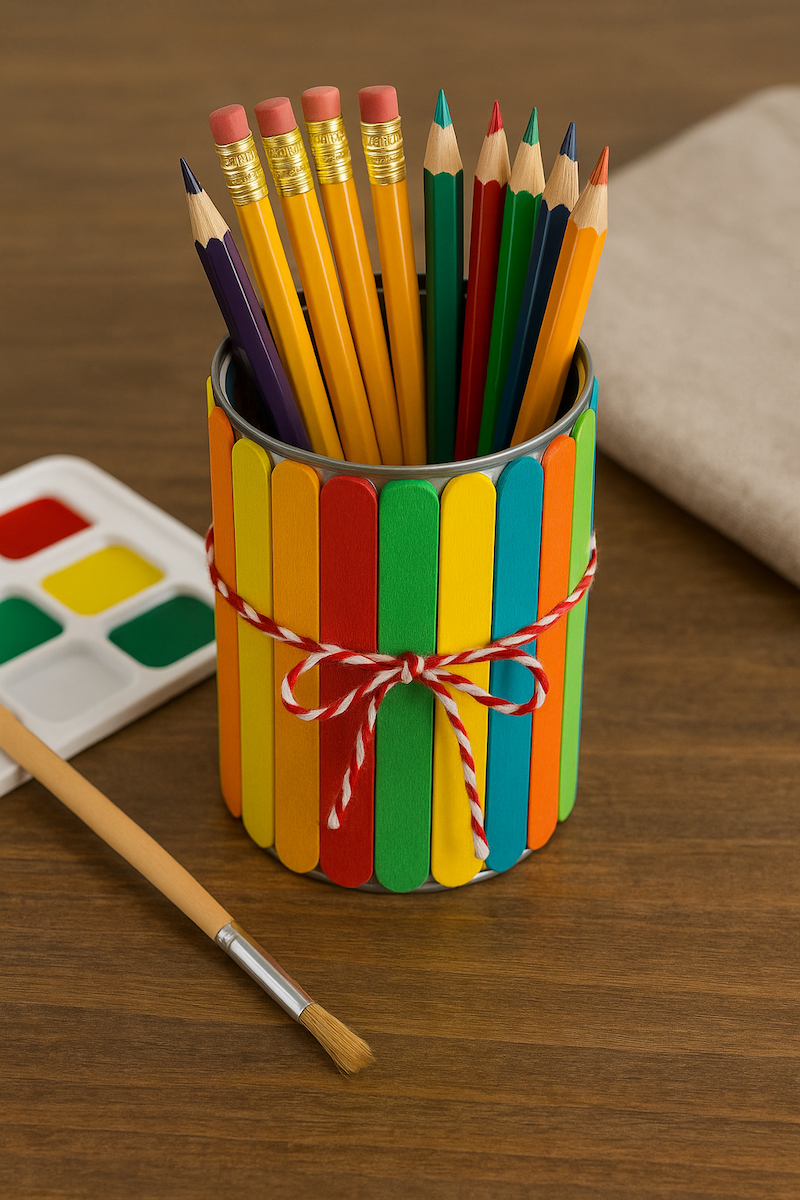
Supplies:
- empty tin can, washed and with rough edges smoothed
- wood craft sticks
- paint and brushes
- hot glue
- optional: yarn or ribbon
Instructions:
1. Determine the number of craft sticks it will take to line the outside of the can when the sticks are placed vertically side-by-side.
2. Have your child paint one side of each of the craft sticks in any color or design they prefer. Let it dry.
3. When the sticks are dry, use the hot glue to secure them in place.
4. Optional: Tie a yarn or ribbon around the sticks for embellishment.
45. Embossed Foil Art
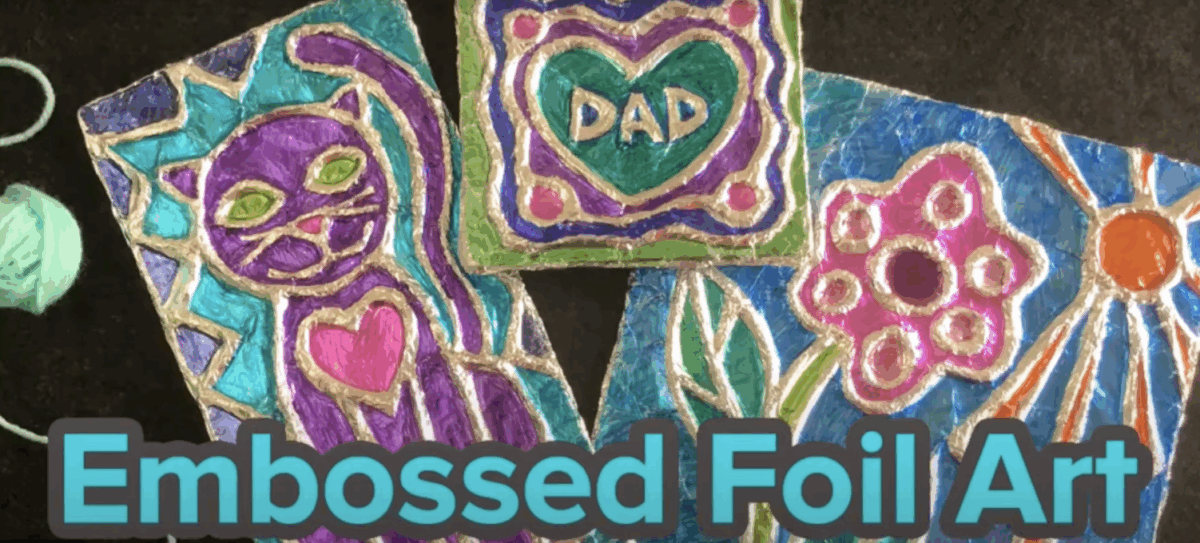
Supplies:
- yarn
- aluminum foil
- cardboard or foam board
- permanent markers
- cotton swabs
- glue
Instructions:
1. Let students use this unique technique to create an image of something they enjoy or write their name. Hang the artwork around the classroom to represent each child.
2. Find step-by-step instructions here.
Legal Disclaimer: Any links to third-party resources are provided for informational purposes only. We are not affiliated with and do not sponsor/endorse these third parties and bear no responsibility for the accuracy of content on any external site.
-

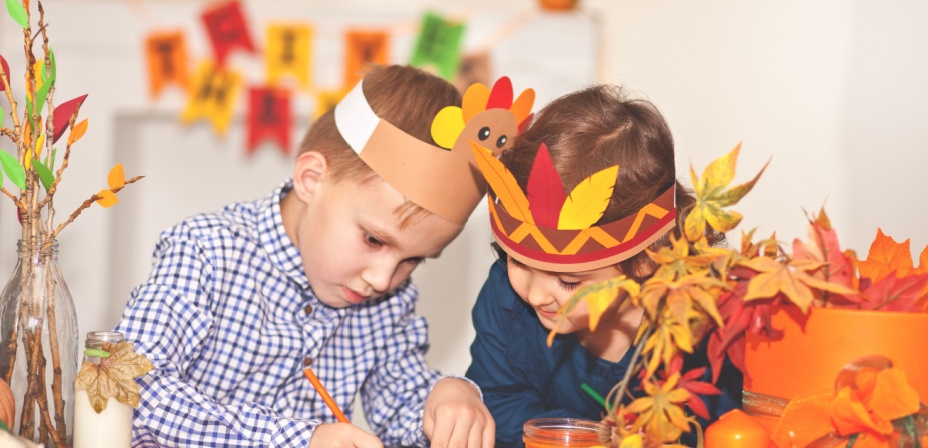
Thanksgiving Crafts and Activities
Keep kids entertained with 35+ Thanksgiving games, crafts, and printables—perfect for classrooms, family gatherings, or holiday fun.
-

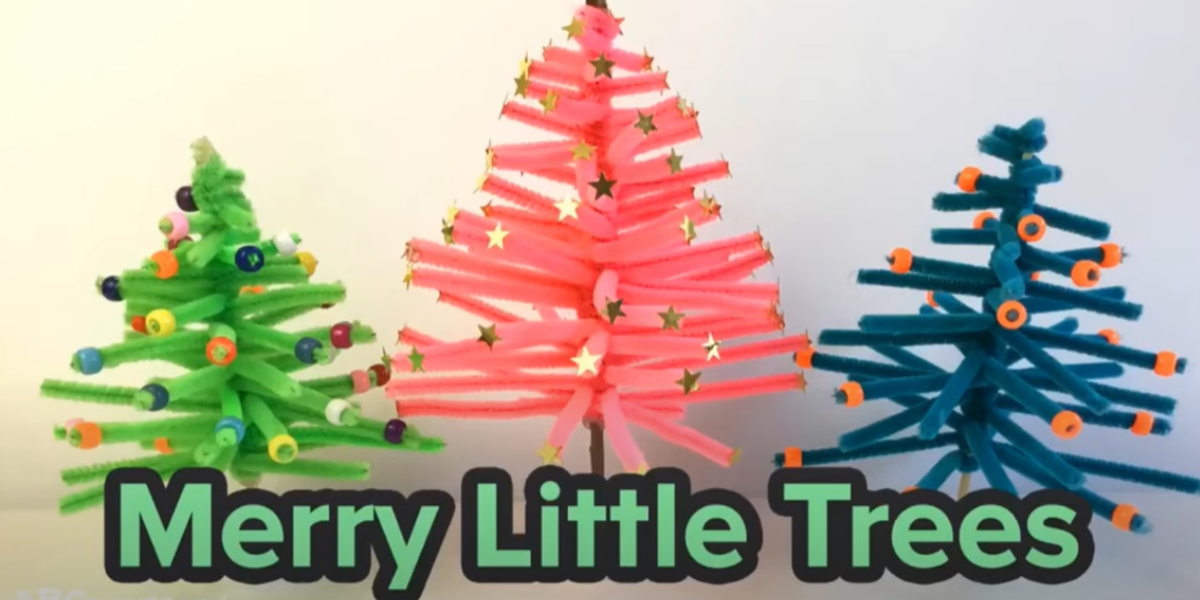
Pipe Cleaner Christmas Tree Craft
Create festive holiday fun with this easy Pipe Cleaner Christmas Tree craft for kids! Using simple materials like pipe cleaners, a wooden skewer, and beads, children…
-

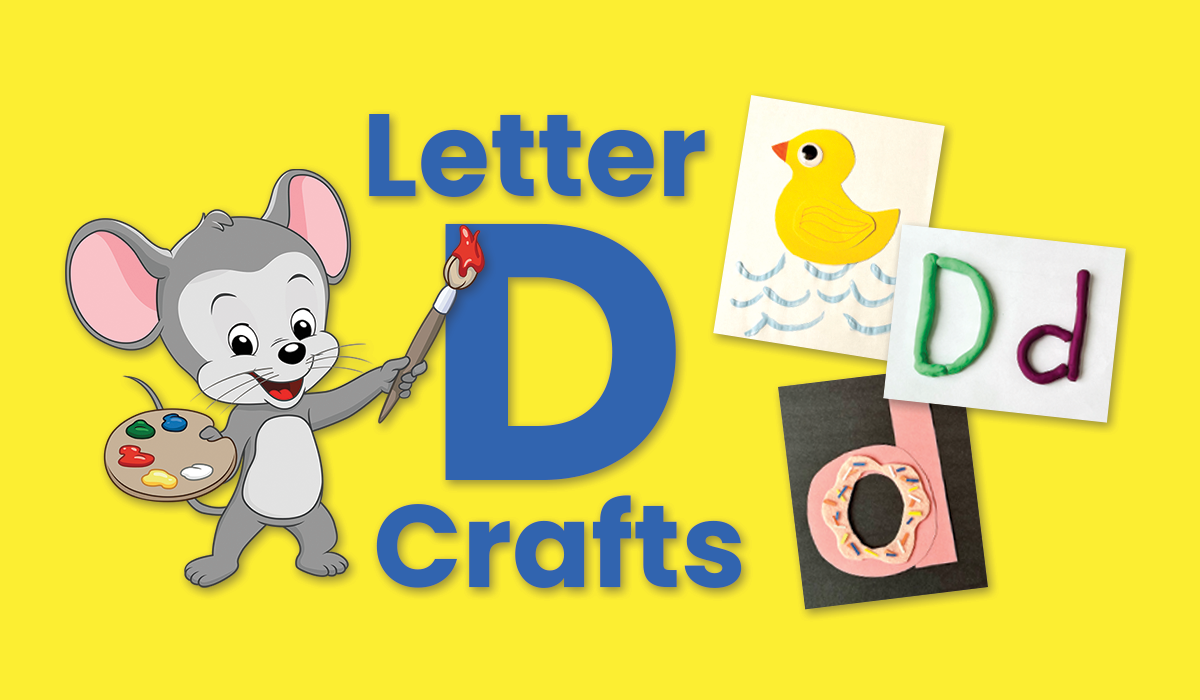
Letter D Crafts and Activities
Discover fun and easy Letter D crafts for preschoolers using common household items! From making doors that reveal hidden Ds to crafting a playful DIY dog,…
-
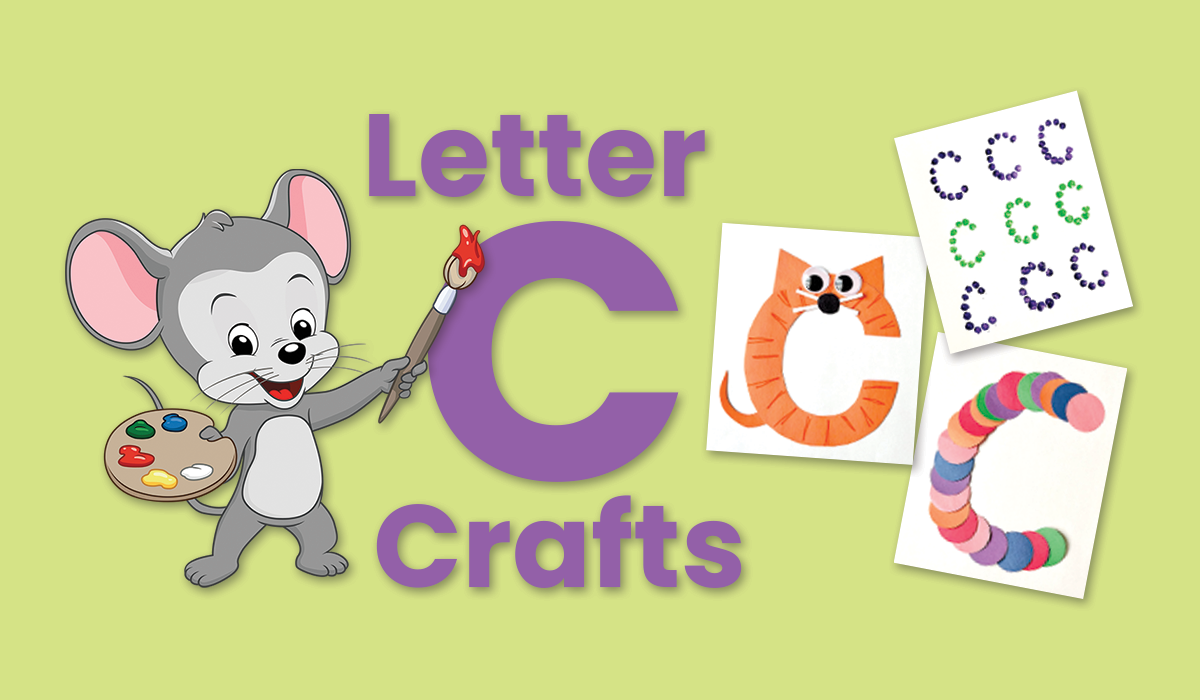
Letter C Crafts and Activities
Explore creative ways to teach preschoolers the letter C with fun, simple crafts like making a caterpillar, cotton ball clouds, or carrot stamps. These engaging activities…
-

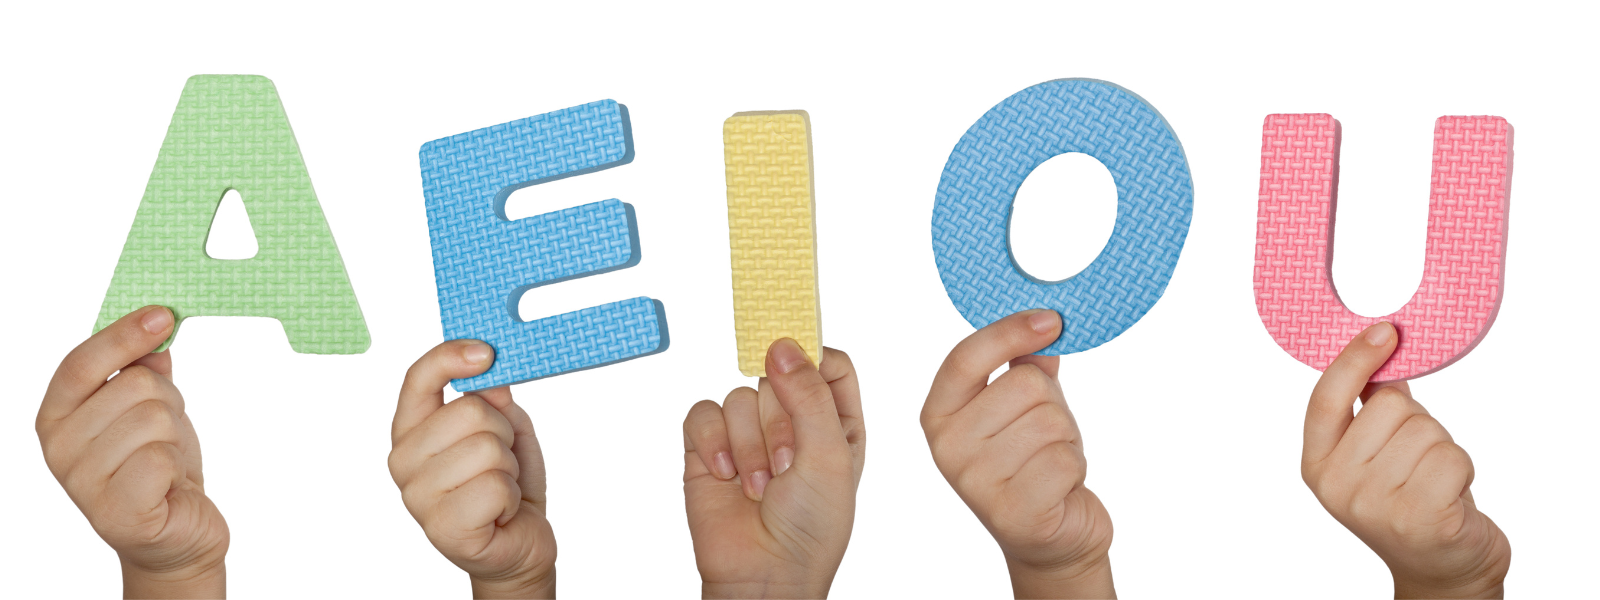
Vowel Activities for Kids
Engage kids in learning vowel sounds with 18 fun activities and games! From sorting vowel sounds to treasure hunts, these hands-on activities will help children practice…
-
Leaf Prints Craft for Kids
Celebrate fall with this easy Leaf Prints craft for kids! Using natural leaves, paint, and paper, children can create colorful and textured prints that capture the…


